
ASUSTek Computer Inc., also known as ASUS, is a multinational computer, phone hardware, and electronic company in Taiwan. It develops products including desktop computers, netbooks, laptops, mobile phones, and more.
As the years passed, ASUS became the world’s 5th-largest PC vendor by unit sales in January 2021. In addition, the company has made a good reputation for producing ZenBook, VivoBook, ASUSPRO, and other laptop computers.
In line with that, one common question with these ASUS laptops is how to screenshot on ASUS laptop, as it isn’t always clear how to do this.
And if you are struggling in taking screenshots on your ASUS laptop, worry not as we got your back.
You just need to understand how the procedure is carried out flawlessly. There is no need to be concerned because we have provided all the simplest methods to screenshot on ASUS laptop. Are you anxious to discover more about them?
So, without further ado, let us begin!
Navigation:
- Part 1: Use AmoyShare Screen Capture Software
- Part 2: Capture with Windows Screenshot Features
- Method 1: Using the Print Screen Key
- Method 2: Using Windows + Print Screen Key
- Method 3: Snipping Tool
- Method 4: Using Windows + H Key
- Method 5: Screenshot with Visible Mouse Cursor using Step Recorder
- Method 6: Take a Screenshot of Active Window
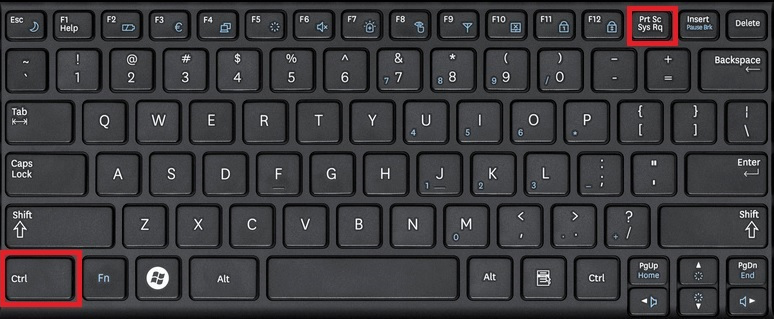
- Method 7: Using CTRL + Print Screen Key
Part 1: Use AmoyShare Screen Capture Software
Distinctive Feature: The tool allows users to take a snapshot using a hotkey (shortcut keys) that comes in handy when taking online classes, attending meetings, or just playing a game.
Installation Packaged Size: 94.2 MB
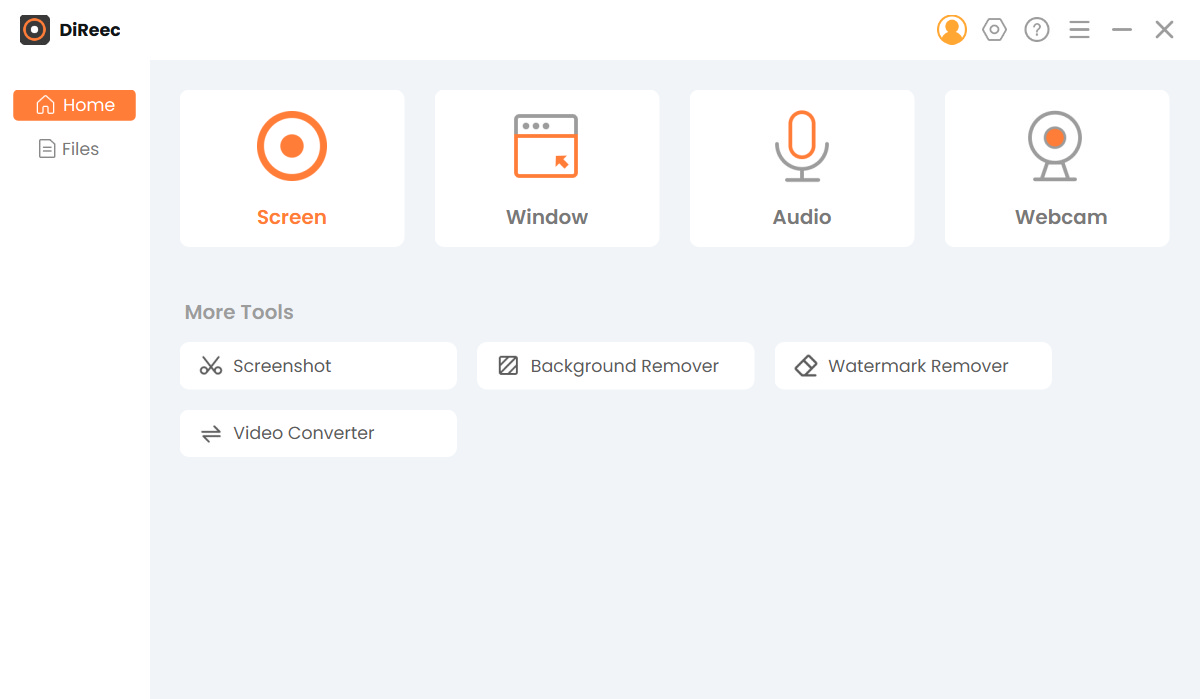
If you’re seeking the best way to capture on-screen activity on an ASUS laptop, look no further. AmoyShare Screen Capture is the ideal tool for you. This versatile software makes it possible to snap screenshots in the simplest way possible. Furthermore, you may save your photos in standard formats like PNG, JPEG, JPG, BMP, and even generate stunning GIFs. In addition to that, you may take a full-screen screenshot or customize the region to your preferences. To make your screenshots more appealing, you can use different annotations such as shapes, text, lines, and more. Further, it lets you save the picture you have captured to your local disk or copy it to the clipboard.
Key Features:
● Apart from taking screenshots, this tool grants you to record your screen and webcam videos in high quality.
● It has a drawing panel to make annotations so users can easily point the details on every picture.
● With the straightforward user interface of the tool, users can easily snap pictures without the help of a professional.
● It supports both Windows and Mac operating systems.
Learn how to screenshot on ASUS laptop by following the steps outlined below.
Screen Recorder
Capture HD video and audio instantly
- for Windows 11/10/8
- for Mac OS X 14+
- for Android
- Download and Install the ASUS screenshot tool
- On your ASUS laptop, get the suitable installer for your OS from the provided “Free Download” button above. Wait until the downloading process is done then, follow the command from the wizard window that will appear on your screen to finish the installation. Then, launch the tool and familiarize yourself with its functions.
- On your ASUS laptop, get the suitable installer for your OS from the provided “Free Download” button above. Wait until the downloading process is done then, follow the command from the wizard window that will appear on your screen to finish the installation. Then, launch the tool and familiarize yourself with its functions.
- Configure the screenshot format.
- Select “Setting” from the menu bar with the gear-like icon. Then, to access the format settings, select the “Output” button. You can adjust the location of the screenshot files as well as the format of the screenshots. PNG, JPEG, and TIFF are among the formats available. After that, to save the changes, simply close the window, as these adjustments will be applied automatically.
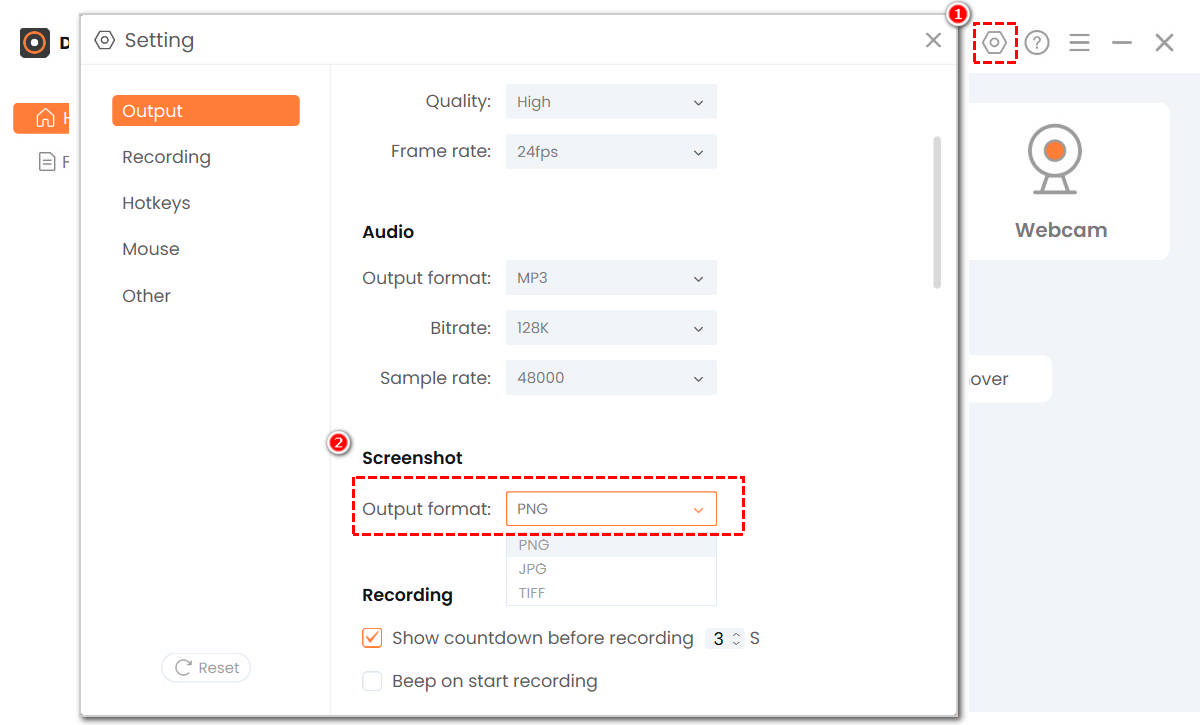
- Select “Setting” from the menu bar with the gear-like icon. Then, to access the format settings, select the “Output” button. You can adjust the location of the screenshot files as well as the format of the screenshots. PNG, JPEG, and TIFF are among the formats available. After that, to save the changes, simply close the window, as these adjustments will be applied automatically.
- Start to take a screenshot.
- From the main interface, select “Screenshot” to begin taking a screenshot. Then, drag your mouse to pick the area you want to capture on an ASUS laptop. You can annotate the screenshot with shapes, texts, arrows, and other elements at any time during the process. When you’re pleased with the screenshot, click the “hook” icon beside the toolbar.

- From the main interface, select “Screenshot” to begin taking a screenshot. Then, drag your mouse to pick the area you want to capture on an ASUS laptop. You can annotate the screenshot with shapes, texts, arrows, and other elements at any time during the process. When you’re pleased with the screenshot, click the “hook” icon beside the toolbar.
Part 2: Capture with Windows Screenshot Features
Taking screenshots on an Asus laptop is similar to taking screenshots on other brands of laptops. However, there are minor modifications based on the laptop brand and some differences in the operating systems. Further, the current generation of ASUS laptops includes a straightforward screenshot method you can utilize.
Below are the methods you can try to screenshot on ASUS laptop for free.
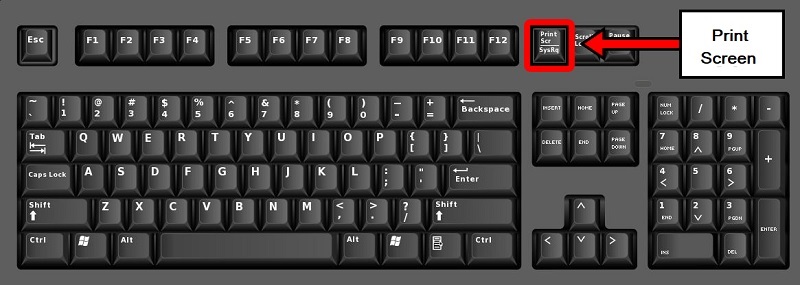
Method 1: Using the Print Screen Key
The first method you can use is the “Print Screen” key of the ASUS laptop, and it is commonly abbreviated to “prt sc.” That is a keyboard shortcut that allows you to take a screenshot on your laptop. Nevertheless, this method is only effective if you want to capture your entire screen. That means that you can’t select a particular area or region to screenshot. Also, your screenshot will not be automatically saved but will be copied to your clipboard. It would help if you opened an editing tool, such as Microsoft Paint, inserted the screenshot into the editor, and saved the file from here.
Follow the simple guide on how to screenshot on ASUS computer.
User Guide:
- First, press the “prt sc” (Print Screen) key on the upper part of your keyboard to take the screenshot.
- Next, open Microsoft Paint, or you can also use other photo editing software like Adobe Photoshop. Then, hold down the keyboard shortcut “Ctrl+V” to paste the screenshot on the editor.
- You can edit the screenshot if you want, and you save it by pressing the keyboard shortcut “Ctrl+S.” A new window will appear from here, and it will require you to name your file, then hit “Save” to store it on your computer or laptop.
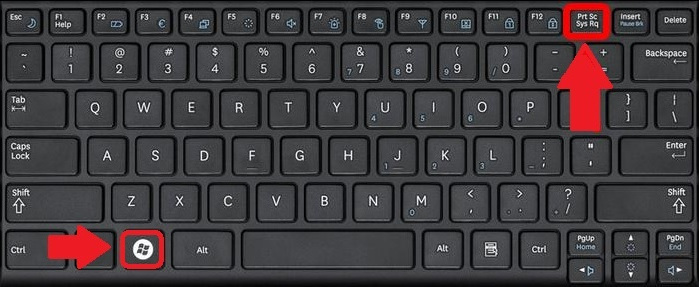
Method 2: Using Windows + Print Screen Key
Another keyboard shortcut you can try is the “Windows + Print Screen” key. This method can easily take the screenshot of your desired image, and it will automatically save it into the screenshot folder. Unlike the first method, this will not require you to open any editing tools to save your captured photo. However, this method is only applicable for Windows 8 and Windows 10. So if your laptop or computer has these operating system, you can efficiently utilize this. Learn the steps below on how to screenshot on ASUS laptop.
User Guide:
- Press the “Windows” and the “Print Screen” keys simultaneously on your keyboard.
- Afterward, your screen will dim a little, and the screenshot will automatically save on your “Screenshot” folder.
- If you want to access the screenshot, open your file explorer. From here, access your “Picture” folder and click on the “Screenshot” folder.
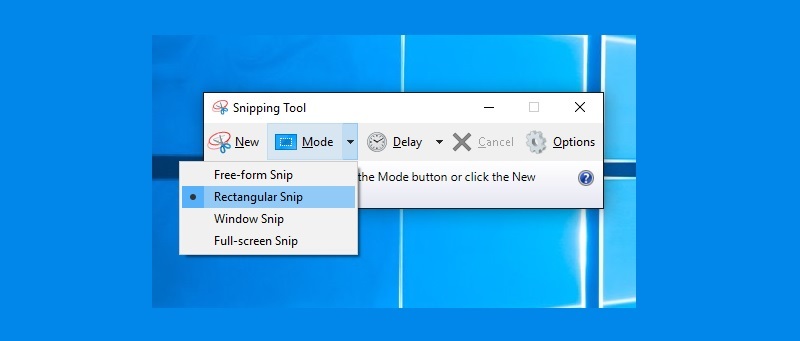
Method 3: Snipping Tool
Any ASUS laptop contains the Snipping Tool. It is a unique capturing capability given by Windows that may be found in every Windows operating system version. This tool lets you take a screenshot and crop the screenshot to remove any undesired areas of the captured material. Furthermore, it grants you to draw on the screenshot by choosing the “Highlighter” or “Pen” button. When you take a screenshot, it is directly copied to the Snipping Tool window. From here, you can modify, save, or share them with your friends.
Find out below how to take a screenshot on ASUS laptop using Snipping Tool.
User Guide:
- In the first step, you need to click the “Windows Key” on your ASUS laptop’s keyboard. Then, input the word “Snipping Tool” in the search bar.
- You have to click on the “Snipping Tool” from here. Once you click it, it will automatically launch. After that, hit the “Mode” button to determine your desired screenshot mode. Next, click “New,” then press and drag your mouse to select a particular area from your screen to capture it.
- After that, release the mouse button, then your screenshot will appear. You can edit it by highlighting or drawing on it. Once done, click the “Save” button.
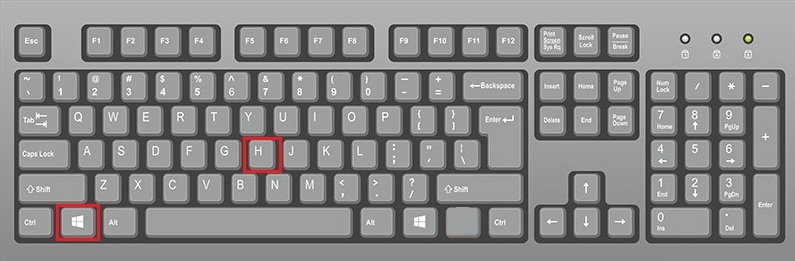
Method 4: Using Windows + H Key
The shortcut key “Windows + H” is used to share a screenshot of the currently active window. You may share your current window with anyone without saving it if you press this shortcut key on your ASUS keyboard. This method really comes in handy when you want to share a specific document with a co-worker, and since you have the copy, you don’t need to save it.
Simply follow the instructions below to discover how to take a screenshot on ASUS laptop and then share it without storing it.
User Guide:
- On your ASUS laptop, open the window in which you want to take a screenshot.
- After that, hold down the “Windows” and “H” keys on your keyboard at the same time.
- A pop-up window will show where you can access all the available sharing options on your computer. And lastly, you just have to select to whom you want to share the screenshot.
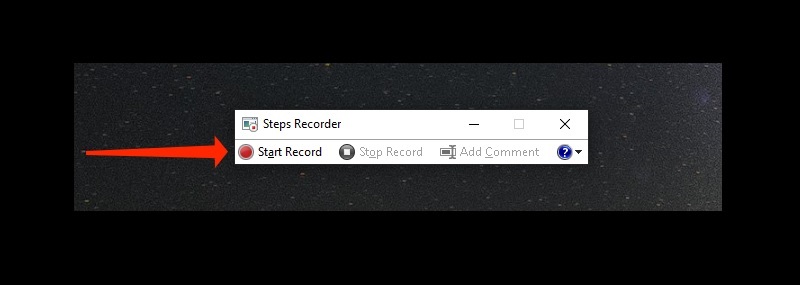
Method 5: Screenshot with Visible Mouse Cursor using Step Recorder
Suppose you have to take a screenshot with the mouse cursor visible, then this method is perfect for you. It is also known as the “Steps Recorder,” this feature is available in all versions of the Windows operating system. Although this feature of Windows is called “Steps Recorder,” the output is not a video but an image file arranged in chronological order. As all the ASUS laptops and computers are created with the Windows operating system, you can take screenshots with the visible mouse cursor using this method.
Follow the simple outline below to learn how you can screenshot on ASUS laptop.
User Guide:
- Press the “Windows” key on your keyboard. Then, search for the “Steps Recorder” in your search box and click it.
- A small window will appear on your computer screen. Click the “Start Record” button to commence it.
- From here, you can point out the essential details you want to emphasize, and you can also add a comment to make it more detailed.
- Once done, hit the “Stop Recording” button and save it on your ASUS laptop.
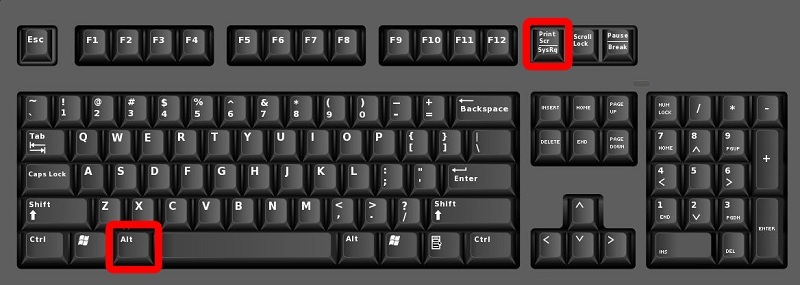
Method 6: Take a Screenshot of Active Window
“Alt” plus “Print Screen” is another way to capture your screen easily. In this method, it can only capture the active window you are currently working in. “Alt + Print Screen” command lets you copy the screenshot from your clipboard and paste it on Microsoft Paint. Then, you can edit it with the editing tool or save it directly to your local drive.
See below on how to screenshot on ASUS laptop.
User Guide:
- First, open the window you want to capture, then press the “Alt” and “Print Screen” keys on your ASUS keyboard.
- From here, the screenshot will automatically be copied into your clipboard. Next, open your “Microsoft Paint” to paste the screenshot.
- Lastly, hit on the “Save” button in the upper corner of the Microsoft Paint interface. Name the screenshot and choose the format you desired, then click “OK” to save it.
Method 7: Using CTRL + Print Screen Key
This method is known as the second keyboard shortcut or command that lets you captures the whole screen of your computer or laptop. It is usually utilized when the “Print Screen” command does not work on your end. You also need an editing tool to save the screenshot you have taken using this keyboard command.
Learn the steps on how to screenshot on ASUS laptop using the “Ctrl + Print Screen” key.
User Guide:
- Press the “Ctrl” and “prt sc” keys to take the snapshot.
- Then, you have to access your photo editor and press “Ctlr+V” to paste the snapshot on your photo editor tool.
- If you want to edit the photo before saving it, you can do so, and once you’re done, just press “Ctrl+S” to save it.
Conclusion
Windows offered different methods to take screenshots easily on your ASUS laptop. And you can choose the best way according to your needs. However, since these methods have limitations and sometimes they don’t meet everyone’s expectations. So I highly recommend that you use AmoyShare Screen Recorder to save the best screenshot and share it with your friends and family.
Frequently Asked Questions
Where is the print screen button on the ASUS laptop?
The Print Screen key or button of an ASUS laptop is located at the upper corner of your keyboard. It is beside the F12 command, and pressing the Print Screen key will automatically screenshot your entire screen.
Where are screenshots saved on ASUS laptops?
When you capture a screenshot using the auto-save method, it will be saved in the Screenshots folder located in the pictures section. To access it, open your File Explorer, then click the picture options available in the quick access section. Lastly, open the folder of the screenshot; this contains all of your screenshots.
How to screenshot on ASUS laptop Windows 7?
Simply press Ctrl + Print Screenshot and then open Microsoft Paint on your laptop, regardless of the version of Windows you have. After that, use Ctrl + V to paste the screenshot into Microsoft Paint, where you can then modify it. Finally, to save the screenshot, simply press Ctrl + S.
How to screenshot on ASUS laptop without Print Screen button?
If your ASUS laptop lacks a dedicated Print Screen key, you can still capture screenshots using alternative methods. One excellent option is the AmoyShare Screen Recorder, a robust screen capture tool that not only helps you screenshot any on-screen activity but also provides extended annotation features compared to conventional ways.