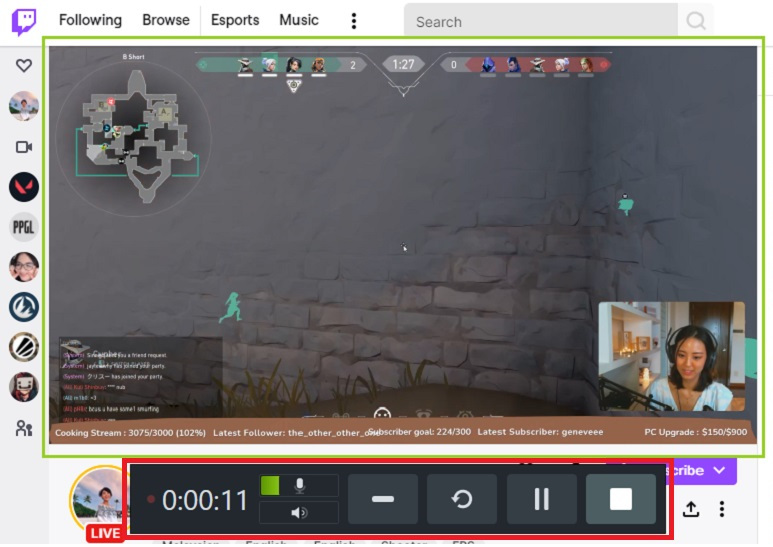
Twitch is one of the leading American video live streaming services that gives emphasis more on video game live streaming.
For Twitch’s daily viewers, Twitch is more than a live streaming service as it also creates a place where creators, gamers, and influencers can connect to the community and share something with their viewers.
The reason behind the growing population of Twitch audiences is the sense of belonging that it encompasses to its viewers and creators.
If you are a gamer, vlogger, or a streamer, you may want to record your Twitch gameplay and share it with your followers.
Sharing recorded Twitch streams doesn’t have much to be stressed out about for we have outlined 5 effective methods on how to record Twitch streams of yours and someone else.
Tip: Besides recording streams, you can also download Twitch clips online with only a few clicks.
Now let’s start!
Part 1: Best Way to Record Twitch Streams
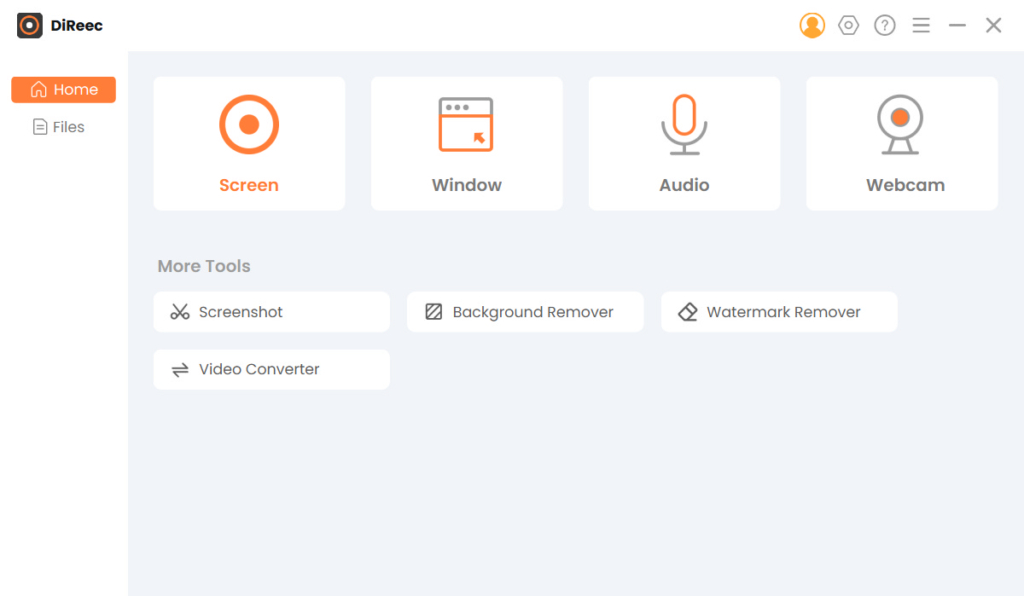
If you are looking for an all-in-one screen recorder that can professionally capture segments on Twitch, AmoyShare Screen Recorder is one of the magnificent screen recording software that you can utilize.
This screen recording software allows its users to capture spectacular parts of their favorite creator’s streams without losing the quality of the video. Even more interesting is that it has such flexible features that allow you to edit the video while you are recording, capture snapshots in the middle of recording, etc. On top of that, its concurrent HD video encoding technology assures you an excellent quality outcome of recorded videos and audio quality.
Supported Output Formats: MP3, MP4, MOV, JPG, PNG, GIF, and more.
User Friendly: You will not see any ads while using the tool.
Key Features:
● It is an intuitive screen recording software that allows users to include webcam overlay adding and screenshot taking while recording.
● It has an extensive setting where you can customize the screen recording area.
● Enables you to set a particular image, video, and audio quality.
● It reduces unnecessary audio noise and excludes audio while recording audio.
● The watermark problem is not an issue for this screen recording software keeps original contents without a trace of any watermark.
Screen Recorder
Capture HD video and audio instantly
- for Windows 11/10/8
- for Mac OS X 14+
- for Android
- Install a Twitch Screen Recorder
- As mentioned above, AmoyShare Screen Recorder is powerful which can help you record. The first thing you have to do is to install it on your computer. Click the “Free Download” button so the software can be successfully saved on your computer.
- Configure Preferences
- After downloading, you will see the intuitive interface of this screen recorder software. Access the “Setting” window from the top menu bar, which looks like a gear icon. Consequently, click the “Recording.” It is located on the left side of the preference tab to set up your recording preference. There are a lot of options where you can choose by checking the boxes beside your recording mode preference.
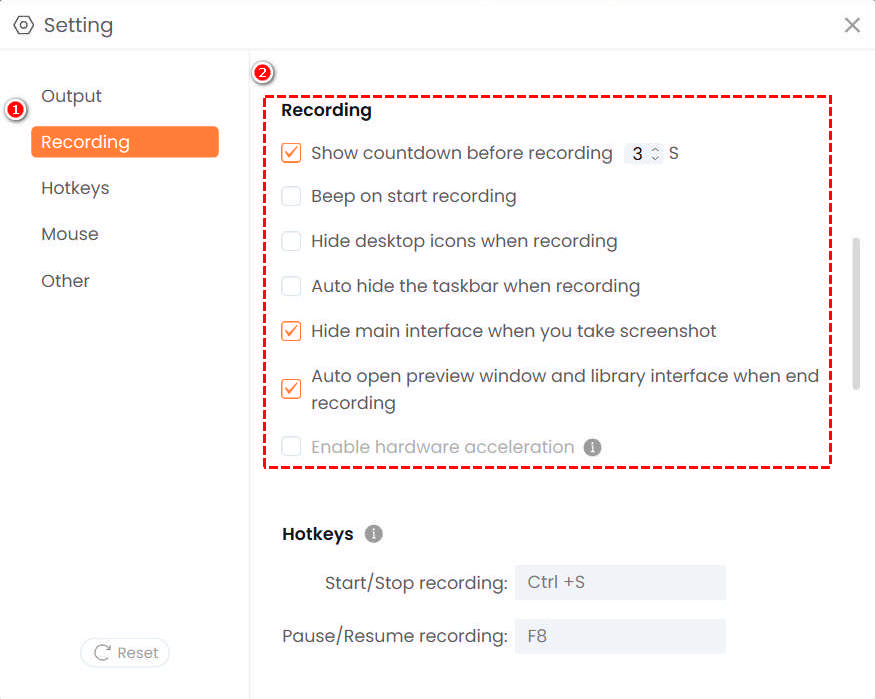
- After downloading, you will see the intuitive interface of this screen recorder software. Access the “Setting” window from the top menu bar, which looks like a gear icon. Consequently, click the “Recording.” It is located on the left side of the preference tab to set up your recording preference. There are a lot of options where you can choose by checking the boxes beside your recording mode preference.
- Select Desired Output Preference
- Afterward, go to the other tab on preferences which is “Output.” From there, you can select what screenshot format, video format, video codec, video quality, and frame rate. As soon as you are done with the configuration, just feel free to close the window and proceed to record, as these changes will be saved automatically.
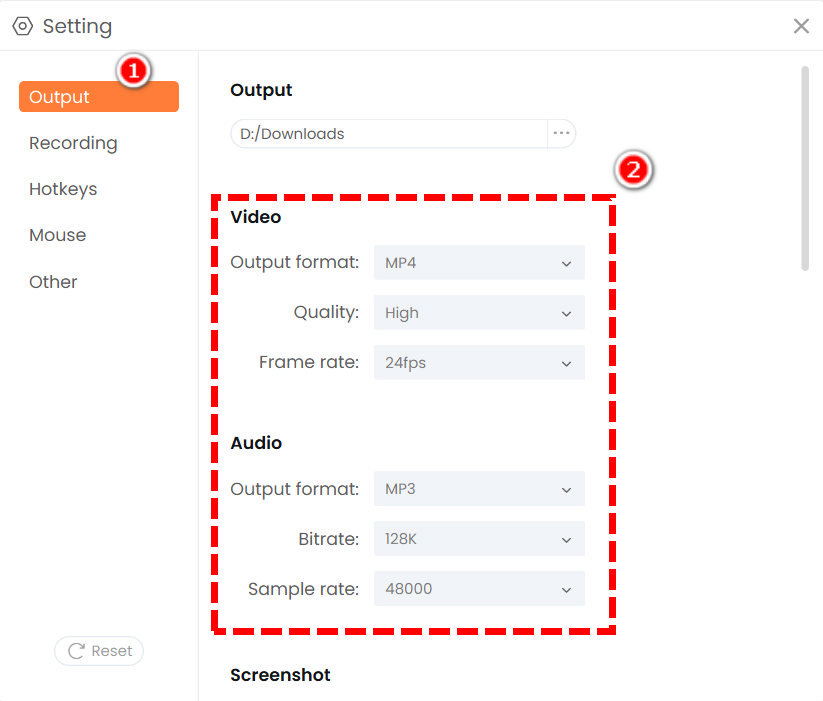
- Afterward, go to the other tab on preferences which is “Output.” From there, you can select what screenshot format, video format, video codec, video quality, and frame rate. As soon as you are done with the configuration, just feel free to close the window and proceed to record, as these changes will be saved automatically.
- Start recording
- Once done with the configuration, go back to the home interface of the software. Click “Screen” mode and select the specific area of the Twitch game you are going to record. Once chosen, enable the webcam, microphone, or system audio as per your requirements. Afterward, simply click the big round button that has “REC” inside to start recording.
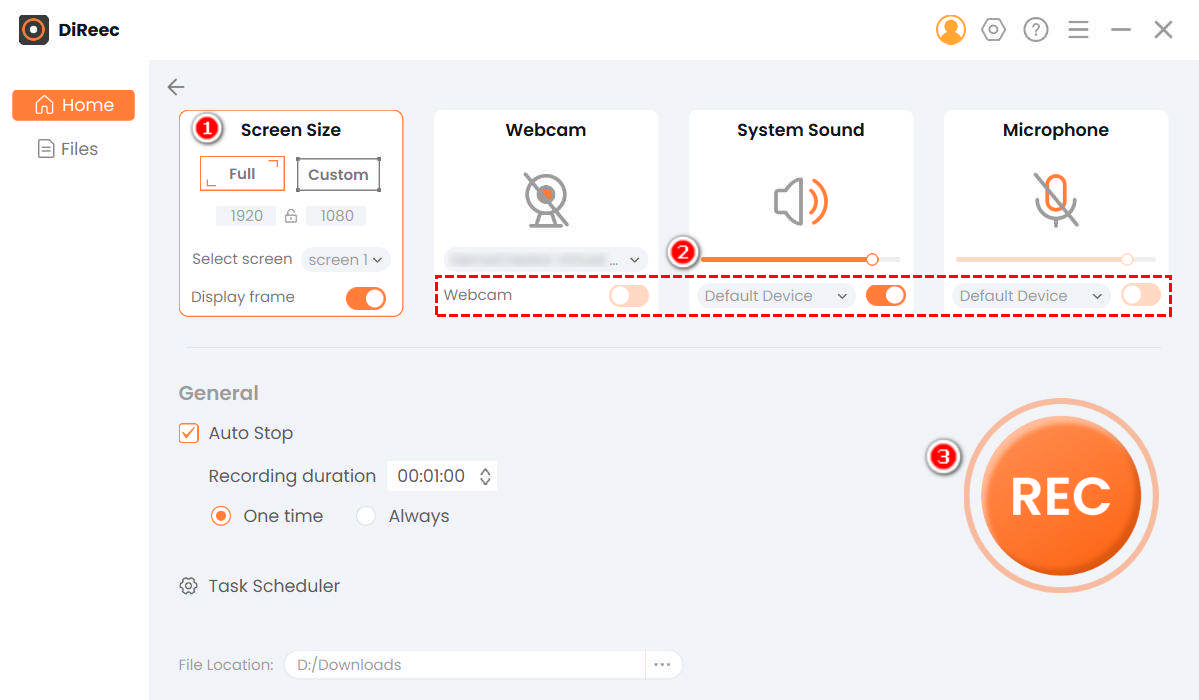
- Once done with the configuration, go back to the home interface of the software. Click “Screen” mode and select the specific area of the Twitch game you are going to record. Once chosen, enable the webcam, microphone, or system audio as per your requirements. Afterward, simply click the big round button that has “REC” inside to start recording.
- Save recorded Twitch Stream
- Afterward, when done recording, click the orange box button to stop the Twitch Stream record. This recorded file will be automatically saved to your device for later viewing. Furthermore, upon hitting the stop icon, it’ll navigate you to the playback interface. From there, you can preview the Twitch stream that you just have recorded.
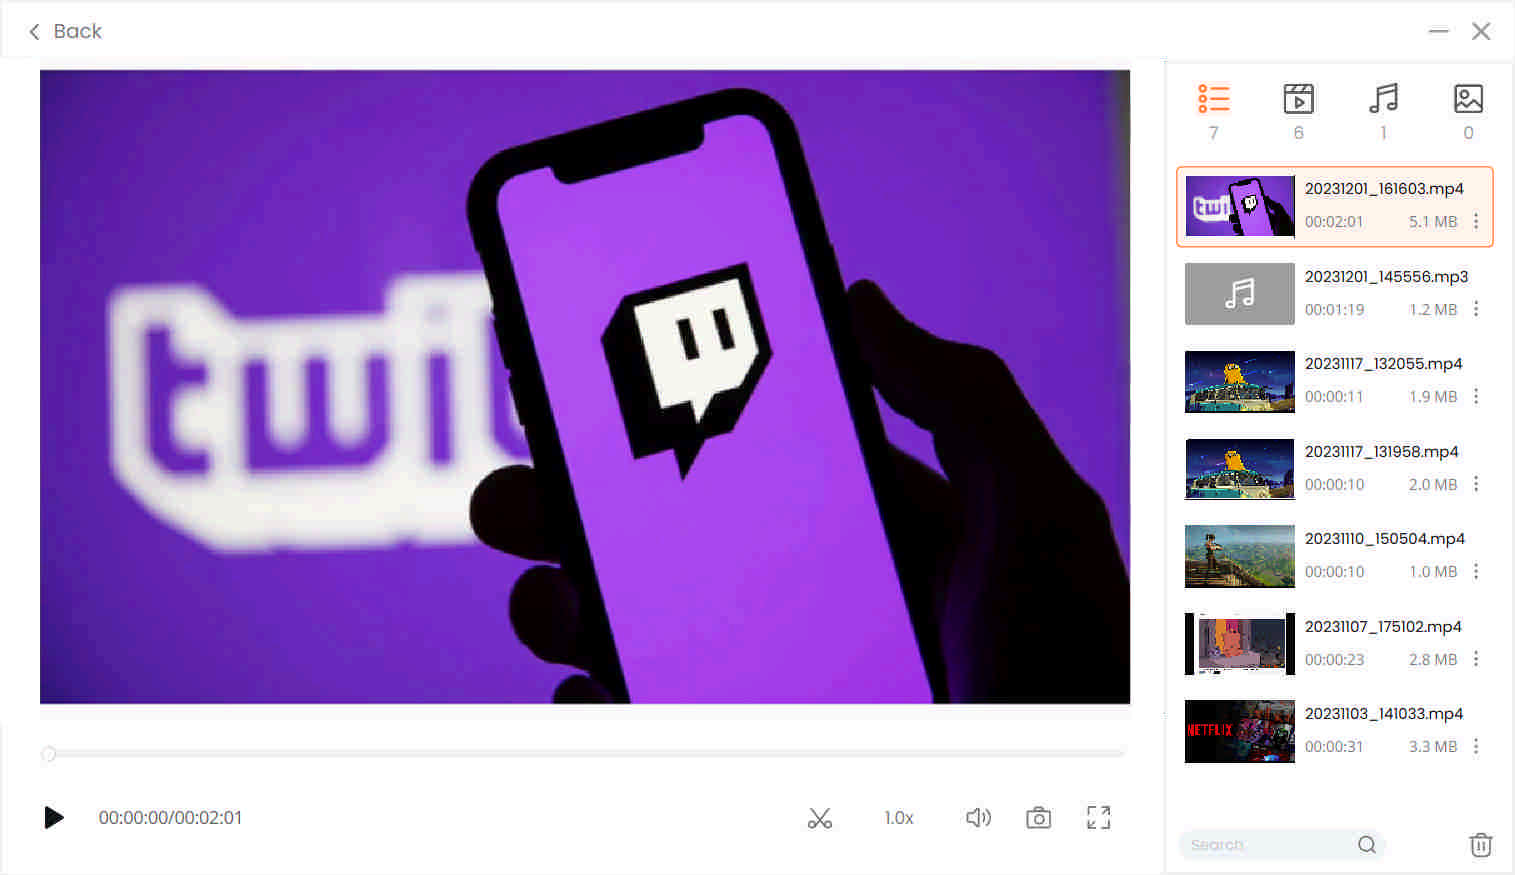
- Afterward, when done recording, click the orange box button to stop the Twitch Stream record. This recorded file will be automatically saved to your device for later viewing. Furthermore, upon hitting the stop icon, it’ll navigate you to the playback interface. From there, you can preview the Twitch stream that you just have recorded.
Part 2: How to Record Twitch Streams on PC with OBS Studio
OBS Studio is a good open-source screen recorder that can be used for recording Twitch streams and is commonly used by advanced users. Surprisingly, OBS Studio creates professional outputs for live video streaming sites especially Twitch and YT.
No matter you are a Twitch streamer or a twitch viewer, OBS Studio allows you to set your recording path and select your desired media quality.
However, this tool requires knowledge to learn about its full features and what you have to do when setting it up.
Supported Output Formats: FLV, MKV, MOV, MP4, MP3, OGG, etc.
User Friendly: It is an open-source application designed for recording and streaming.
Key Features:
● Allows you to set hotkeys for multiple purposes like for start or stop streaming/recording, switching to another scene, save replay buffer, and more.
● Multiple themes are available.
● It enables you to arrange your layout based on your preference for it has a modular “Dock” user interface.
Here comes how to record streams on Twitch with OBS.
- To record a Twitch stream using OBS Studio, go to the “Settings” panel and select “Twitch” for the stream type.

- Afterwards, you can select a location where you want your recorded video to be saved, tap over the “Automatically save the stream file” and then click that “OK” button to start the recording, it will be then automatically saved.
Tip: You can also use OBS Studio to record someone else Twitch Stream.
Part 3: How to Record Twitch Streams with VLC
If you are looking for a tool that is available for desktop and even mobile devices, VLC Media Player is one of the greatest options for you to consider.
It allows you to record and watch Twitch streams without ads interruption and screen buffering. More of that, it enables users to search numerous album covers as it has a playlist feature that encompasses playing another film right after the finished one. What’s even more fascinating about this screen recorder software is that it is highly customizable and it is very good at supporting different file formats.
Supported Output Format: MP4, MOV, MPEG, ASF, AVI, MKV, FLAC, FLV, MXF, etc.
User Friendly: When setting it up for recording it is a bit complicated.
Key Features:
● Allows you to play podcasts and even internet radio.
● It has a graphic equalizer for music.
● Free from ads and user tracking.
How to record Twitch Streams with VLC? Follow the tips below.
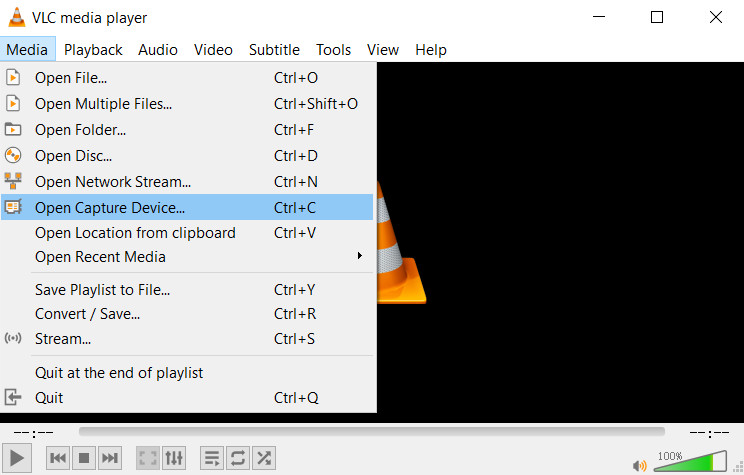
- To record a Twitch stream using VLC Media Player, click the “Media” on the upper tab of the software, then further choose “Open Capture Device” option.
- On the Capture Device tab, select “Desktop” from the drop-down menu next to “Capture mode.” Then set the desired frame rate around 10.00-30.00f/s.
- Now hit the triangle icon next to “Play” at the bottom, and click on “Convert.” A new box pops up. Click the triangle drop-down icon at the middle of the box and set the “Profile” to MP4 format, then designate the destination file path.
- Finally, hit the “Start” button at the bottom to initiate recording process. To finish it, hit the grey square icon.
Part 4: How to Record Twitch Streams on PC with Camtasia
Camtasia is popularly known as a screen recorder software that can capture any moments on your computer screen whether it be a video call, presentation, and even online live streaming services like Twitch.
A powerful screen recorder software like Camtasia must be installed first for you to be able to record Twitch streams on PC. Its interface is very user-friendly which makes it easy for users to record their Twitch streams without complicated steps. In addition, it offers visual effects that can be simply applied with just an easy drag-and-drop, very convenient for green hand users.
However, Camtasia comes with a price to fully maximize more advantageous features.
Supported Output Formats: MP4, MP3, WAV, AVI, WMA, etc.
User Friendly: This tool is very easy for beginners.
Key Features:
● It allows you to edit keyboard shortcuts.
● Supports several themes with other logos as well as images.
● Easy to use but produces high-quality outputs.
How to record Twitch streams with this tools? Here comes the steps.
- To record a Twitch stream using Camtasia, open the software once it has been installed and click the “New Project”.
- From there, select the “File” and click “Import” to bring the video. After that, simply tap the red circle button that has a “rec” inside to start recording.
- Lastly, select the “Share” button on the upper right side to save your Twitch stream recorded video.
Part 5: How to Record Twitch Streams on Mac with QuickTime Player
If you are a Mac user and you are finding the perfect tool to record Twitch streams, QuickTime Player is your go-to software for it enables you to record anything on your computer including live streaming videos on Twitch and even on YT.
It also allows you to create quick edits and is very easy to use especially for beginners.
Supported Output Formats: MPEG-4 Files, DV Stream, Mpeg, WAV, AAC, etc.
User Friendly: This tool is purely for recording.
Key Features:
● It encompasses synchronized graphics, sounds, and videos.
● Supported by several multimedia authoring applications.
● Allows live streaming, internet radio listening, and live T.V watching through a web browser.
Now follow the simple steps below to learn how to record Twitch streams on Mac.
- To record Twitch streams using QuickTime Player, open the “File” and click “New Screen Recording.”
- From there, you can activate the recording interface and select the “Record” button to start recording on the Twitch screen.
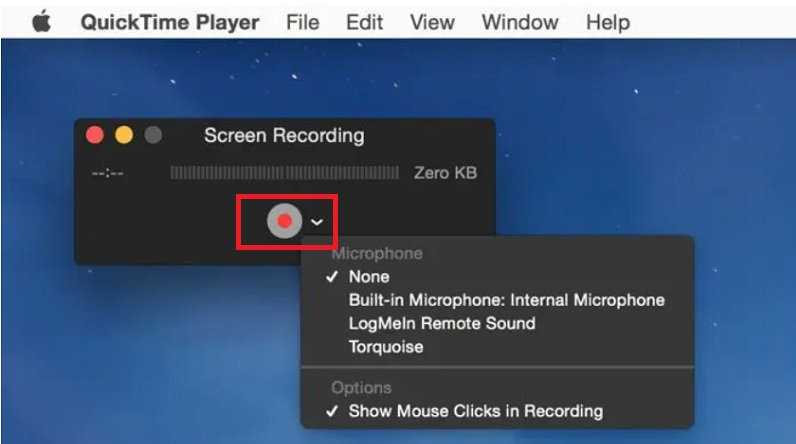
- As soon as you have finished recording, click the “Stop” icon beside the Wi-Fi. Tap the “File” button located on the menu and select “Save”, the recorded Twitch stream video will then be saved.
Frequently Asked Questions
How to record someone else Twitch stream?
You can use screen recorders like AmoyShare Screen Recorder, VLC Media Player, and OBS to record other Twitch streams. You can install the mentioned tools and simply configure a few things on the settings. Afterward, you can click the recording button to start recording someone else’s Twitch streams for later viewing and without them knowing.
Can you save a Twitch stream?
Yes, you can save a Twitch stream in many ways, like recording it first or directly download it. You just need the link and the perfect tool to save it. AmoyShare AnyVid Video Downloader is one of the solutions for that. .