OBS (Open Broadcaster Software) is a free program for video recording and streaming. You can use it to record multiple video sources, different webcams or camera angles, screenshots, and static graphics at the same time. Besides that, it lets you capture multiple channels of audio simultaneously.
How to record with OBS? The learning curve for OBS is a bit steep for many users, particularly beginners.
In this post, I would like to walk you through the quick start for getting screen record with OBS. Follow the steps below, and you can get your first recording now.
Yet, if you want a simple way to record your screen and audio, please head to Part 2., where you can find a “pick up and go” screen recorder without any learning curve.
CONTENTS
Part 1. How to Record with OBS
OBS screen recorder is a feature-rich tool and fully cross-platform. You can download and install it on your Windows 8,8.1.10, Mac, or Linux.
The process for recording on these devices is similar. Hence I will take an example of how to use OBS to record screen on Windows. So now, let’s get a quick start and record screen instantly.
OBS Studio Quick Setup
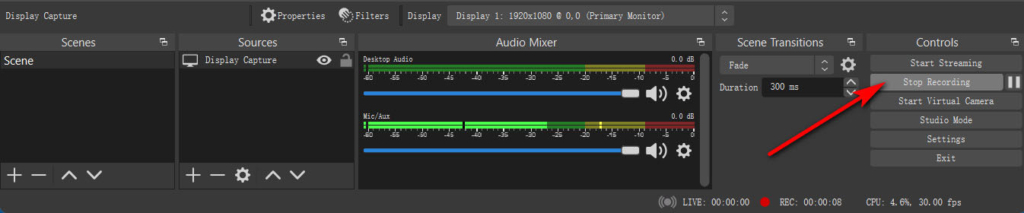
When you first launch OBS, a scene is already added by default. You can see it at the bottom left corner of the interface.
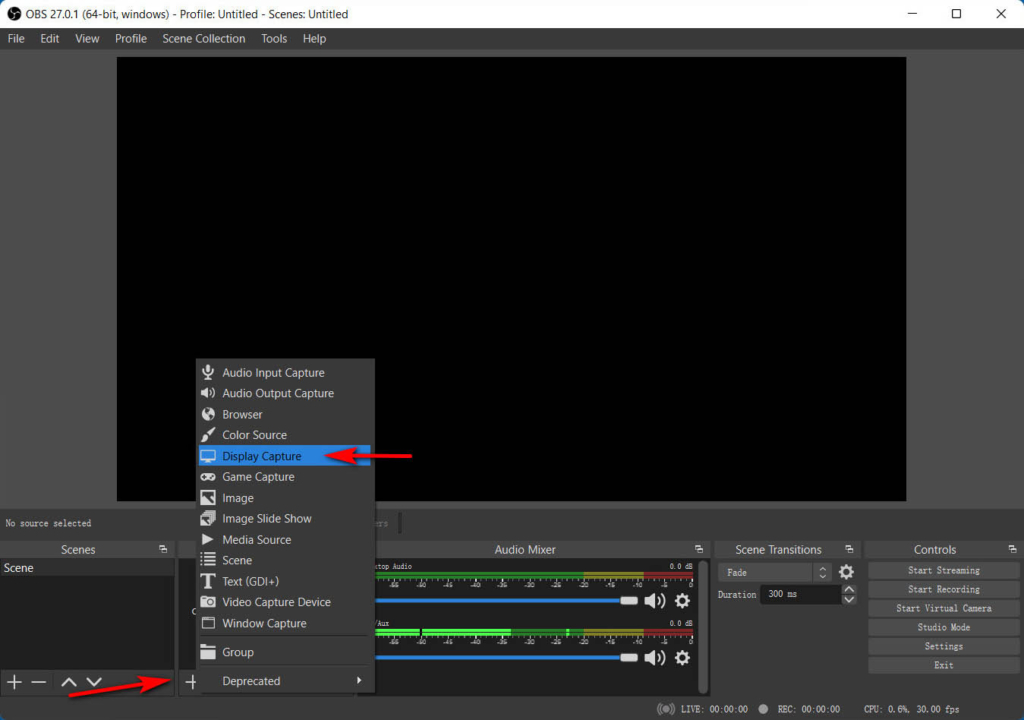
Before start recording, you need to add a source inside this scene. Click the “+” icon at the bottom of the panel labeled Sources, and you will see a list of options. Pick the Display Capture to record full screen or Window Capture to record a specific window. Confirm your choice by hitting the OK button.
Tip: many beginners will find OBS showing multiple windows in OBS if they pick the Display Capture. That is caused as OBS Studio displays itself in the preview, and it’s normal. To get rid of it, you can move OBS to another, non-captured monitor. Or you can pick up a Game or Window Capture mode instead.
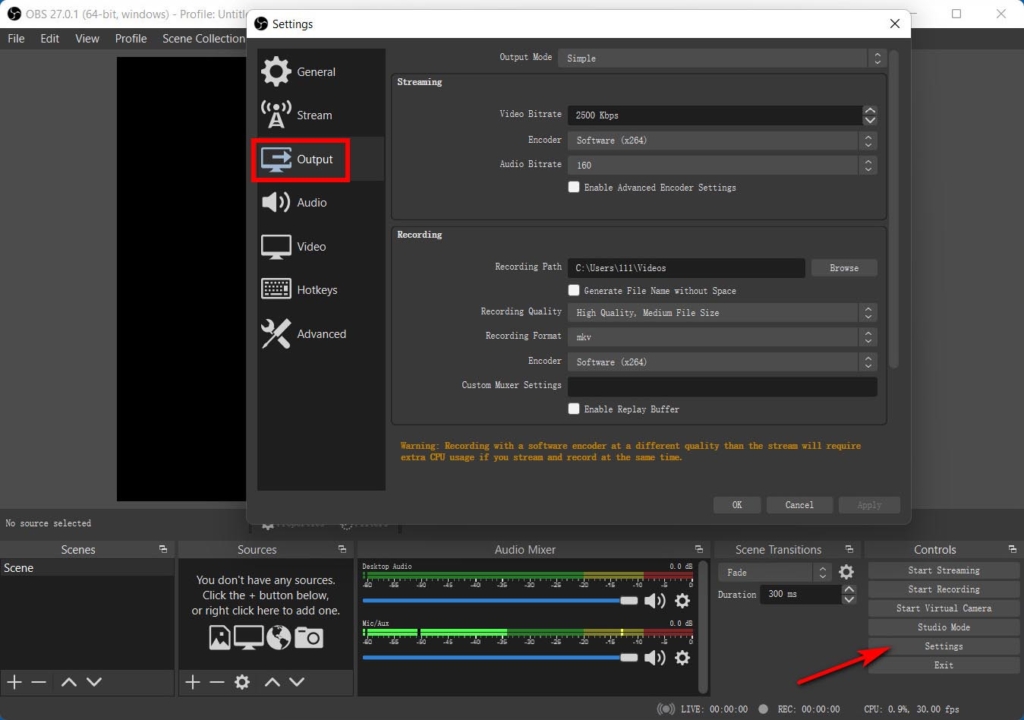
Now hit the Settings menu at the bottom right menu. In the Output tab, you can decide the recording path, recording quality, and format. Many users are wondering what the best recording formats for OBS are. Well, FLV and MKV are highly recommended by the OBS team. Both formats can contain different types of video or audio.
Now you are ready for OBS recording.
Start Recording
Once the parameter is set, you can hit the Start Recording button at the bottom right tab.
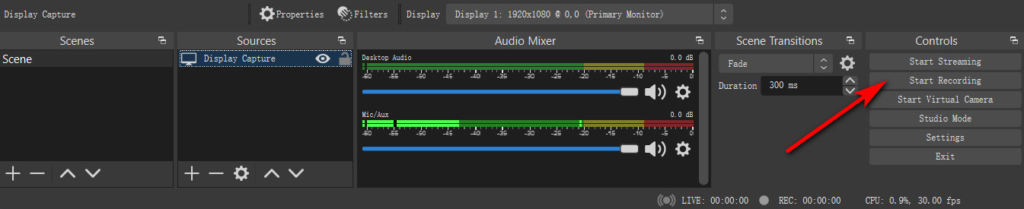
To stop the recording, click the Stop Recording button, and a video will be written to the specific folder you designated in the settings.
Many users get confused about where does OBS save recordings.
There are 2 ways you can find it. First, when the video is written, a prompt will show at the bottom of the OBS interface about the recording path. The second way is to hit the Settings menu in the Controls tab, which is located at the bottom right corner of the interface. A wizard will show up. Then go to the Output tab, and you can see the recording path. Go to this path, and you can find your screencast.

Part 2. Easiest Way to Record Screen on PC & Mac
Follow the steps above, and you have learned how to screen record with OBS so easily.
However, you may notice that OBS doesn’t allow you to add text or lines in real-time. Besides that, there are not hotkeys to start or stop the recording quickly. As a result, you may include the OBS interface in your screencast.
Are there any better ways to avoid such a situation?
There are many OBS alternatives for recording that could fix this issue. Among all these replacements, AmoyShare Screen Recorder is a great option.
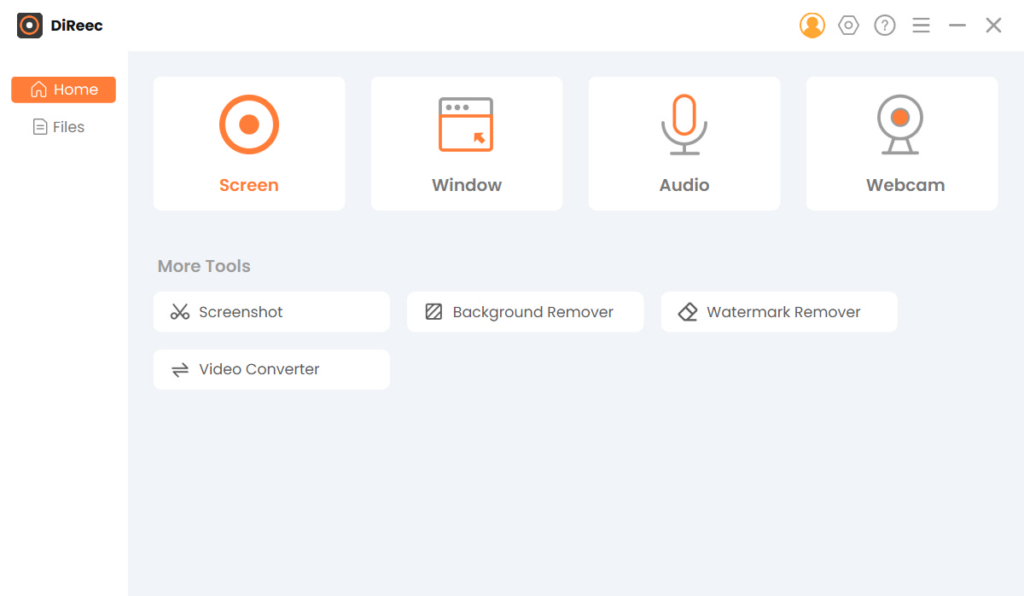
AmoyShare Screen Recorder is an all-in-one tool that allows you to record screen, audio, and webcam simultaneously or separately. Besides that, you can also use its built-in Window Recorder to specifically capture any desired window.
The key features of this screen recorder include:
● Recording screen, webcam, and audio at the same time;
● Set recording area to full screen, a window or user-defined region;
● Capturing audio from microphone and system sound and save them in a pure audio file;
● Editing with text, lines, shapes, etc., in the recording process;
● Hotkey to start/stop, pause/resume recording, screen capture, open/close the webcam, etc.
● Preview and trim the screencast before saving;
● Advanced recording mode to lock recording window, recording mouse tracks, exclude certain window in the recording process;
● Add mouse effect for easy noticing.
Then how to record screen with this free screen recorder?
First of all, please install AmoyShare Screen Recorder on your Windows 11/10/8/7 or Mac 10.10+.
Screen Recorder
Capture HD video and audio instantly
- for Windows 11/10/8
- for Mac OS X 14+
- for Android
- Run Screen Recorder, select the Screen module, enable the Display icon, set the recording area, and toggle on the webcam if necessary. Now hit the orange REC icon to start recording.

- Editing with pen, text, shape, steps in real-time.

- Hit the orange Square icon to stop the recording. Then you can preview and trim the screencast before saving it to your computer.

All done. The steps are easy, and the features are powerful.
Go for it now!
Start Recording
How to record with OBS? Above is the basic, quick-start approach for recording screen with OBS. Follow it and capture your first video now.
Yet, the OBS screen recorder is not ideal for making video tutorials or recording gameplay with limited functions. If you want to add annotate while recording or use hotkey to trigger various recording settings, AmoyShare Screen Recorder is the best option.
It allows for HD video and audio recording with editing, trimming, and other customizable features.
Give it a shot now!
Screen Recorder
Capture HD video and audio instantly
- for Windows 11/10/8
- for Mac OS X 14+
- for Android
Frequently Asked Questions
Where does OBS save recordings?
Run OBS Studio, hit the Settings in the bottom right tab, head to the Output tab, and locate the Rerecording Path. That is where OBS recording goes.
How to use OBS to record?
1. Run OBS Studio, then click the + icon and pick up Display Capture to record full screen.2. Hit the Start menu at the bottom right tab to initiate the recording process.3. Click the Stop menu at the bottom right corner to finish and save it. A prompt at the bottom of the OBS interface will indicate the storage path.
How to record screen with OBS with Windows 10?
If you're wondering how to use OBS Studio to record screen on Windows 10, you're in the right place. First, open OBS and click the + under the Sources section. Choose Display Capture from the drop-down menu. Next, configure the settings in the Properties window, then hit OK. Finally, click the Start Recording in the lower-right corner to begin your recording journey!
How to record Discord audio with OBS?
Recording Discord audio on OBS is a breeze. Simply follow these steps below:Launch Open Broadcaster Software, go to the Sources section, hit + button, and select Audio Input Capture.Name the source and click OK. After that, choose your preferred audio device.Once selected, hit Start Recording in the Controls section. To end, simply click Stop Recording.
How to record with OBS on Mac?
The process of OBS recording on Mac mirrors that of Windows. Just simply download OBS for your computer, add a display capture source, configure settings, and then hit Start Recording button to initiate it.