Thanks to technology, various software relevant to daily human activities is being developed. One of these is screen recorders. Screen recorders are widespread and in-demand nowadays due to expanding internet and computer activities.
Many content creators from famous video-sharing platforms, including Instagram, Facebook, Twitch, and more, use screen recorders for their video blogs.
In addition, a screen recorder can come in helpful in creating professional-looking video tutorials, eLearning courses, or even recording your favourite gameplay.
However, not all screen recording software in the market is always available for other operating systems, especially on Mac OS.
Luckily, in this article, we present the best ways to record your entire Mac computer screen or just a portion of it. Find out here how to screen record on Mac in the easiest way possible. So without further ado, let us start!
CONTENTS
Part 1. Best Way to Screen Record on Mac
Supported Output Format: MP4, MOV, F4V, AVI, WMV, TS, and GIF
Installation Packaged Size: 106.92MB
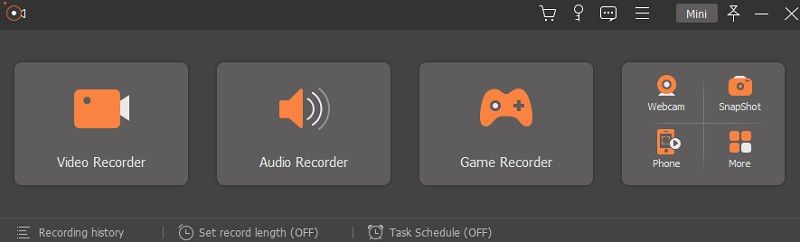
Recording a Mac computer’s screen with AmoyShare Screen Recorder gives you the advantage of exporting your recordings in high quality. It is a versatile tool that helps you record screen Mac in full screen, a specific window, or even a customized area. Aside from that, it can record audio from computer system sound and microphone or both, perfect for creating video tutorials with voice narration. In addition, you have complete control to change the shortcut keys to access its features without directly navigating the tool. To add more, this excellent software supports HEVC/H.265, so it handles your recordings with high compression rates without losing their original quality. So, if you are curious about how to screen record on MacBook Air and other Mac computer models with AmoyShare Screen Recorder, follow the simple steps presented below.
Key Features:
● It can record videos in HD quality like 720P and 1080P.
● It supports recording for up to 60fps for more detailed, smooth, and higher clarity output videos.
● It has a “Task Scheduler” function that allows users to set up a specified recording task to initiate and end automatically.
● The tool can record audio-only and save the file in popular audio formats like MP3, WMA, AAC, and M4A.
● It has many supported languages, including English, Chinese, Spanish, and more, to smoothly use the tool in your most comfortable language.
How to screen record on Mac with this screen recording software? Please follow me.
Screen Recorder
Capture HD video and audio instantly
- for Windows 11/10/8
- for Mac OS X 14+
- for Android
- Get the Mac Screen Recorder
- Click the “Download” button provided above. Then, follow the command from the wizard set-up window to install the tool on your Mac computer ultimately. After that, run the tool to launch its main interface and to be familiarized with its functions.
- Click the “Download” button provided above. Then, follow the command from the wizard set-up window to install the tool on your Mac computer ultimately. After that, run the tool to launch its main interface and to be familiarized with its functions.
- Configure the Recording Settings
- Next, hit the “Video Recorder” button from the main interface and click the “gear” icon next to it. Afterwards, the “Preferences” window will pop out on your Mac screen displaying the tool’s main settings. From here, you can take advantage of changing the recording settings, output format, sound quality, and a lot more settings. Maximize them to get the best output video. Then, hit the “OK” button at the bottom part of the window to save your changes.
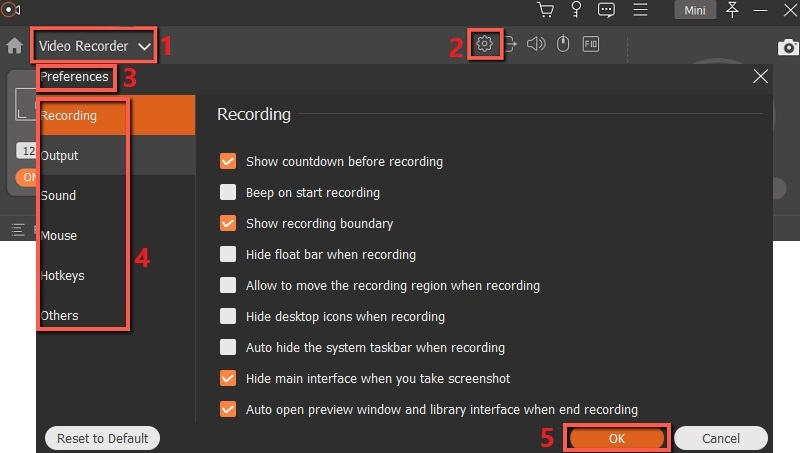
- Next, hit the “Video Recorder” button from the main interface and click the “gear” icon next to it. Afterwards, the “Preferences” window will pop out on your Mac screen displaying the tool’s main settings. From here, you can take advantage of changing the recording settings, output format, sound quality, and a lot more settings. Maximize them to get the best output video. Then, hit the “OK” button at the bottom part of the window to save your changes.
- Start to Record Video on Mac
- Now that you have edited the recording settings, you can go to the video you want to record. Then relaunch the tool and hit the “REC” button. After the three seconds countdown, the tool is now recording your Mac computer screen. Next, you can hit the “Pen” icon to launch the annotation tools like shapes, texts, arrows, and many more. These are convenient to use in highlighting essential details on your recordings. Once done recording, click the “Stop” from the floating toolbar to end the recording process.
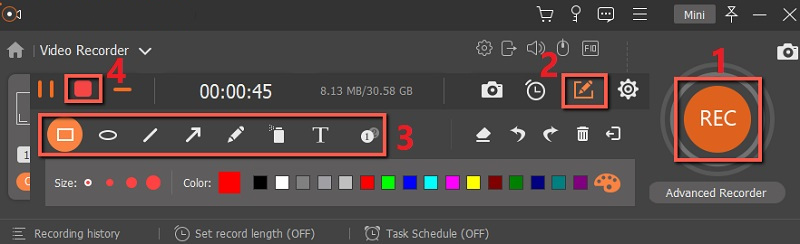
- Now that you have edited the recording settings, you can go to the video you want to record. Then relaunch the tool and hit the “REC” button. After the three seconds countdown, the tool is now recording your Mac computer screen. Next, you can hit the “Pen” icon to launch the annotation tools like shapes, texts, arrows, and many more. These are convenient to use in highlighting essential details on your recordings. Once done recording, click the “Stop” from the floating toolbar to end the recording process.
- Save the Recorded Video
- After hitting the “Stop” button, a new window will appear on your Mac computer. In this window, you can change the name of the recorded video to locate it on your computer quickly. Also, you can edit the output destination folder depending on your liking. This way, you can put all your recordings in one folder or location. Lastly, hit the “Next” button at the bottommost part of the window to save the recorded video thoroughly.
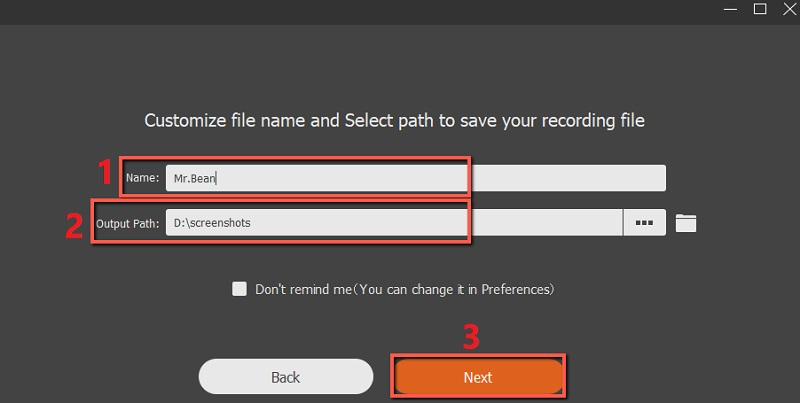
- After hitting the “Stop” button, a new window will appear on your Mac computer. In this window, you can change the name of the recorded video to locate it on your computer quickly. Also, you can edit the output destination folder depending on your liking. This way, you can put all your recordings in one folder or location. Lastly, hit the “Next” button at the bottommost part of the window to save the recorded video thoroughly.
- Play the Recorded Video
- After learning how to record a video on Mac with the given steps above, you can now play the recorded video. First, you can directly play it under the “History” section of the tool. Then, just double-click its filename, and a media player will come out on your Mac screen playing the recorded video. Furthermore, you can transfer it on other devices like smartphones and tablets and share it on popular social media platforms, including YouTube, Twitter, Vimeo, and more. That’s how quickly you can record a video with the help of AmoyShare Screen Recorder.

- After learning how to record a video on Mac with the given steps above, you can now play the recorded video. First, you can directly play it under the “History” section of the tool. Then, just double-click its filename, and a media player will come out on your Mac screen playing the recorded video. Furthermore, you can transfer it on other devices like smartphones and tablets and share it on popular social media platforms, including YouTube, Twitter, Vimeo, and more. That’s how quickly you can record a video with the help of AmoyShare Screen Recorder.
Part 2. How to Record Video on Mac with QuickTime
Supported Output Format: MP4, MP3, FLAC, and AAC
Installation Packaged Size: none
Another way on how to record screen on Mac is through QuickTime Player. QuickTime is the most practical tool to record your screen if you have an earlier Mac computer model. Furthermore, QuickTime is a pre-built tool capable of recording digital video, taking a screenshot, recording audio, and a lot more. In addition, the software has basic editing features like cut, rotate, and trim unwanted parts of the recording. Moreover, it can record audio input through a microphone as a source, although the quality has a minute delay. Learn to record a video on Mac using QuickTime by following the simple guide written below.
Key Features:
● QuickTime has a built-in media player that allows users to play the recordings easily.
● The main features of QuickTime like record screen and take a screenshot can be easily controlled using shortcut keys.
● It enables users to show mouse clicks in the recording to highlight the mouse cursor.
User-guide:
- Launch the “Applications” folder in the “Mac Dock” and click the “QuickTime Player” to open the app. Then hit the “File” button on the panel and click the “New Screen Recording” from the options.
- After that, drag the cursor to select the portion of the screen that you want to record. You can click anywhere if you like to record the entire screen.
- Now, hit the “Start Recording” button in the middle of the recording toolbar to initiate the recording process.
- If you want to stop the screen recording on Mac, click on the square “Stop” button at the top menu bar. Another way is to press the “Command + Ctrl + Esc” shortcut keys to finish the recording task.

Part 3. How to Record Screen on Mac with Shortcuts
Supported Output Format: MP4
Installation Packaged Size: none
If you like to record on MacBook in a less hassle method, you can use the “Command + Shift + 5″ keyboard shortcut keys. Using these shortcut keys will save your time and effort in looking for a screen recorder online. Also, you can save hard disk storage instead of installing a third-party app. If you have Catalina, Mojave, or later Mac OS, you can easily record your screen and take a screenshot with the assistant of the shortcut keys. Aside from that, you can select either the “Record Entire Screen” or “Record Selected Portion” buttons from the pop-up toolbar. Let’s follow the guide below and discover how to record video on Mac with shortcut keys.
Key Features:
● It allows users to set their preferred countdown timer before the official recording process.
● It can record the audio of the Mac computer and the audio from an external microphone.
● It allows instant sharing of recorded videos to popular platforms like YouTube, Dailymotion, or send them via email.
User-guide:
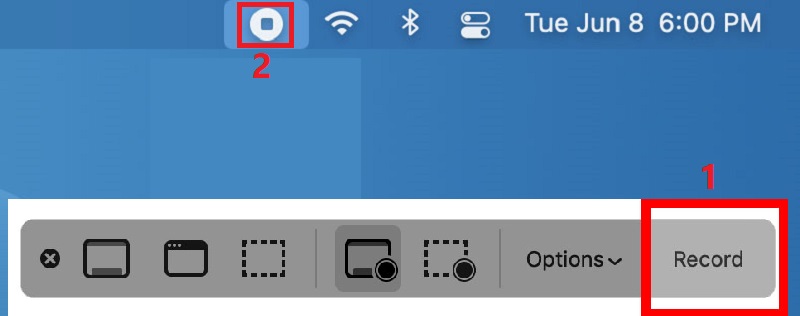
- Press the “Command + Shift + 5” shortcut keys on your keyboard. The Screenshot Toolbar will automatically appear at the bottom portion of your screen.
- Then choose the area you want to record by clicking the “Record Entire Screen” or “Record Selected Portion” button from the recording toolbar. If you select the “Record Selected Portion” button, drag your mouse around what you like to record.
- Once done, click the “Options” button to set the countdown timer, choose a microphone, and edit the destination folder of the recordings. Then, hit the “Record” button on the right side of the toolbar to begin screen record on Mac.
- To finish the recording, click the “Stop” button from the menu bar at the top of your Mac screen. Another option to stop the recording is by pressing the “Command + Ctrl + Esc” shortcut keys.
Part 4. How to Take a Video on Mac with OBS
Supported Output Format: MP4, FLV, and MKV
Installation Packaged Size: 92.16MB
OBS is free and open-source program that is very popular for video bloggers and streamers. The tool has a high performance in real-time video and audio recording. It allows you to create scenes from various sources like images, texts, webcams, capture cards, and more. In addition to that, you can set up a massive number of scenes and smoothly switch using custom transitions. Another good feature of OBS is its customizable shortcut keys to quickly switch scenes, muting audio sources, start/stop streams or recordings, and more. If you like to know how to record screen on Mac using OBS, go along with the simple guide beneath.
Key Features:
● It has a “Studio Mode” feature that allows users to preview scenes and sources to ensure they are perfect before your viewers can see them.
● It allows monitoring eight different scenes and easily transitions them with a few clicks.
● OBS has an “audio-mixer” to adjust basic audio settings like noise gate, suppression, and gain.
User-guide:
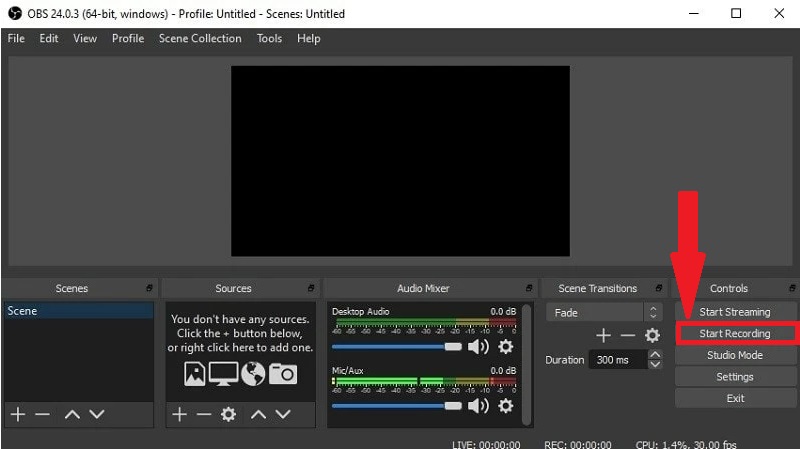
- Go to its official website and hit the “download” button for Mac OS to install the tool on your Mac computer. Once installed, open it and click the “+” icon in the “Scenes” box.
- Then go to the “Sources” box and click the “+” icon and choose “Display Capture” from the options. A small window will appear on your screen, allowing you to add a title. Hit the “OK” button to keep the changes.
- Next, go to the tool’s “Settings” and select “Output” from the sidebar menu. You now can edit the recording path, format, encoder, and a lot more. Make sure to hit the “OK” button to store the changes you made.
- After that, click the “Start Recording” button at the lower-right corner of the tool to start the recording process.
That’s how to screen record on a Mac using OBS.
Part 5. How to Screen Record on Mac with VLC
Supported Output Format: MP4, AVI, TS, WMA, OGG, and more.
Installation Packaged Size: 38MB
VLC media player is known as one of the best media players. It is mainly used to play and convert different formats of videos. But in case you are not aware, VLC is also a reliable screen recorder. It can capture video of your Mac computer in full-screen without losing its original quality. Furthermore, the VLC allows you to record your screen for up to 100 frames per second. Apart from that, the tool can record both sounds from the computer or a microphone. The convenient thing about using VLC is you have a media player and a screen recorder in one software. To learn how to record a video on a Mac, observe and follow the instructions below.
Key Features:
● It can also download video by pasting the video link on its “Open Network Stream” feature.
● It allows users to convert recorded and downloaded videos to other video formats like WebM, ASF, MP3, and many more before saving them ultimately.
● It has a “Normalize Volume” feature that helps users protect their ears while playing a video.
User-guide:
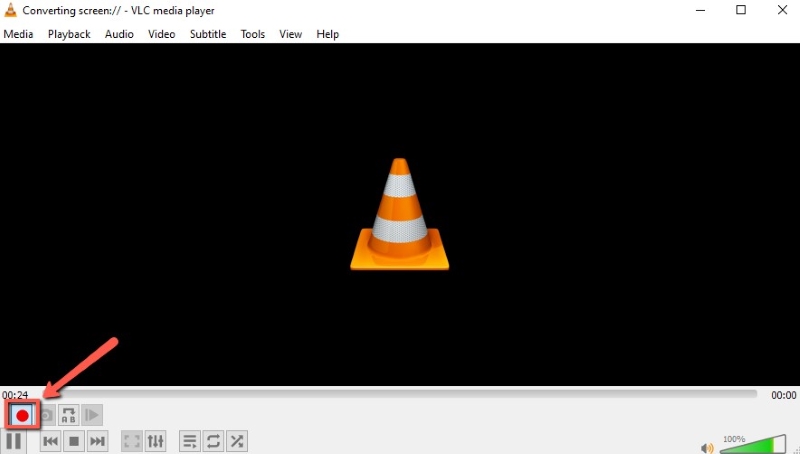
- Install VLC player on your Mac computer and launch it afterwards. Then select the “Media” from the menu, located at the top part of the tool.
- After that, pick the “Open Capture Device” button from the selection, and a new window will pop out. Here, click the drop-down button beside “Capture Mode” and click the “Desktop” button.
- Next, customize the frame rate depending on your liking and hit the drop-down button at the bottom part of the tool, then select “Convert.” You can now change the output format and the destination folder of your recordings.
- Once finished, hit the “Start” button, and the tool will automatically record your screen. If you like to end the recording, hit the solid “red” button from the tool.
Thanks to VLC, you now have another way on how to video record on Mac.
FAQs about Screen Recording on Mac
How to Record a Video of Yourself on Mac?
Suppose you are curious about how to take a video on a Mac with yourself. Remember that it is easier as long as you have a suitable screen recorder. Therefore, it is essential to look for software that can record in picture-in-picture (PIP) mode, like the. With it, you can connect your webcam to your Mac computer and let the tool do the task for you.
How to Record on a Mac Without QuickTime?
Although QuickTime is a better option to record your screen, it is still advisable to use third-party screen recording software. In that way, you can take advantage of advanced features to make your recordings more eye-catching. Presented above are some of the best methods on how to record on Mac. If you don’t prefer using QuickTime, you can switch to other methods until you find the best one for you.