
The internet world is fast-paced – as web developers innovate web technologies, humans adapt them for their daily lives. Back in the day, screen capturers were not a universal tool to use. The first screenshots were taken on an interactive computer in 1960.
With the development of new devices, like Mac, Windows, smartphones, and tablets, screen capturing functions were introduced. One of the essential screen capturing tools nowadays is OBS.
This tool is an open-source and free cross-platform screen recording and streaming program that works well on different devices such as Windows and Mac. It is a perfect tool for video creators in line with content such as video games, How-to-tutorials, and many more.
Yet, for video enthusiasts like us, are you familiar with its tips and tricks that can enhance how you screen record using OBS?
If not, then this article is suitable for you. We curated the best recording settings for OBS below.
Read them for you to know.
CONTENTS
Part 1: Best OBS Basic Recording Settings
There are seven sections of OBS settings that are not easy to figure out. This highly adjustable screen recorder has some secrets that you need to know. Many OBS users have no single idea how to set up a series of best OBS settings for recording.
Therefore, we will tackle the basic settings that you need to use for better screen capture videos in this part. Follow through with the tips below.
- First, launch the OBS on your computer and go to the Settings under the Control section.
- Then, on the General Module, scroll down and select the System Tray option. Tap the Enable box. OBS will be active on your background screen in this process, and you can activate the tool using shortcut keys.
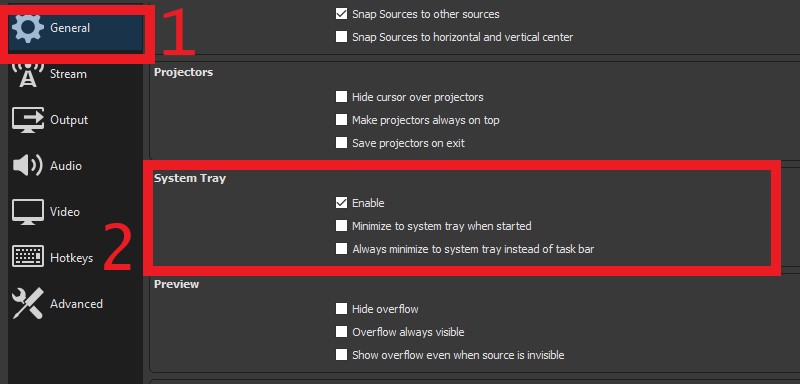
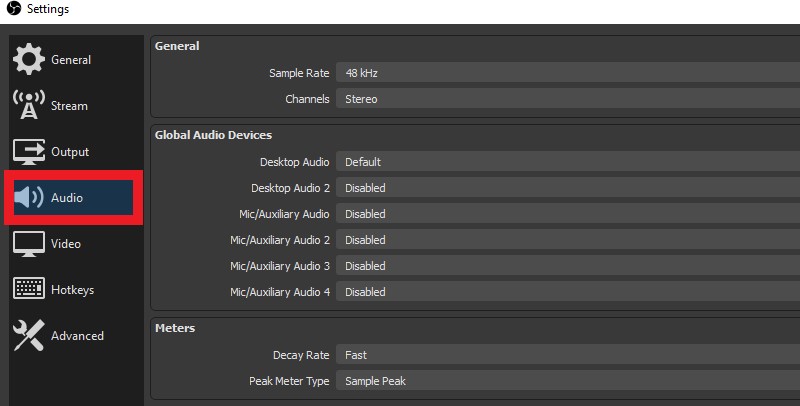
- Next, go to the audio section and modify different audio parameters such as Channels, Auxiliary audio, audio source, and more.
- Lastly, go to the Hotkeys menu to enable shortcut keys for different functionalities.
There you are; these steps above are the general settings that users need to know to have a better screen-recorded video using OBS.
Part 2: Best Output Settings for Recording
For video enthusiasts like us, we always look for the best output file for any video processing program that we use. Thus, when you are using OBS to record gameplay videos or any content you want, you have to take a look at several video parameters. Below are the tips on the best OBS recording settings for output.
Here is the list of items you need to focus on when recording gameplay videos on OBS.
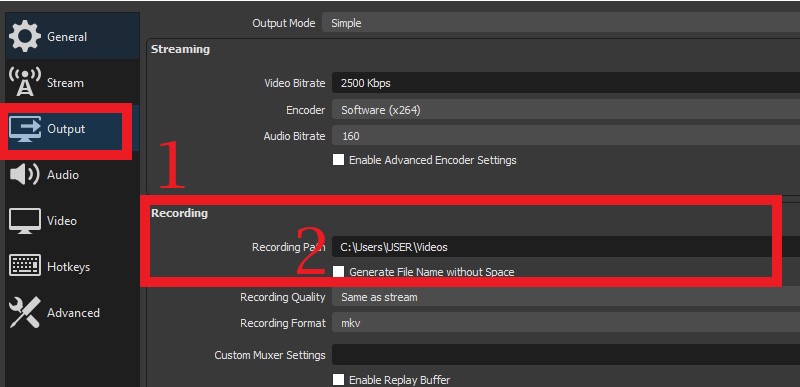
a. Output Folder
Many of us do not often use the output folder or the recording path to save our output recorded files. It can cause trouble sometimes because we cannot locate the output file. The best way to do this is to use a default folder or create a new one to locate the output file conveniently. Simply go to the Settings, hover over the Output tab, and locate the Recording Path to modify or change it.
b. Best Recording Format for OBS
If you are about to share the recorded file on different social media platforms such as Instagram, Facebook, and more, you have to consider the compatible formats of these sites. If you are uncertain about what format that your platform supports, choose the MKV format instead. MKV format is the best recording format for OBS. Why MKV is better than MP4 – a universal container that is mostly compatible with different media players and social platforms.? Because recordings saved in MP4 will be unrecoverable if the file fails to be finalized properly. To choose MKV – the best recording format for OBS, access the Settings, go to the Output tab, and modify the output format.
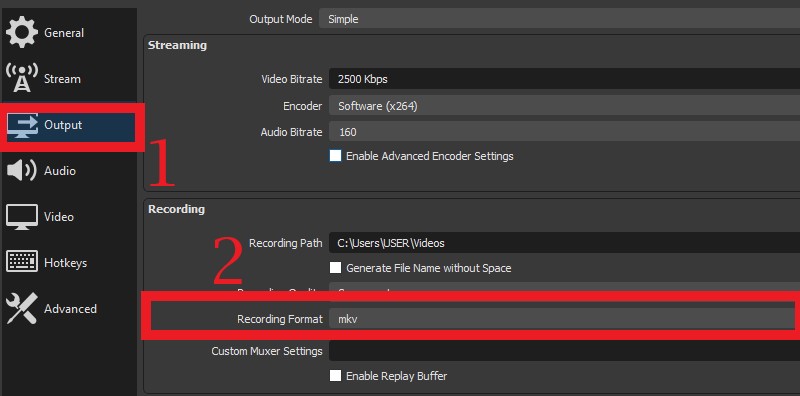
Tip: OBS allows you to convert the recorded MKV video to MP4 or MOV format in a hassle-free method. When the recording is finished, hit the File in the upper-right corner of OBS, and choose Remux Recordings. Then add the recordings you want to convert. Finally, hit the Remux button at the bottom to get the task done instantly.
c. Best Video Bitrate for OBS
The number of bit rates correlates with the resolution of the recorded file. To modify the bit rate, click the Video Bitrate under the Output tab on the settingsand change it. Underneath is the table below that will help you to choose the best video bitrate for OBS.
| Quality of the video | Best Bitrate for Recording OBS | Resolution | File Size |
| High | 1,200 | 862*480 | Small |
| High Definition(720p) | 1,500 | 1280*720 | Medium |
| High Definition(1080p) | 4,000 | 1928*1080 | Large |
| Ultra-High Definition | 8,000 | 4K | Very Large |
| Lossless | 20,000 | – | Tremendously Large |
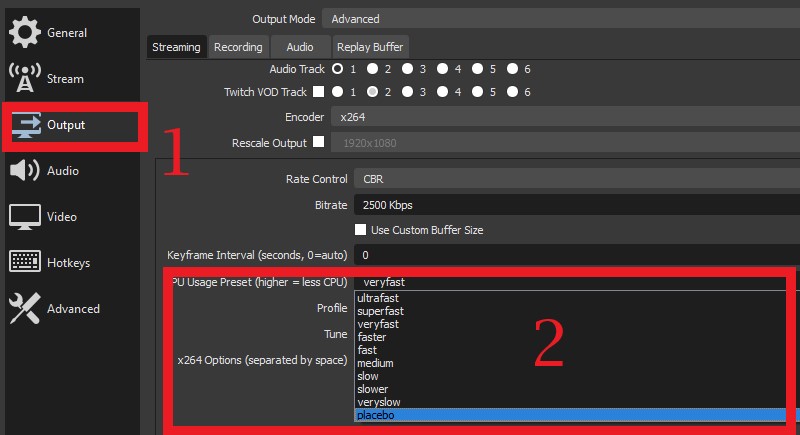
d. CPU Usage Preset
This parameter is perfect for gameplay videos. CPU usage preset is ideal for recording gameplay videos to provide a smooth recording process. To select the best settings for OBS recording process, access the Output tab and the Advanced settings, then modify the CPU Usage preset from placebo up to ultra-fast.
Part 3: Best Video Recording Settings for OBS
Now, in this part, we will focus on video parameters and the several items that we need to consider when using OBS. Underneath is the list of video parameters of OBS Studio best recording settings.
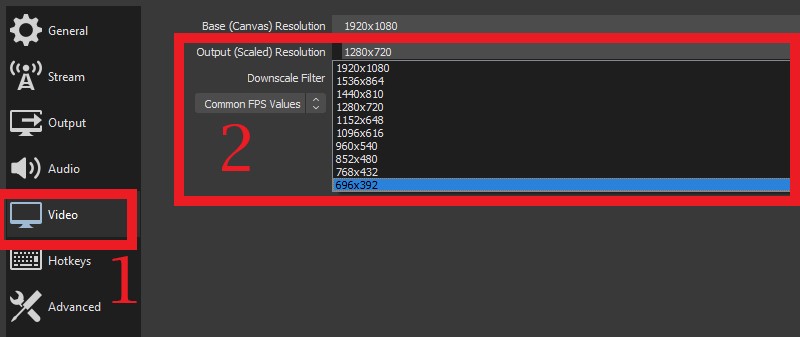
a. Output Resolution
As a video enthusiast, we wanted to have a better and clear resolution for our output files. OBS is able to record and render 4K quality and lossless quality with its smooth and quick functions. To change the video resolution on OBS, access the Video tab on the settings and locate the Output Resolution option. That will grant you access to a list of video resolutions such as 1928*1080, 4K, 1280*720, and more.
You can decide the ideal video output bitrate with the table on Part 2.c Best Video Bitrate for OBS.
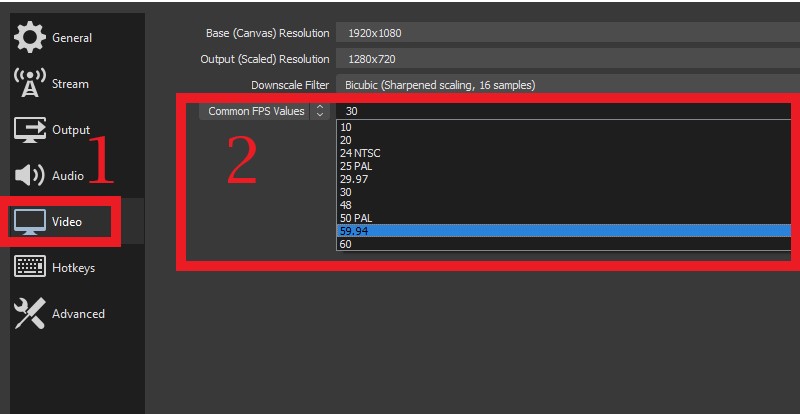
b. FPS Value
An average human eye can process 12 separate images per second. It means that a video with 12 FPS can display motion, but it will appear choppy when playback. OBS can provide 10 FPS to 60 FPS on a video file. With 60 FPS, it provides a smoother and clearer playback experience to the audience. If you want to modify the FPS of your video file, simply access the Video tab and locate the Common FPS Value. Then, select the FPS number on the dropdown menu.
Part 4: Best OBS Audio Settings for Recording
In this part, we will centre on the audio parameters of OBS. Audio is an essential element or file on the recorded media. It sets the mood, provides emotions, and stimulates the story setting of the video. Therefore, the better the quality preset, the better the overall playback experience. Beneath is the list of audio parameters that users can utilize for better OBS settings for recording.
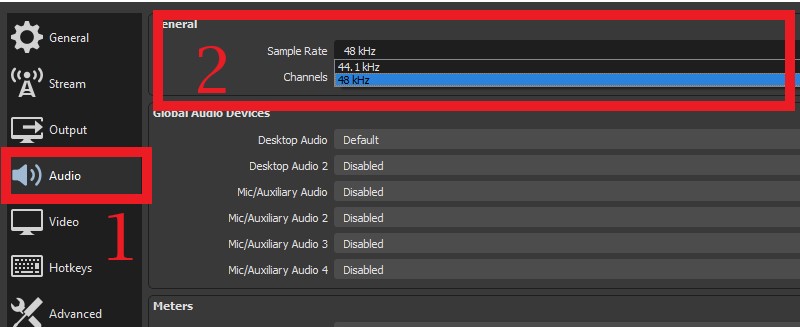
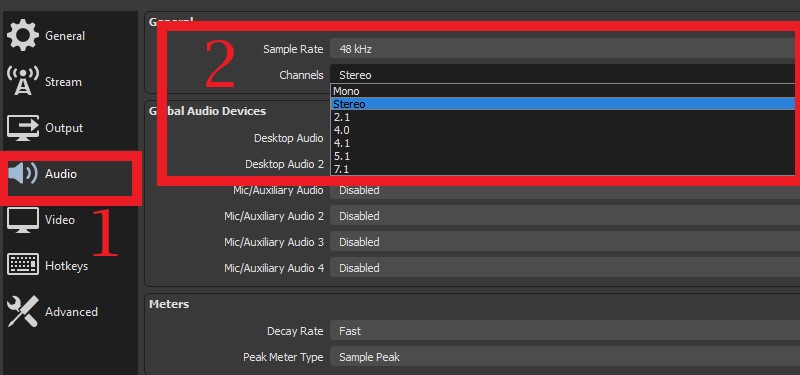
a. Sample Rate
Sampling rate or sampling frequency is a measurement of samples of audio recorded per second. It uses Hertz (Hz) to measure it. A sampling rate represents the measurement of acoustic waves valued at a specific point in time. OBS offers 44.1 kHz, which is typical for music CDs, and 48 kHz for audio tracks in movies.
You can choose between these two by simply accessing the Audio tab on the settings, hover over the Sample Rate, and choose between 44.1 kHz and 48 kHz. This way, you can maximize the best OBS audio settings that you want on your recorded file.
b. Channels
Channel is a representation of music or sound coming from or going on a single point. For example, a microphone can make one channel of audio, and a speaker can receive one audio channel. Many users record channels using stereo because it saves two channels that can be played on the left and right sides of your earphones or headset. Thus, this will provide a crisp and good quality of audio.
To modify channels on your OBS, access the Audio Tab and look over the top of the Channel option menus. Next, hit the dropdown to select your preferred channel from 2.1 up to the stereo channel.
Part 5: Best OBS Alternative for Recording
Distinctive Feature: It has a task scheduler that enables the user to set a recording process in a predetermined time.
Supported Formats: MP4, WMV, MOV, F4V, and more.
Well, if you are quite new to the screen recording process and you are not that tech-savvy. OBS might overwhelm you with its complicated settings and hard-to-understand parameters. Thus, in this part, we curated the best OBS alternative for recording.
We will be using the DiReec Screen Recorder due to its intuitive and comprehensive functions. As a matter of fact, its interface is lightweight and consists of understandable buttons and functions. Even without a video walkthrough, you can easily circumnavigate its recording features. It offers no time limit to record any activities on your desktop screen. It is equipped with microphone noise cancellation and microphone enhancement features. That will make your recorded voiceovers crisp and soothing in the ears. Moreover, it can capture high-quality videos and render them with 60FPS. Lastly, it is equipped with simple shortcut keys, making it more flexible and accessible to use.
Beneath is the detailed walkthrough to record using OBS Alternative.
Screen Recorder
Capture HD video and audio instantly
- for Windows 11/10/8
- for Mac OS X 14+
- for Android
- Install the OBS Alternative
- First, get the DiReec Screen Recorder on your desktop. Next, tick the Free Download button below to install it fully. Follow through with the wizards and installation prompts to continue. Next, once installed, launch the software, and circumnavigate its features and functionality to get familiarized.
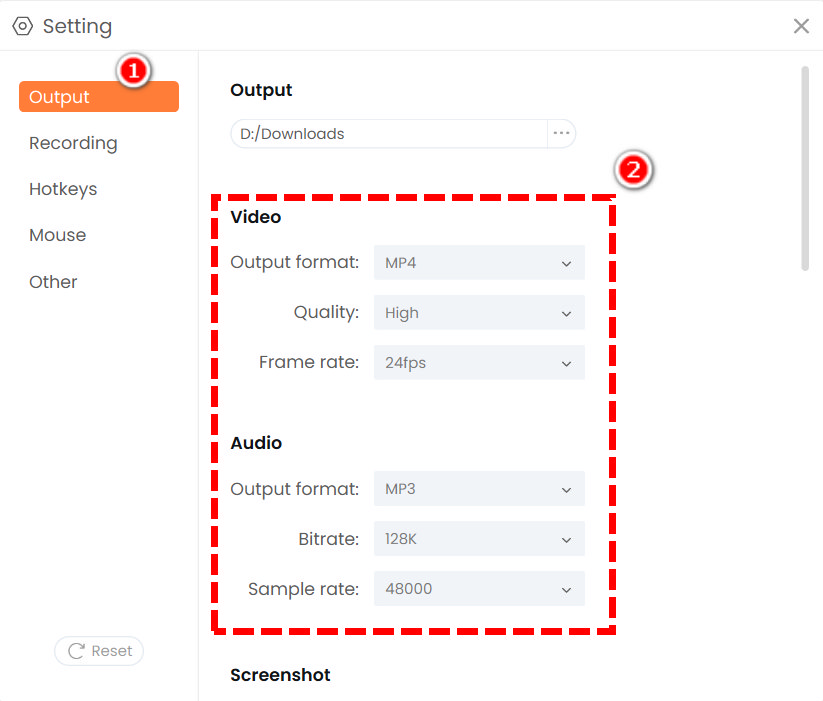
- Optimize Settings
- Then, optimize the settings by going on the Setting icon located at the upper-right part of the tool. When you click on this icon, the settings window will appear. Go to the Output option to locate different recording parameters such as video format, fps, audio format, audio and video quality, and more. Once you’ve selected your desired output options, these settings will be saved automatically.
- Then, optimize the settings by going on the Setting icon located at the upper-right part of the tool. When you click on this icon, the settings window will appear. Go to the Output option to locate different recording parameters such as video format, fps, audio format, audio and video quality, and more. Once you’ve selected your desired output options, these settings will be saved automatically.
- Select Your Content
- Next, go to any video-sharing platform and select the video that you want to record. Play the video and go back to the DiReec Screen Recorder. Prepare the tool for the process. You can utilize the Screen Recorder for capturing desktop activities, the Audio Recorder for music and sounds, and the Window Recorder to focus on a specific tab.
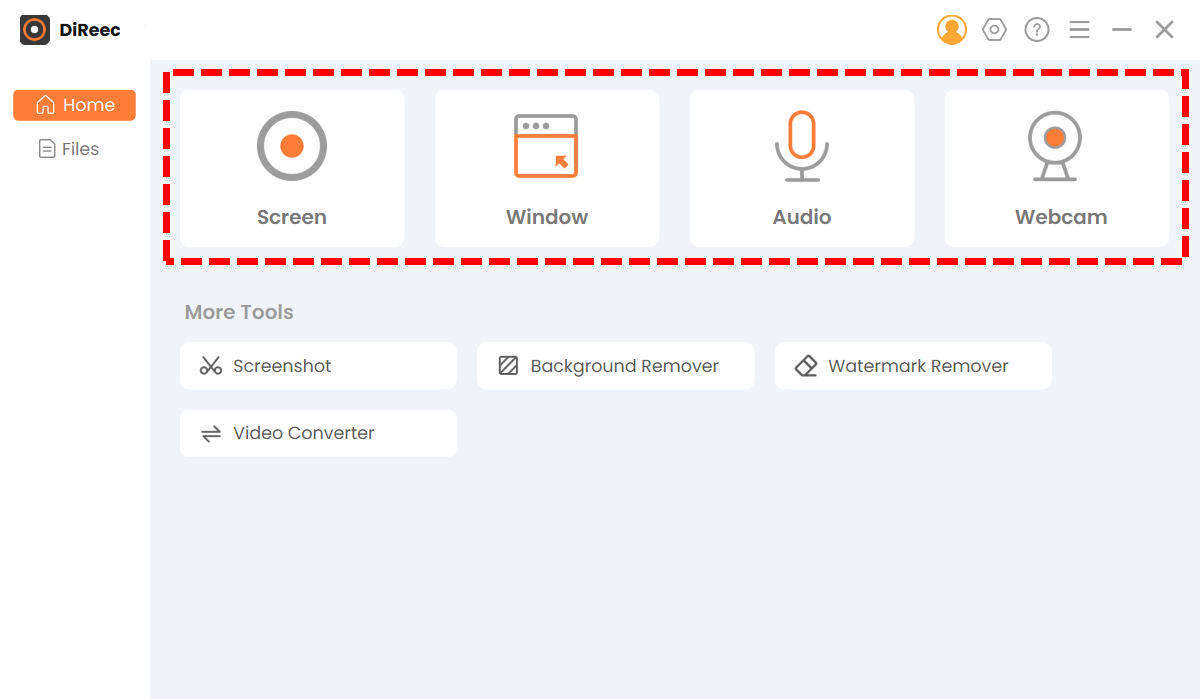
- Next, go to any video-sharing platform and select the video that you want to record. Play the video and go back to the DiReec Screen Recorder. Prepare the tool for the process. You can utilize the Screen Recorder for capturing desktop activities, the Audio Recorder for music and sounds, and the Window Recorder to focus on a specific tab.
- Record using OBS Alternative
- Afterwards, play the original video and hit the Screen option. Choose the Custom tab to select your preferred area of recordings. Tap the REC button to instigate the process. A dialogue box will appear to provide you with different options such as play and pause buttons, text annotation, and more. Hit the stop icon to export the recordings. Then, a media player will appear to provide you with a preview option if you want to re-record the process or cut and save the recorded files.

- Afterwards, play the original video and hit the Screen option. Choose the Custom tab to select your preferred area of recordings. Tap the REC button to instigate the process. A dialogue box will appear to provide you with different options such as play and pause buttons, text annotation, and more. Hit the stop icon to export the recordings. Then, a media player will appear to provide you with a preview option if you want to re-record the process or cut and save the recorded files.
Conclusion
Now you know the best recording settings for OBS and its best alternative – DiReec Screen Recorder. You can now go and try to record different contents online.
As they say in a quote, “Experience is the best teacher,” so go ahead and record using these tools to hasten your recording skills. If you have further questions or any suggestions, please comment down below.
Frequently Ask Questions
What bitrate should I record at OBS?
It is recommended to use 1,500 bitrates up to 4,000 bitrates if you want to aim for smooth and clear video recordings. Though it is not as smooth as the 4K qualities and 1080P videos, it will save up a large file size and won't compromise your storage.
What is the best OBS setting for recording Twitch?
The recommended setting this article will offer on recording twitch is to use Bitrate with 6500Kbps, Preset: Max Quality, Rate Control: CBR, Format: MP4. You can try the tips above to modify the OBS settings according to your preferred output.