Welcome to the guide page of our screen recorder. We appreciate your choice of our product. Here, we’ll provide you with detailed guide information to help you easily utilize our powerful and helpful DiReec screen recorder.
CONTENT
- Part 1. Get Started
- Part 2. How-Tos on Any Topic
- Part 3. Advanced Functionality
Part 1. Get Started
Whether you’re yearning to create engaging tutorials, demonstrate the function of a product, or immortalize your gameplay highlights, our DiReec screen recorder software can meet all your needs. In this section, we’ll show you how to install, activate, and update the software while providing you access to an array of detailed guides to grasp recording strategies.
Detailed Installation Guide on Windows/Mac
Before utilizing our screen recorder, you must install it on your computer. Please follow the steps below for a smooth installation process:
Install Screen Recorder on Windows:
- If you haven’t downloaded our desktop program yet, please visit our official site: https://amoyshare.com/pro-screen-recorder/ to download.
- Once the download is complete, double-click the .exe file on the button-left corner to initiate the installation. Perhaps you might need to grant administrator rights to ensure a successful installation.
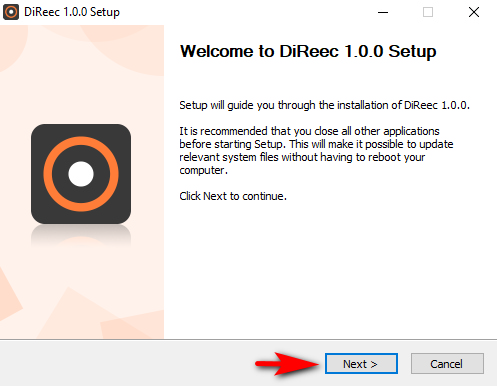
- When the installation window pops up, hit “Next” to start it.
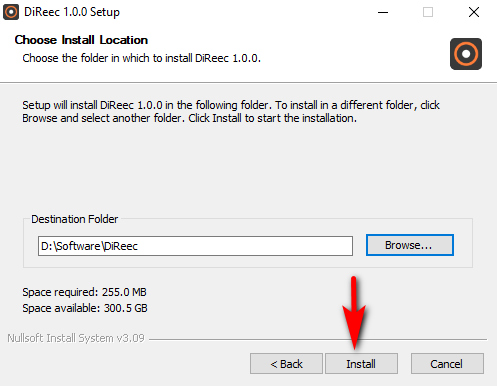
- Choose your preferred destination folder. Afterward, click the “Install” button to begin the process. And please wait patiently until the installation is completed.
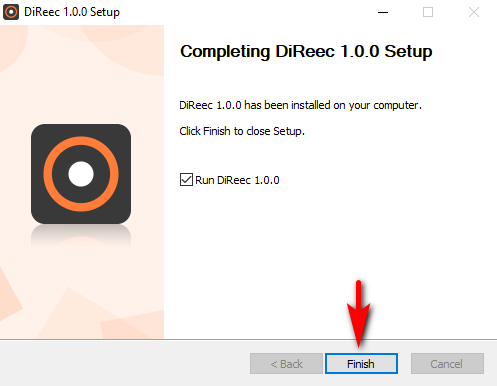
- When it is over, you can tick the “Run DiReec” option and hit the “Finish” button to start using DiReec Screen Recorder instantly.
Install Screen Recorder on Mac:
- After downloading the package, locate the screen-recorder.dmg file at the bottom left corner of your browser and open it.
- Once the package window appears, drag & drop the icon into your Applications folder. Perhaps, you need to enter the admin password to proceed with the installation.
- If a prompt saying, “Are you sure you want to open it?” simply click “Open” to proceed. And the recorder software has been successfully installed on your Mac.
Upgrade & Activation Instruction
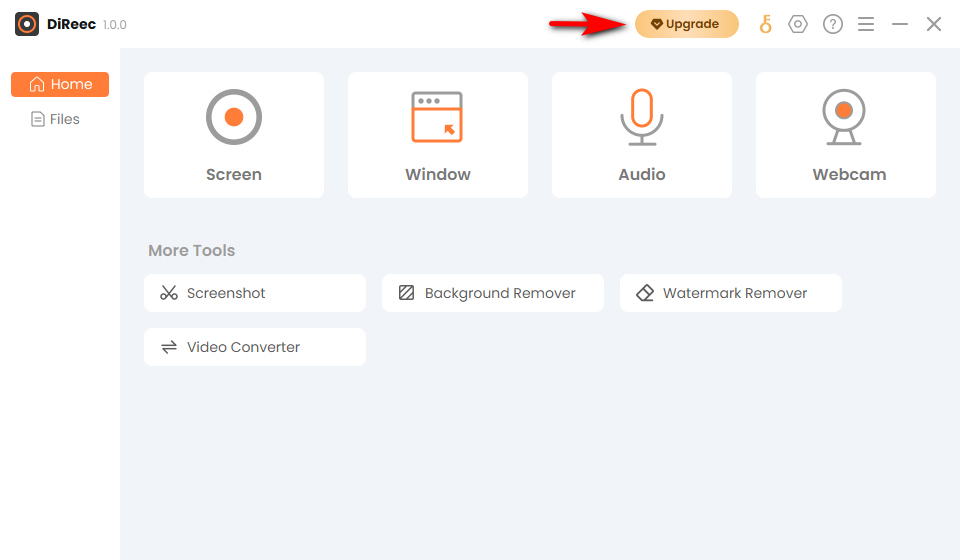
When you have successfully installed our program, you’ll discover both the “Free Trial” and Pro versions available for recording your computer screen. To enjoy more advanced recording features and outstanding functions, we recommend upgrading to our Pro version. Here is a step-by-step guide on how to upgrade and activate the Pro version:
- Launch our program and click the “Upgrade” button in the top taskbar. Alternatively, head to our price page to make a purchase directly. Select one plan you prefer and hit “Buy Now.”
- Once the purchase is complete, go back to the DiReec program. Click on the key icon in the top status bar.
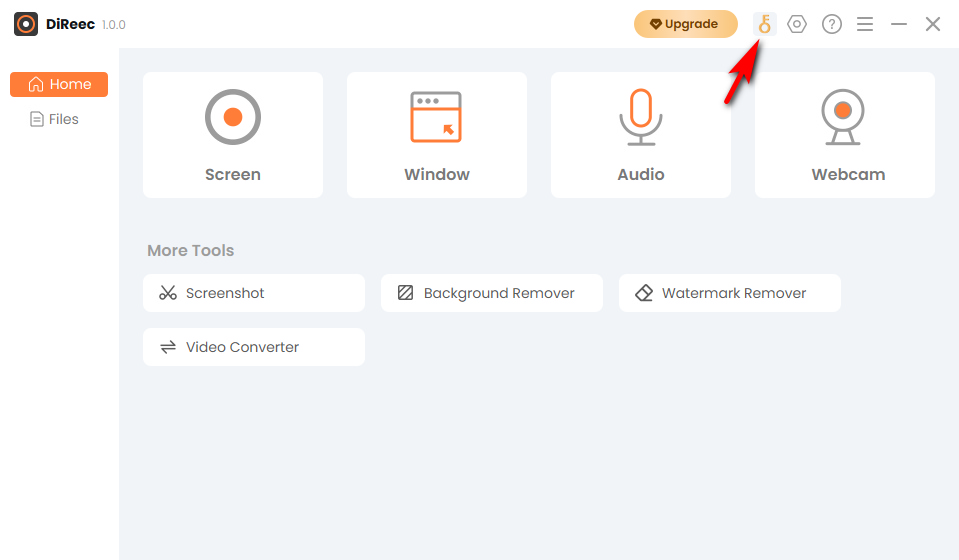
- When the “Activate DiReec Pro” window appears, enter the activation code from your email and click the “Activate” button.
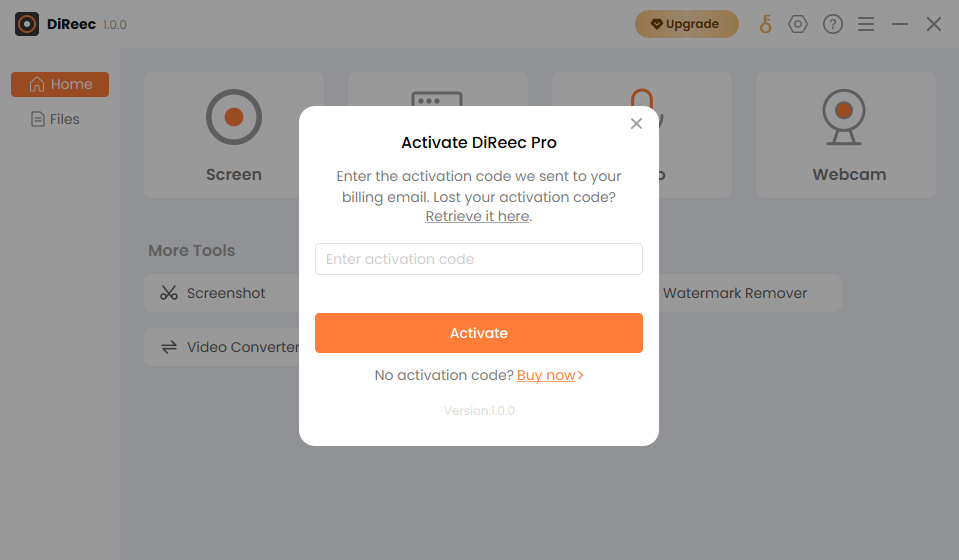
In summary, you have activated your account successfully. If you encounter an error code or any other activation-related issues, please feel free to contact us at [email protected]
Software Updates
Our program may require occasional updates to enhance user experience, fix bugs, and develop new features to improve uniqueness. Follow the procedures below to check if you have the latest version and update accordingly.
- Run the DiReec program and click the three-line menu to select the “Check for Updates” option from the top side. And wait for the system to check the updates.
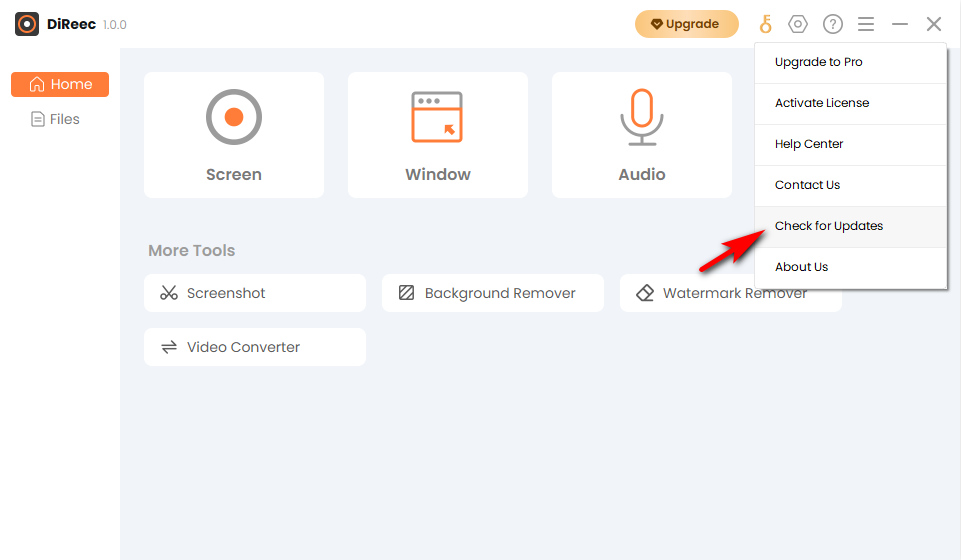
- If you already have the latest version, a prompt will appear saying “You’re up to date!” Otherwise, an “Update Available” interface will pop up, and you need to click the “Update” button.
- Once the update is finished, hit “Install Now” to instantly install the latest version on your computer.
Congratulations, you have updated to the latest version. If you encounter any problems that cannot resolve smoothly during the process, feel free to contact us via email [email protected].
Uninstallation Guide
If you decide to discontinue using our screen recording software anymore, you can uninstall it by following these steps:
- Locate the Control Panel (Windows) or Applications (macOS) on your operating system.
- In the list of installed software, find the screen recorder and select the uninstall option.
- Follow the system prompts to complete the uninstallation process.
Part 2. How-Tos on Any Topic
In this section, we’ll guide you through the detailed steps to master all recording functions. Whether you’re a newcomer or seeking knowledge about more advanced features, our “How-Tos” will provide you with comprehensive instructions to tackle any scenario.
How to Record Your Screen with Ease?
Recording screen with our DiReec Screen Recorder is a breeze! Follow these simple steps to save high-quality videos of your recording and enjoy them offline on your computer in various video formats like MP4, FLV, MOV, AVI, etc.
- Select Your Recording Area
Launch the DiReec screen recorder software and effortlessly choose your preferred area. Whether it’s the entire screen, a specific window, or a custom region, you have the flexibility to record what you need.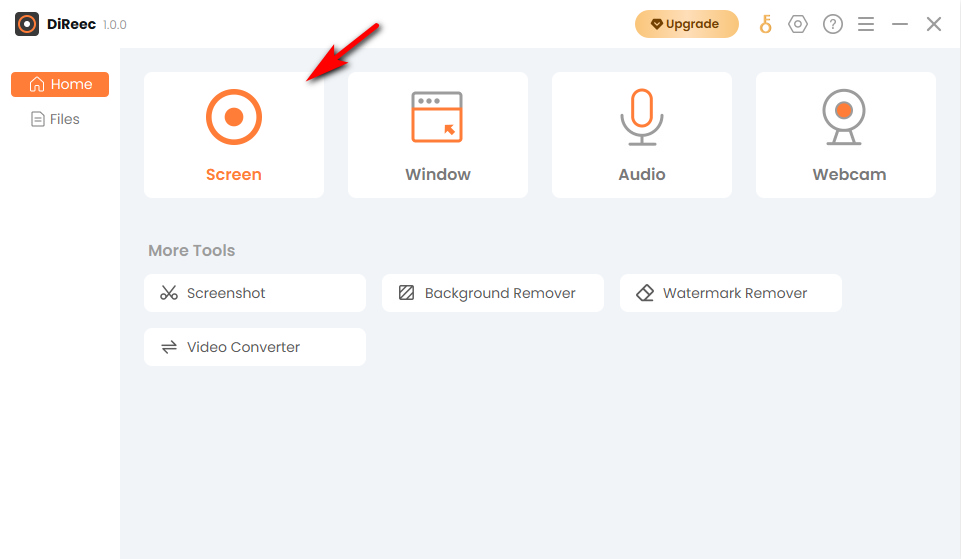
- Start Recording
Once you have selected your desired area, just customize the settings according to your needs. After that, with a simple click of the “REC” button to initiate the recording process.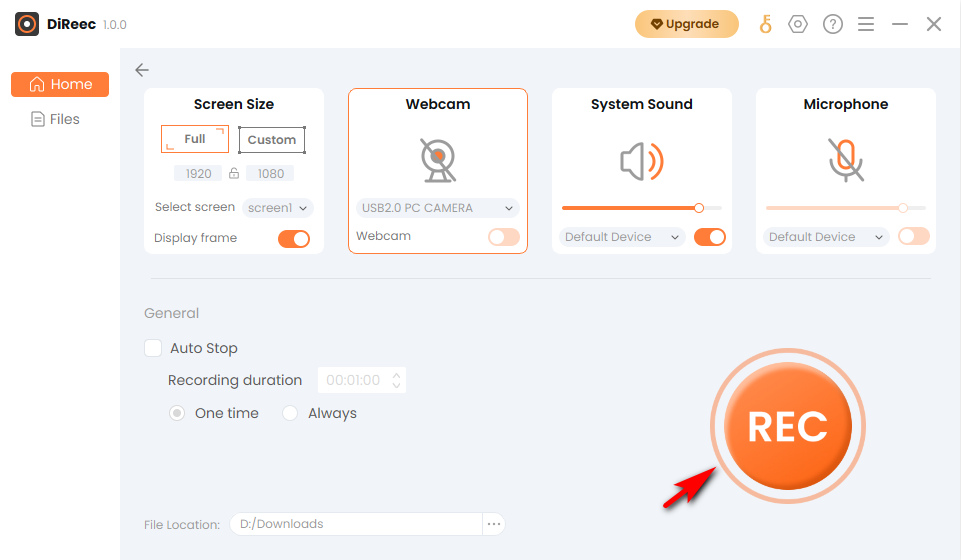
- Stop & Save the Recording
Show any content you desire, be it a video, tutorial, livestream, or any content from video-sharing sites or social media platforms. Once your recording is over, simply hit the “Stop” icon to end it, and the recorded file will be automatically saved to your device.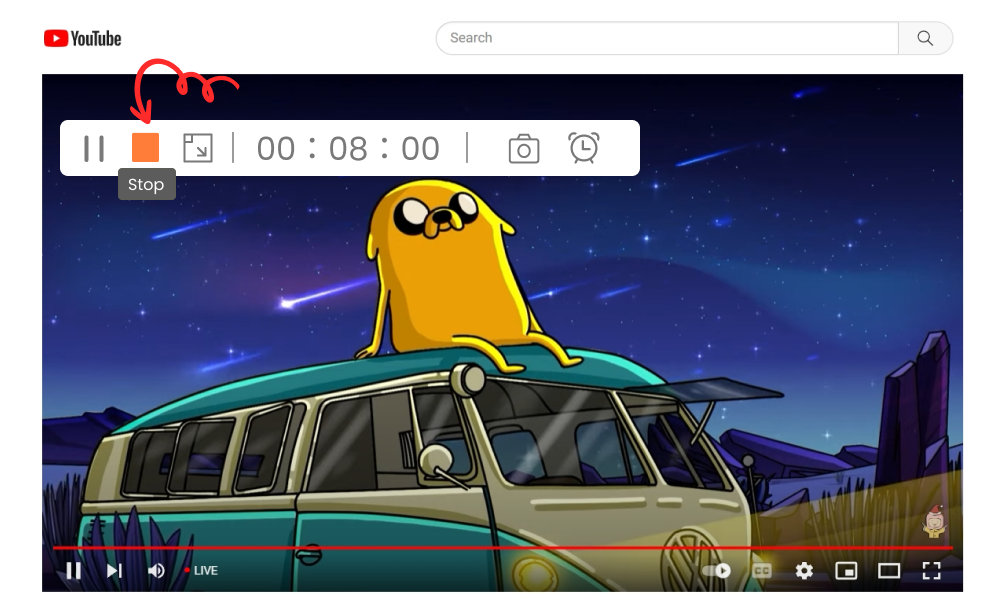
How to Record High-Quality Audio?
Recording audio with our software is as easy as recording your screen. With its newbie-friendly interface and seamless operation, it makes you create professional-quality videos without any hassle. Beyond the screen recorder, there is more to explore! Here I will show you how to record audio with crystal-clear quality for listening.
- Select Audio Source
Run our program and navigate to the Audio interface. Then choose your desired audio source from system audio, microphone, or both for recording.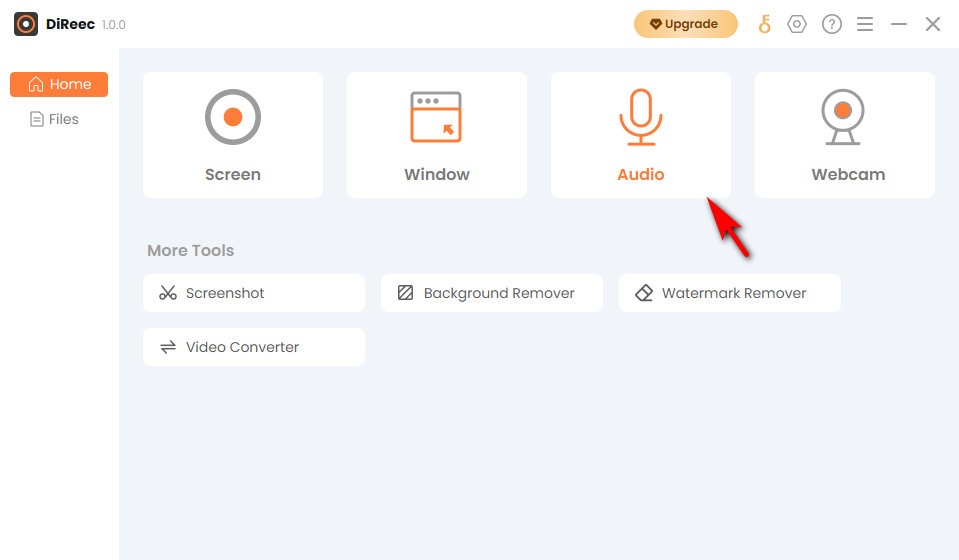
- Initiate the Audio Recording
Once you’ve chosen the desired source, a waveform indicator ensures that you have successfully selected the option. Click on the “REC” to start the audio recording.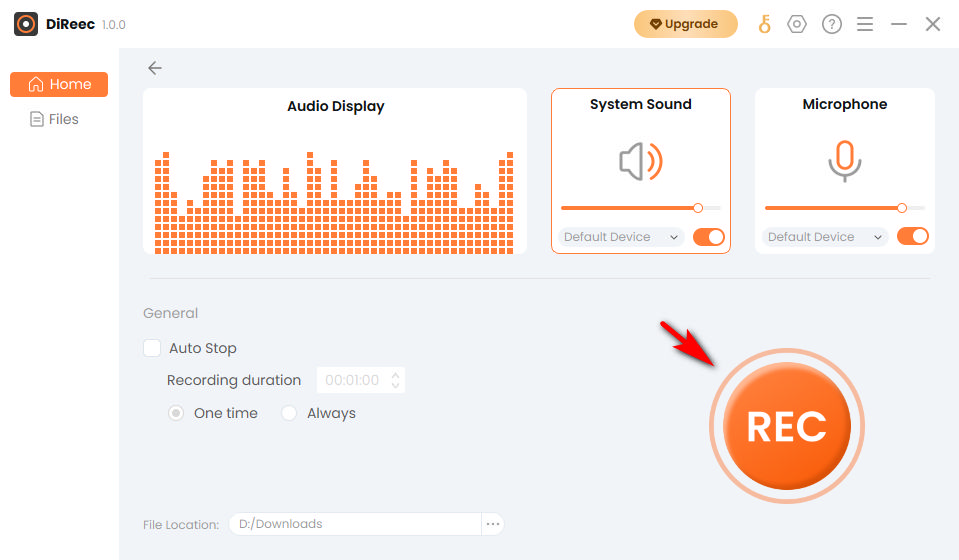
- Save the Recorded Audio
When your recording is complete, click the “Stop” icon, and the audio file will be saved to your chosen location automatically.
Tip: To export the recorded audio in various formats, just access the “Setting” icon in the top taskbar before recording. Our software supports formats like MP3, AAC, OPUS, and more catering to your needs.
How to Handle Webcam Recording?
If you wish to record yourself or present a face cam in your recorded videos, you’re in luck! Our screen recorder makes it a doddle to record from your webcam, whether it’s an external or internal device. Here is a step-by-step guide on how to record yourself from webcam. Just follow it!
- Choose Webcam Recording
Open our screen recording software and choose the “Webcam recording” option. Alternatively, you can select the “Screen” option to capture both your screen and webcam.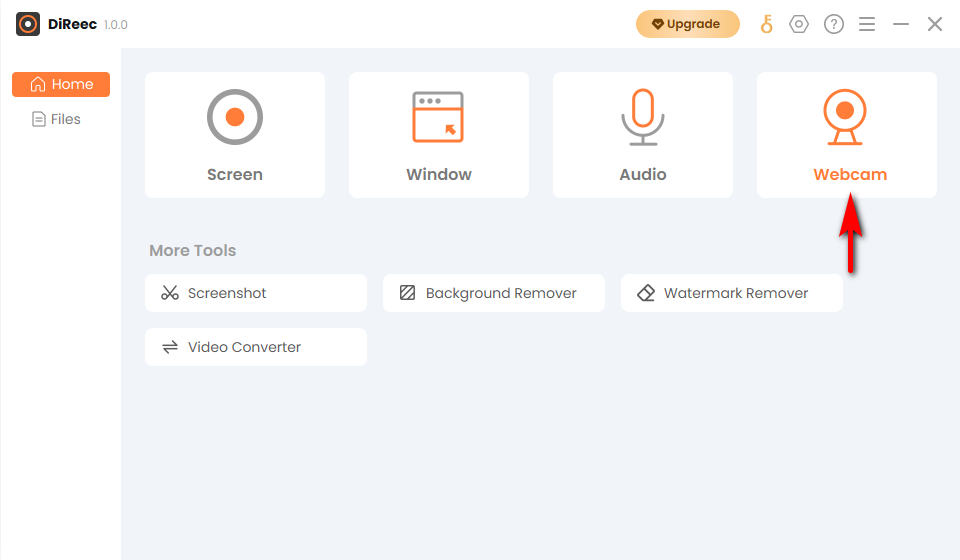
- Customize Settings & Start Recording
Choose your desired output resolution, which supports up to 1920p. Then enable the system audio or microphone based on your needs. Click the “REC” button to initiate it.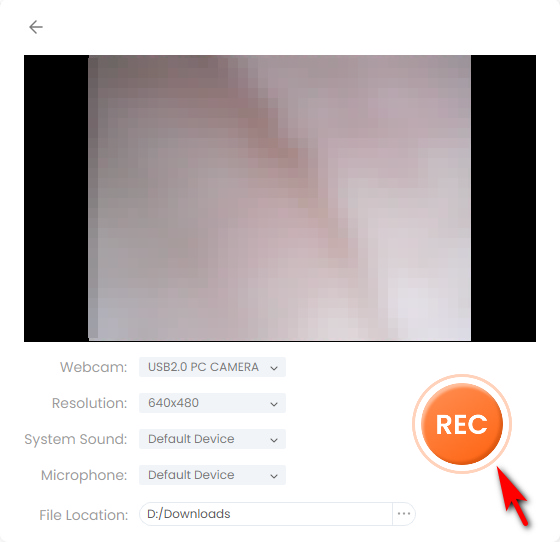
- Stop Webcam Recording
When you’re done, hit the “Stop” icon. The recorded videos from your webcam will be instantly saved to your device without interruptions.
How to Record Games for Later Reviewing?
Need a screen recorder to capture your game streaming for analysis or save other people’s livestreams for future reference? You’ve in the right place. Our screen recording tool is the perfect solution. Here are the steps to do it:
- Select Game Window
Launch the DiReec program and select to record the entire screen or only the game window.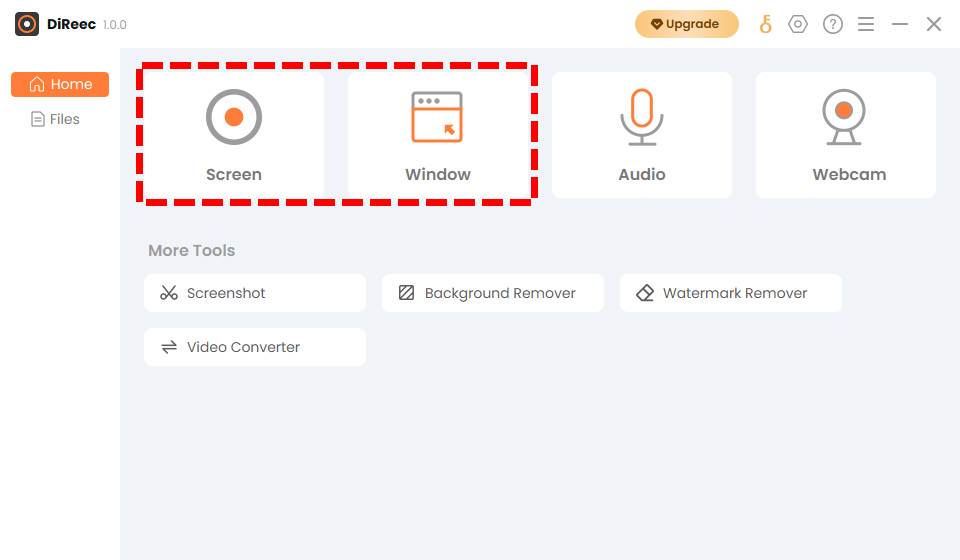
- Initiate Game Recording
Once you’ve made your selection, click the “REC” button to start recording. Then, begin the game streaming you wish to capture.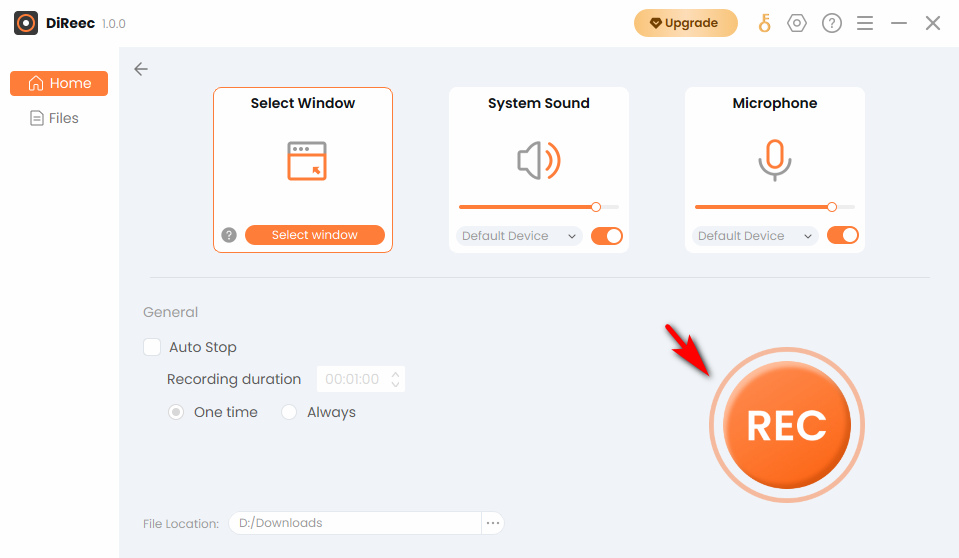
- Save the Recorded Gameplay
When you’ve finished playing, hit the “Stop” icon to end it. Our screen recorder will automatically save the new file to your default location.
How to Use the Screen Capture Tool to Capture Any Moment?
Apart from the essential recording functions, our feature-packed screen recorder also empowers you to capture any moment on your computer in real-time. Whether you need to snap a screenshot before or during the recording process, the tool has got you covered. Here is the simple tutorial on how to make full use of our screen capture feature:
- Choose Screenshot Tool
Open the screen recorder software and simply click on the “Screenshot” option from the located “More Tools” menu. Alternatively, access the screenshot option represented by a camera icon on the status bar during the recording process.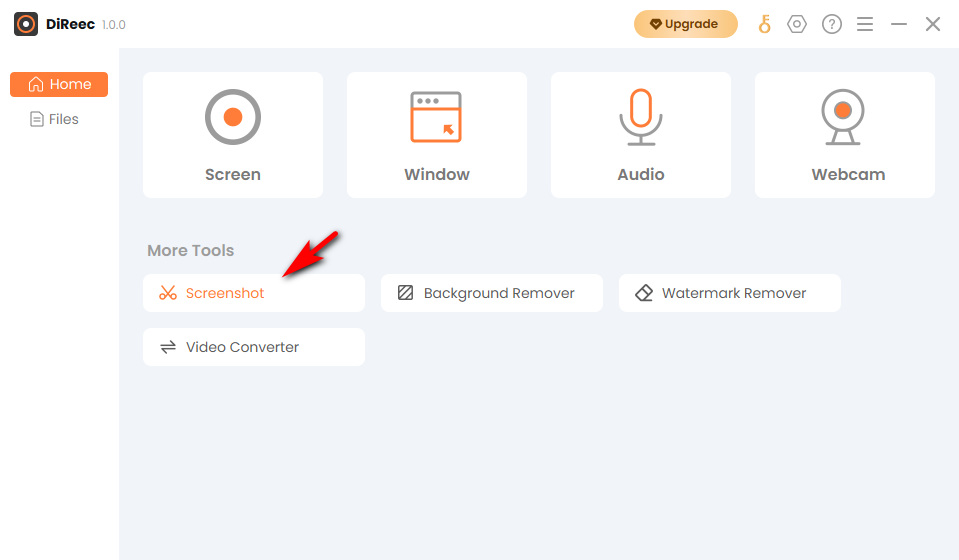
- Seize the Moment
Once you’ve initiated the screen capture, your screen will turn into a canvas for your action. Select the desired area you wish to take a screenshot. Plus, you can also adjust the position before checking. - Click and Save the Image
When you’ve done, click on the right hook icon to ensure the utmost precision. And the screenshot will be promptly saved to your device.
Part 3. Unleash the Power of Advanced Functionality
Beyond the comprehensive recording capabilities of DiReec screen recording tool, it also boasts advanced features waiting to be discovered. Enhance your recording experience with a range of unique tools offered in this section. Let’s dive in and explore them!
Annotate while Recording
Elevate your recording experience with the advanced feature of adding annotation in real-time. With these tools, you can highlight essential part during the recording process, ensuring that crucial points can be noticed by people in the recorded file. Here’s how it works:
- Launch DiReec screen recorder and start your recording.
- Access the annotation feature by hitting the brush icon located in the status bar. And add annotation to your recording through multiple tools like text, shapes, numbers, highlights, etc.
- Once you’ve completed your creation and recording, simply click the “Stop” icon to end it. The recorded file will be saved to your device without delay.
Schedule Recording
Wish to plan and automate the recording sessions at specific time? You’ve come to the right place. Our powerful screen recorder allows you to save the hassle of manually starting or ending the recording and lets you schedule events in advance. Follow these steps to use the time-saving feature:
- Open the program and go to the “Task Scheduler” option under More Tools.
- Set your desired start time, duration, or choose the stop time option. Plus, adjust the recording settings as needed.
- When you’ve done, click the “OK” button to successfully create a scheduled task.
Customizable Hotkeys
At our core, providing the best user experience is our top concern. Thus, we’ve designed the screen recorder with a feature that enables users to personalize hotkeys according to their preferences. It makes the recording process more comfortable and straightforward. Here is how to harness this feature:
- Access the settings window from the top taskbar and locate the hotkey section.
- Enter your preferred key combinations for each recording action, such as start and stop, pause and resume or others.
- Once you’ve entered, the settings will be saved automatically. Then you can activate these hotkeys during your recording process.
 Get Started