Thanks for choosing our ID3Genius tag editor! Here, we’ll provide you with detailed guide information to help you custome your music metadata with our advanced ID3 tag editor.
Part 1. Get Started
Whether you’re customizing music tags or fixing mislabeled tracks, our powerful ID3Genius tag editor is built to handle it all.
Detailed Installation Guide on Windows/Mac
Before utilizing our ID3 tag editor, you must install it on your computer. Please follow the steps below for a smooth installation process:
Install ID3 Tag Editor on Windows:
- If you haven’t downloaded our desktop program yet, please visit our official site: https://www.amoyshare.com/id3genius/ to download.
- Once the download is complete, go to the Downloads button in the top-right corner of your browser and double-click the id3genius-setup.exe file to start the installation. You may need to grant administrator permissions to ensure the installation completes successfully.
-
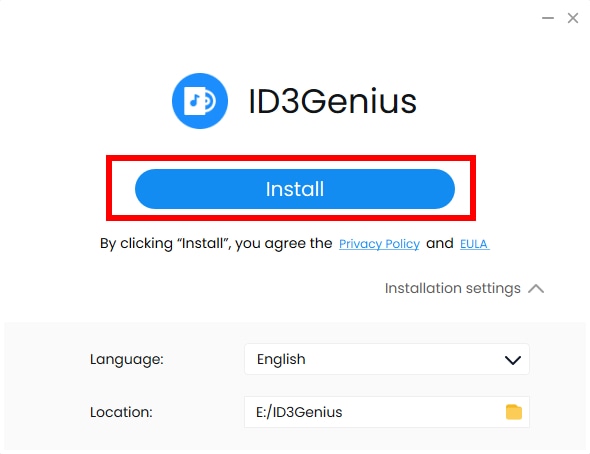
When the installation window pops up, choose your preferred installation location. Afterward, click the "Install" button to begin the process. And please wait patiently until the installation is completed.
-
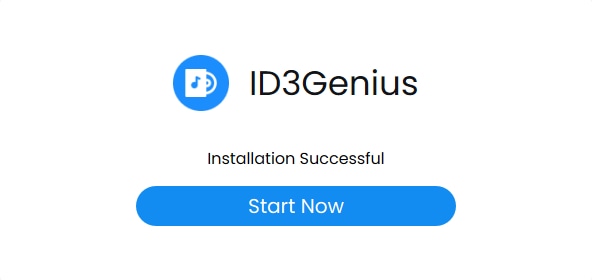
When it is over, you can click the "Installation Finished" button to start using ID3Genius tag editor instantly.
Install ID3 Tag Editor on Mac:
- After downloading the package, locate the id3genius.dmg file at the bottom left corner of your browser and open it.
- Once the package window appears, drag & drop the icon into your Applications folder. Perhaps, you need to enter the admin password to proceed with the installation.
- If a prompt says, "Are you sure you want to open it?" simply click "Open" to proceed. And the ID3 tag editor software has been successfully installed on your Mac.
Upgrade & Activation Instruction
Once ID3Genius is successfully installed, you’ll find both the "Free Trial" and Pro versions available for editing your music metadata. To unlock advanced features such as unlimited automatic ID3 tagging, lyric auto-matching, audio feature analysis (BPM, key, energy, and more), and access to multi-platform music databases, we highly recommend upgrading to the Pro version. Follow the steps below to upgrade and activate the Pro version with ease.
-
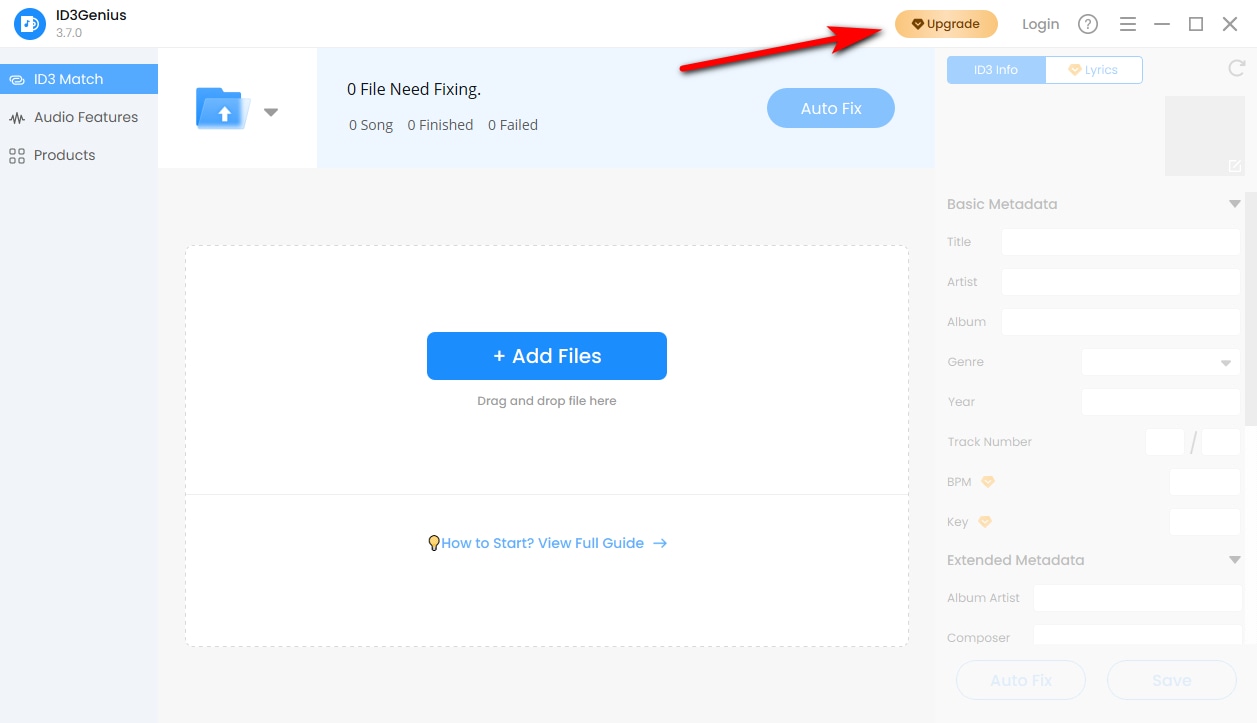
Open our program and click the "Upgrade" button in the top toolbar. You can also visit our price page to purchase directly. Choose the plan that suits you best and click "Buy Now."
-
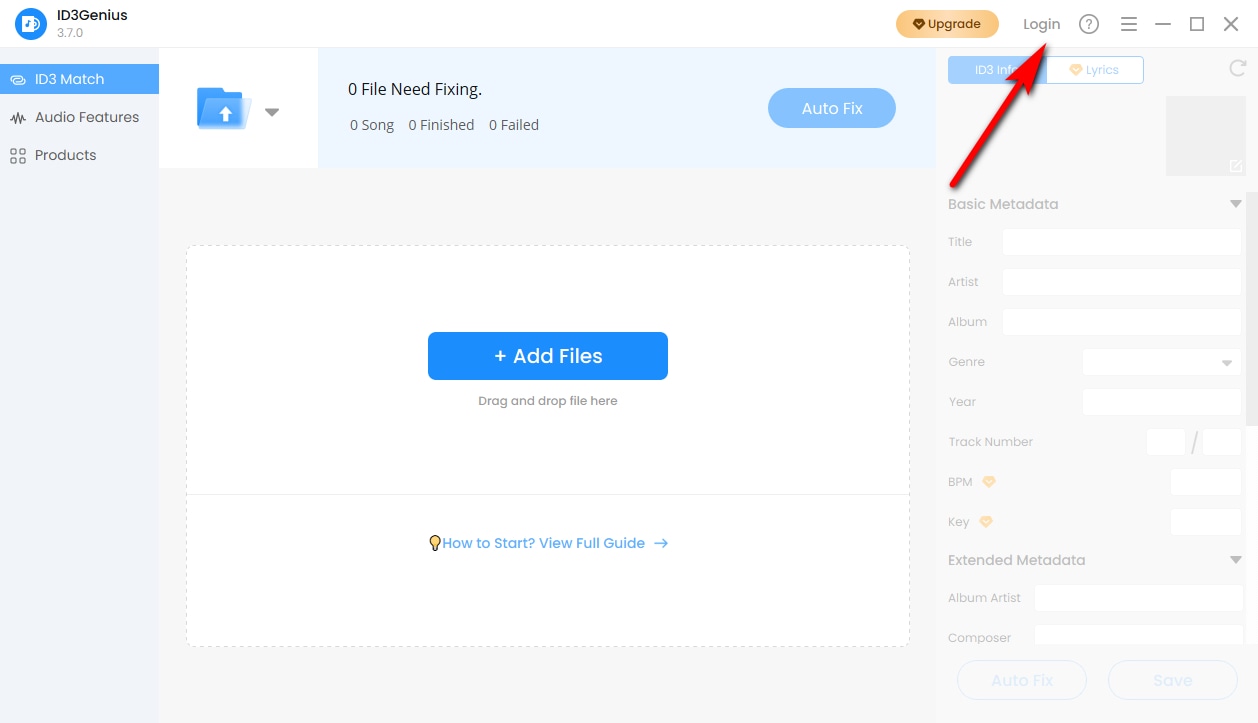
After completing your purchase, return to the ID3Genius program and click the "Login" icon in the top menu bar.
-
In the pop-up "Login" window, enter the account and password sent to your email, and then click the "Login" button.
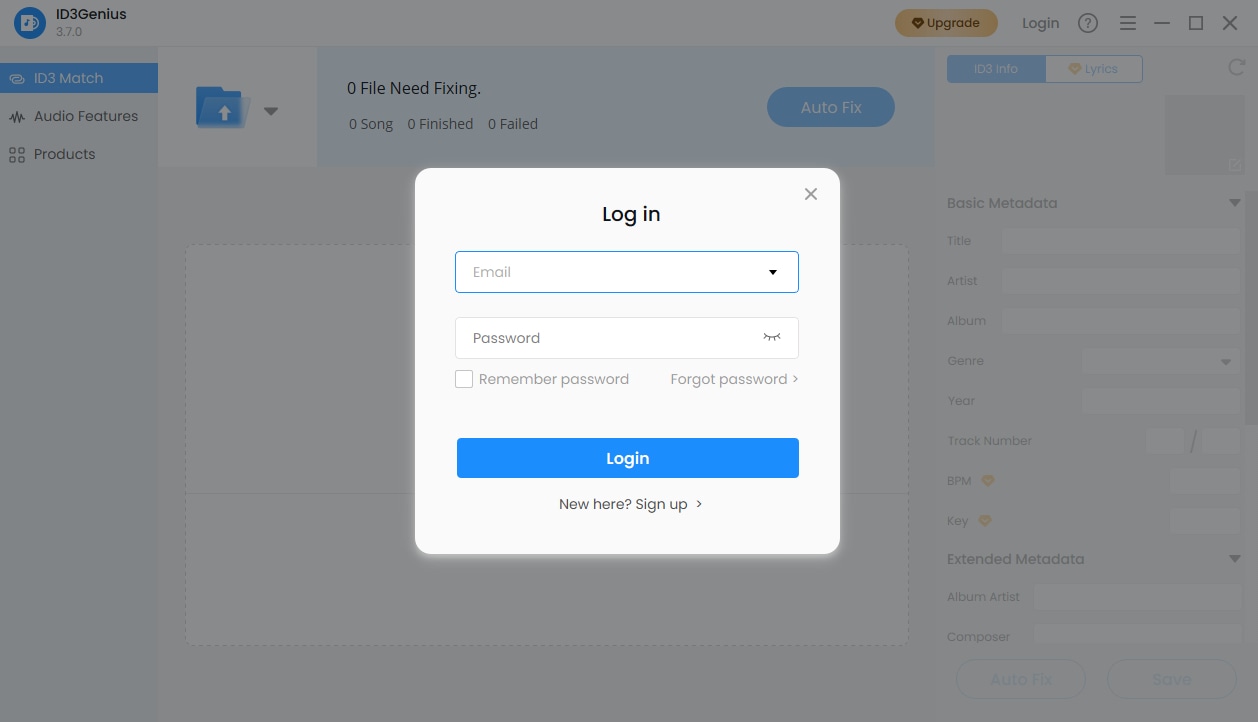
In summary, you have activated your account successfully. If you run into any error codes or issues during activation, don’t hesitate to reach out to us at [email protected].
Software Updates
We're constantly working behind the scenes to enhance your ID3Genius experience. From fixing bugs and improving performance to rolling out exciting new features, we strive to bring you the best. To ensure you're always using the latest version, follow the steps below to check for updates:
-
Launch the ID3Genius program and click the three-line menu icon in the upper corner. Select "Check for Updates" from the dropdown menu. The system will automatically check the updates.
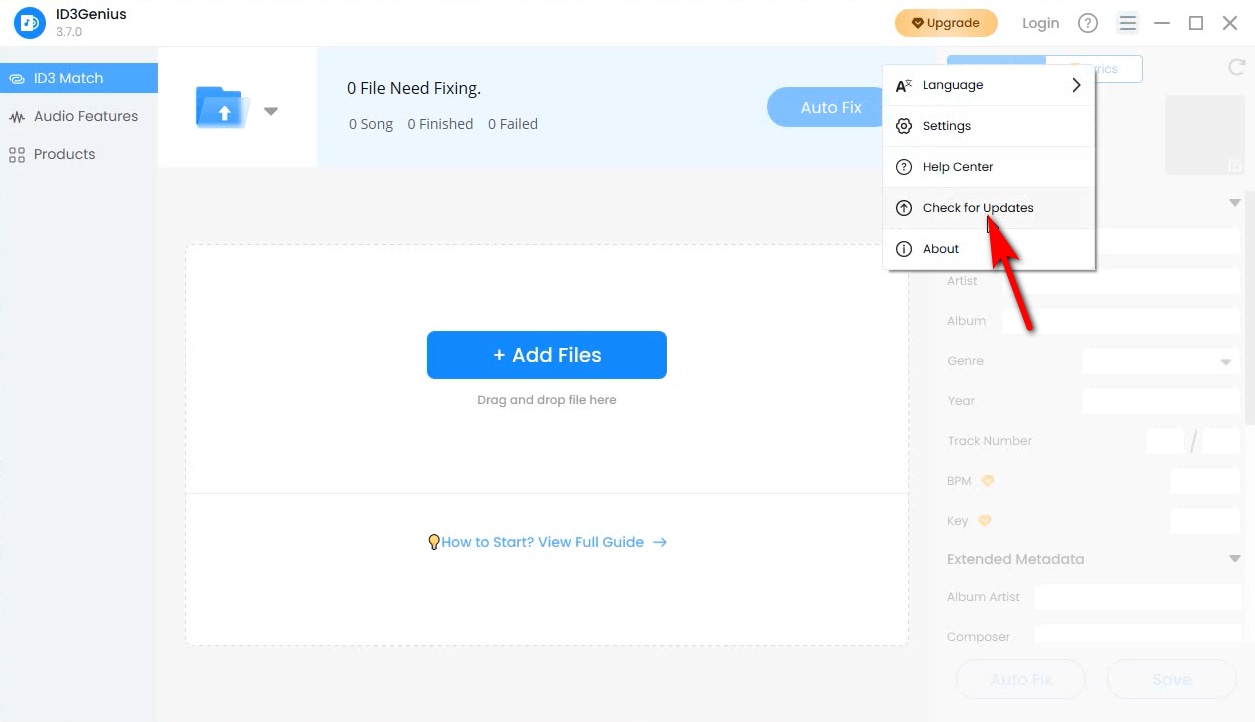
- If you already have the latest version, a prompt will appear saying "You’re up to date!" Otherwise, an Update Available" interface will pop up, and you need to click the "Update" button.
- After the update is downloaded, click "Install Now" to apply the latest version right away.
Congratulations, you have updated to the latest version. If you encounter any problems that cannot resolve smoothly during the process, feel free to contact us via email [email protected].
Uninstallation Guide
If you no longer wish to use our ID3 tag editor, you can uninstall it by following these steps:
- Open the Control Panel (on Windows) or navigate to the Applications folder (on macOS).
- Locate ID3Genius in the list of installed programs, then select the option to Uninstall or Move to Trash.
- Follow the on-screen instructions provided by your system to complete the uninstallation.
Part 2. How-Tos
How to Tag/Edit Metadata of Songs Quickly?
Whether you're looking to fill in missing metadata, fix incorrect music tags, or explore advanced tag editing features, our step-by-step “How-To” guides will walk you through everything you need.
-
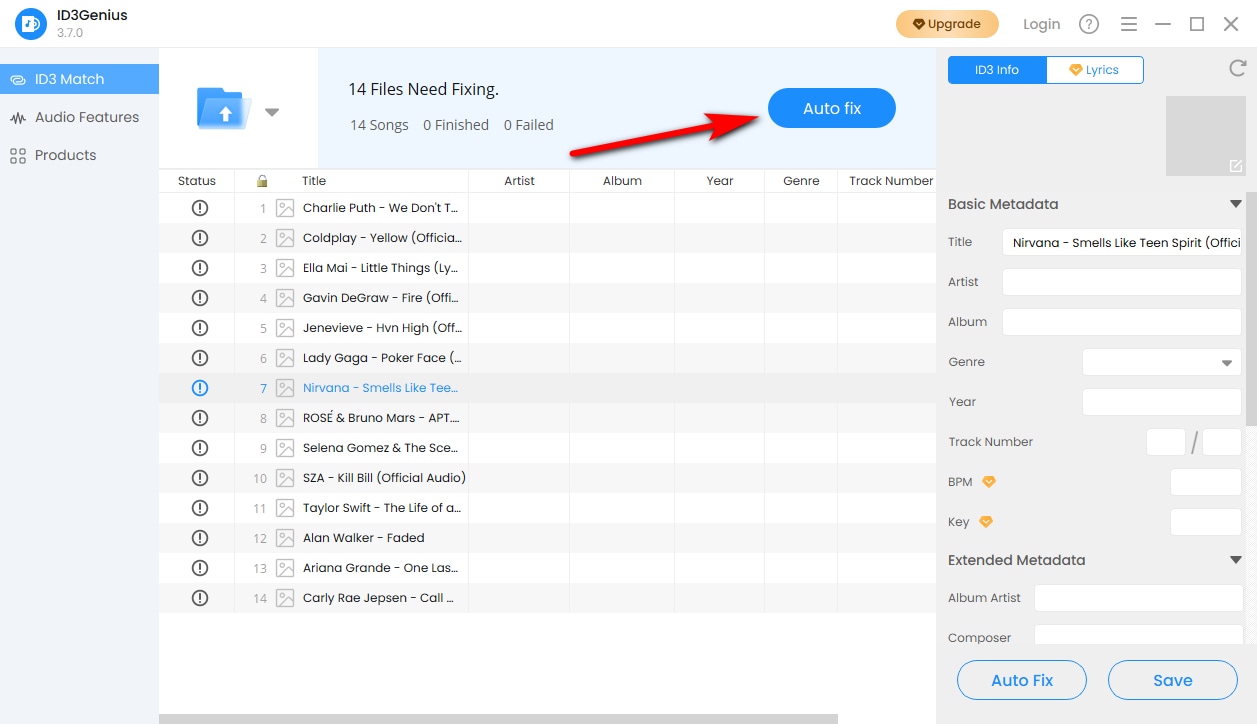
Upload Your Music Files
Click the "Add Files" button to select and upload music files, or simply drag the files into the upload box. You can choose to import a single file or an entire folder, with support for up to 5,000 files at a time.

-
Click Auto fix Button
After uploading your files, click the "Auto fix" icon. Our ID3 tag editor will automatically detect and match metadata (e.g., title, artist, album cover, genre) in bulk from Spotify, MusicBrainz, Discogs, and other music databases.
-
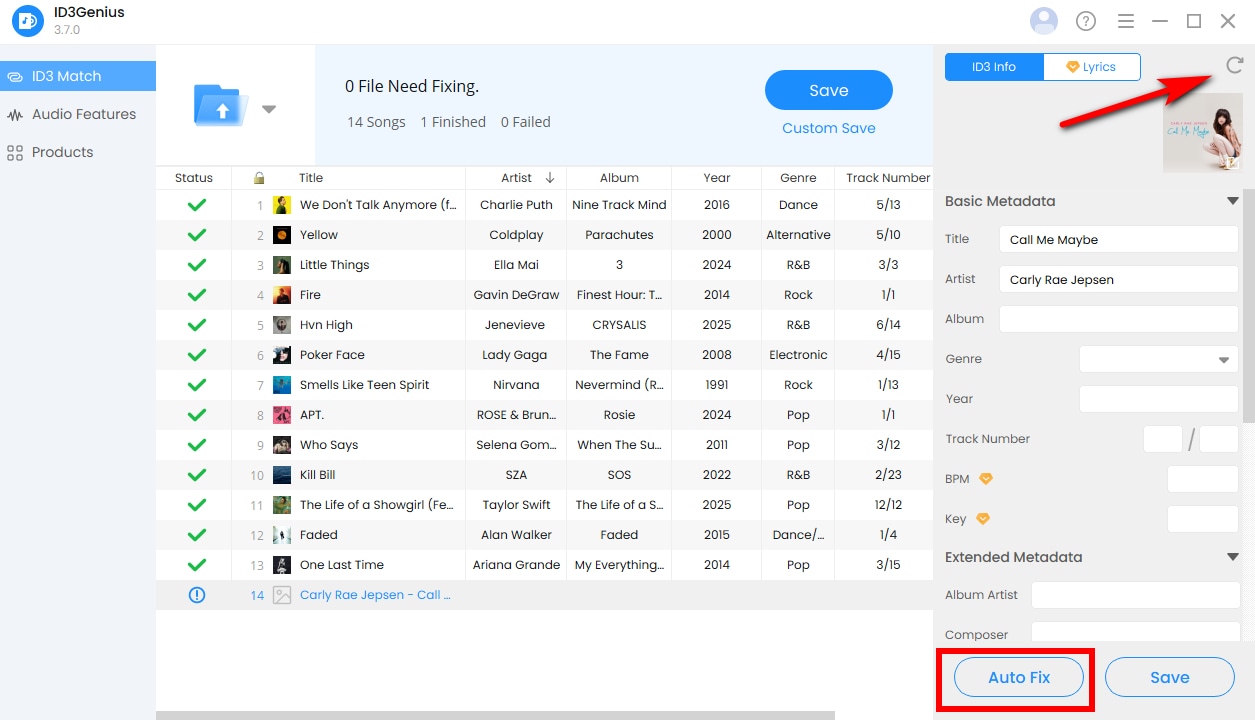
Save Changes
If you want to change tags such as title, artist, album art, genre, etc., you can edit them manually. When you're done, click "Save" to update all changes to the ID3 tags.

-
Re-match Metadata If Needed
If some tags fail to match or no results are found, try clicking the "Reset" button (above the music cover). Then click "Auto Fix" again or enter the correct title and artist to try it again.
-
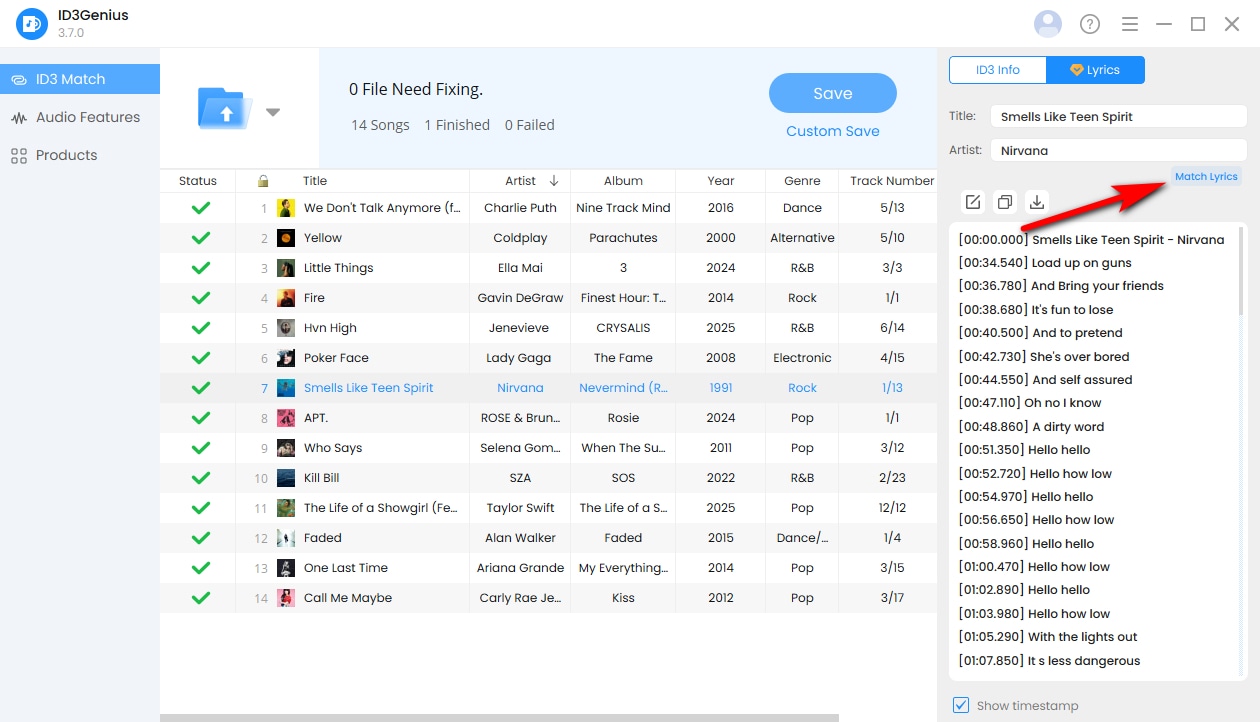
Match Lyrics to Your Songs
Our music tag editor not only reads existing lyric tags, but also automatically matches and embeds lyrics into your songs. You can edit, copy, or download the lyrics in LRC, TXT, or SRC formats as needed, with optional timestamps for each line.
How to Organize Your Music Library?
After batch tagging or fixing metadata, the music tag editor helps you efficiently clean up and organize your music library. It supports major audio formats such as MP3, WAV, FLAC, M4A, etc., and multiple ID3 versions, and is compatible with ID3v1, ID3v2.3, and ID3v2.4, ensuring smooth playback across music players and DJ software.
Browse and Preview Your Music
Sort by metadata fields
Click any column header — such as Title, Artist, Year, Genre, or BPM — to sort your music files in ascending or descending order.
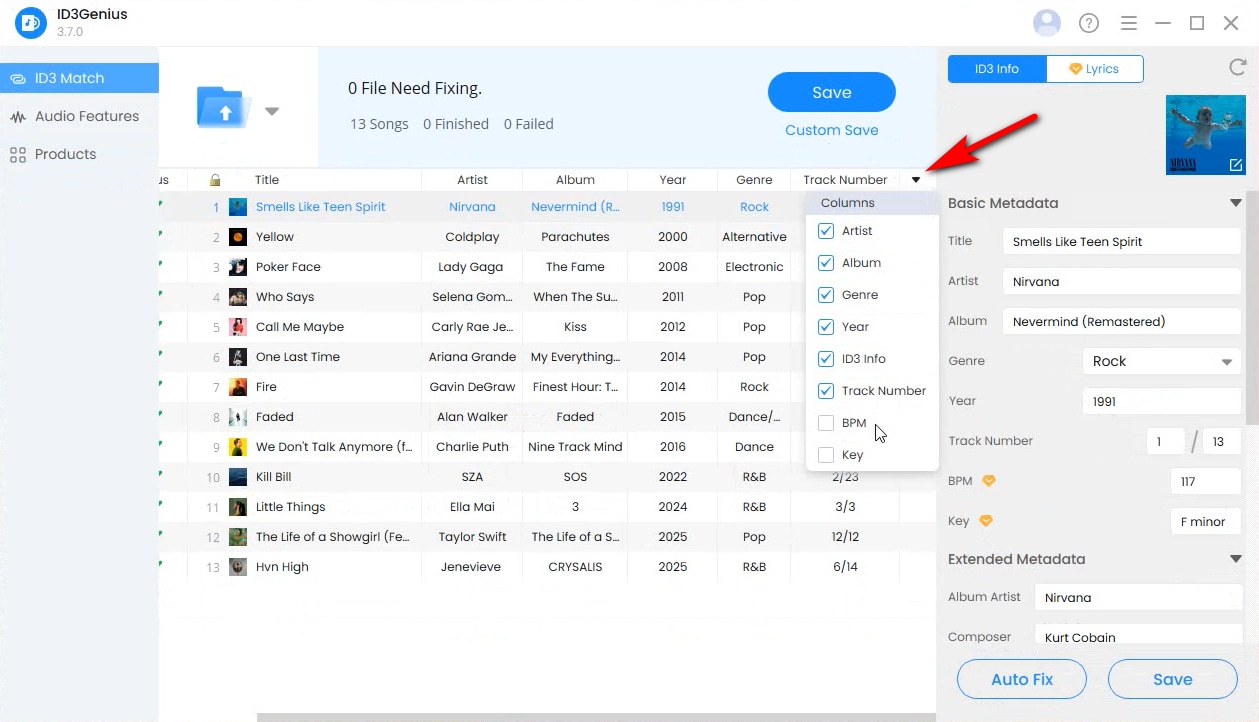
Customize visible columns
You can drag and reorder columns freely, or click the dropdown button on the far right of the column bar to customize which metadata fields are displayed.
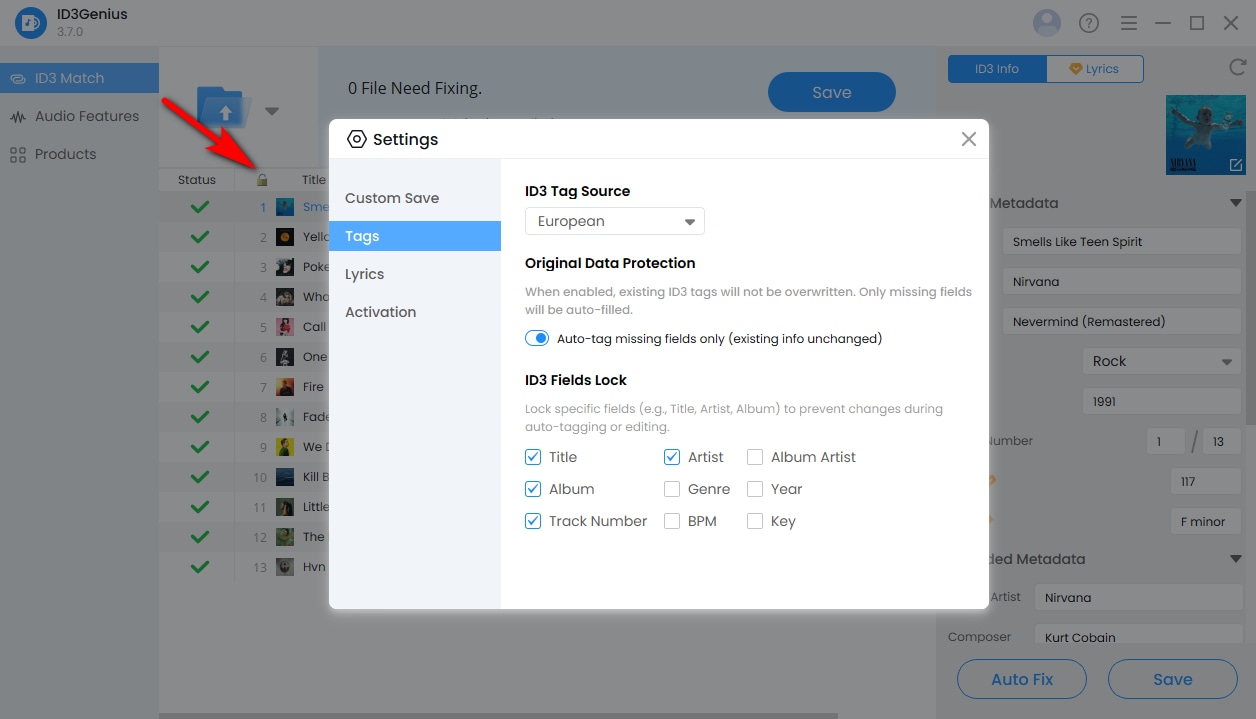
Lock specific metadata fields
Click the lock icon in the header to lock selected fields (such as Title, Artist, or Year). When performing automatic metadata matching, ID3Genius will only fill in missing information while preserving your existing tags.
Album artwork preview and editing
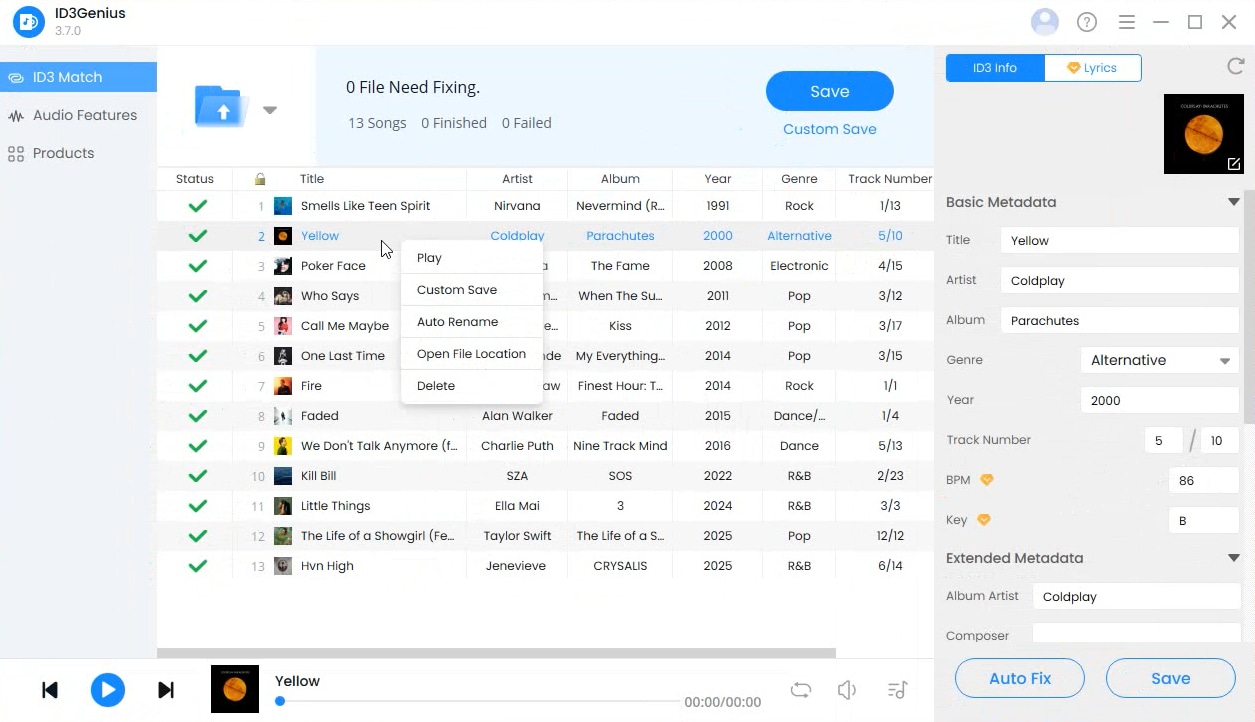
Left-click an album cover to view it in high resolution. You can also right-click the artwork to change, view, or remove the album cover.
Built-in music player
You can double-click a song or right-click it and choose Play to preview the track and check whether the audio matches its metadata.
File Management and Saving Options
Save changes directly
When you’re ready to apply the corrected metadata, click "Save" to overwrite the original file with the auto-matched ID3 information.
Custom Save to prevent data loss
Alternatively, click Custom Save and enable “Save as New File” to avoid accidental data loss or metadata mismatches.
Automatically organize files into folders
To organize your music library by Artist or Album, enable “Save to Subfolder by”. ID3Genius will automatically place files into corresponding folders.
Batch rename music files
To rename files in bulk, enable “Auto Rename” and define your own naming rules using metadata fields,
such as: {Artist} - {Album} - {Title}
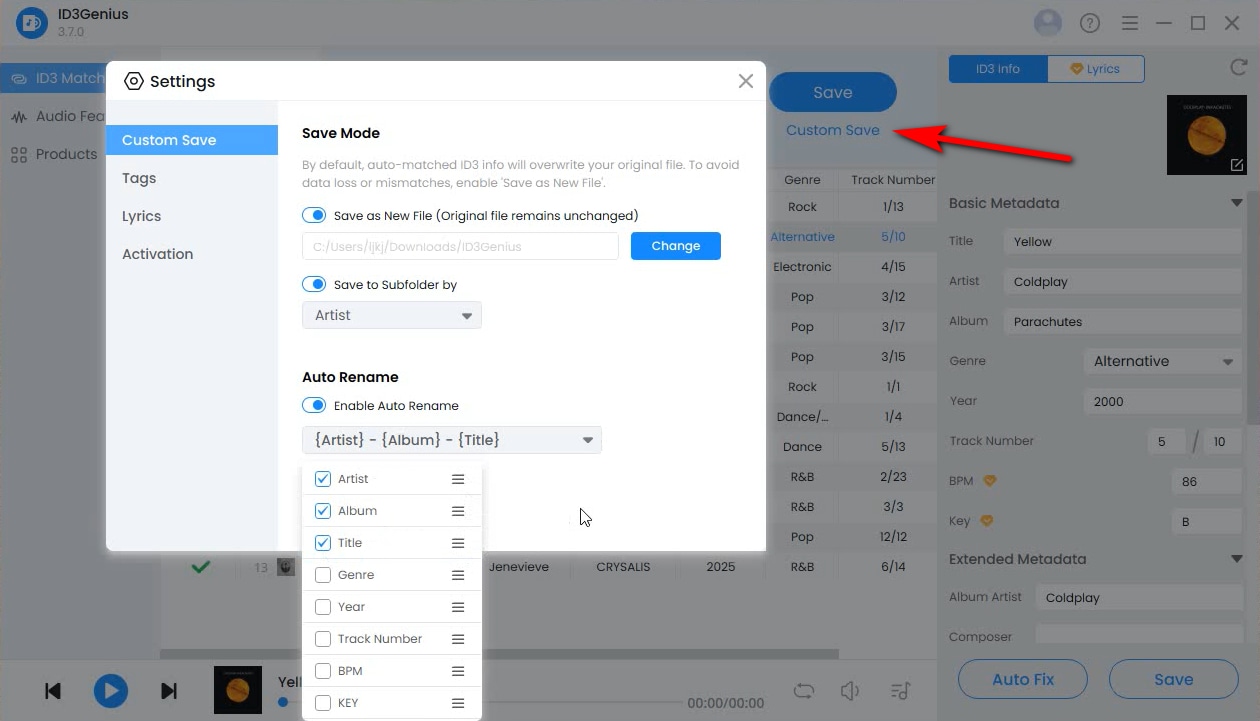
This helps keep your music files consistently named and neatly organized.
How to Analyze Audio and Music Files?
In addition to fixing music metadata and managing your music files, ID3Genius music tag editor enables you to analyze audio features and better understand how your music sounds and feels. This is especially useful for DJs, producers, and playlist curators who rely on energy, mood, and sound characteristics to create seamless mixes and well-structured playlists.
-
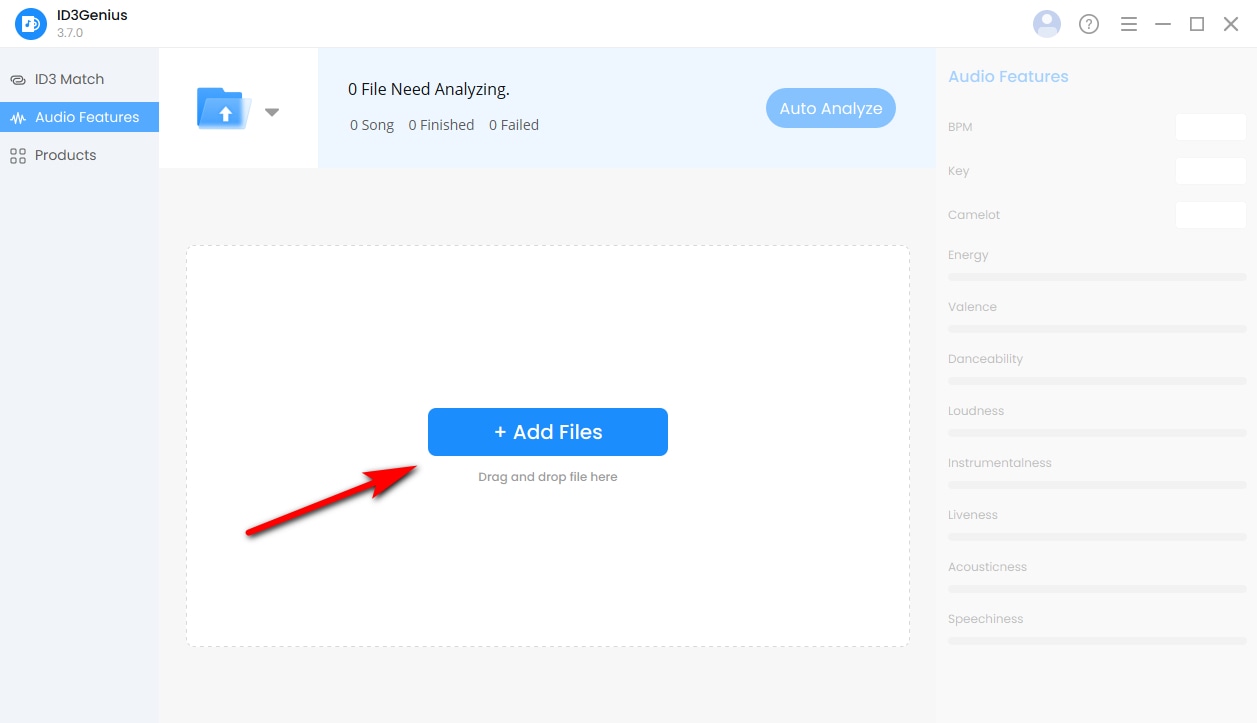
Upload Your Music Files
Switch to the Audio Features tab, then click the “Add Files” button to upload the music files you want to analyze, or simply drag and drop them into the upload area. You can upload a full song or a specific audio clip.
-
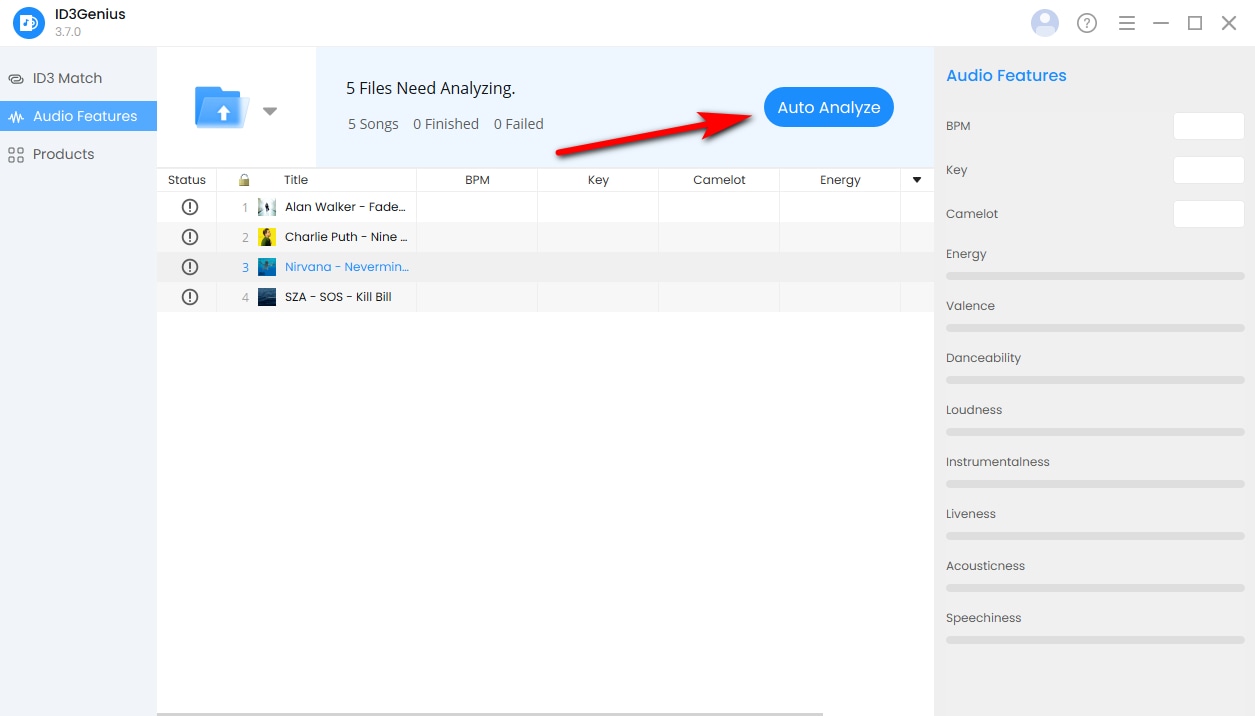
Start Automatic Audio Analysis
Once your files are uploaded, click the “Auto Analyze” button. Our music tag editor will use AI to automatically analyze both emotion- and energy-related features as well as audio source composition characteristics of your music.
-
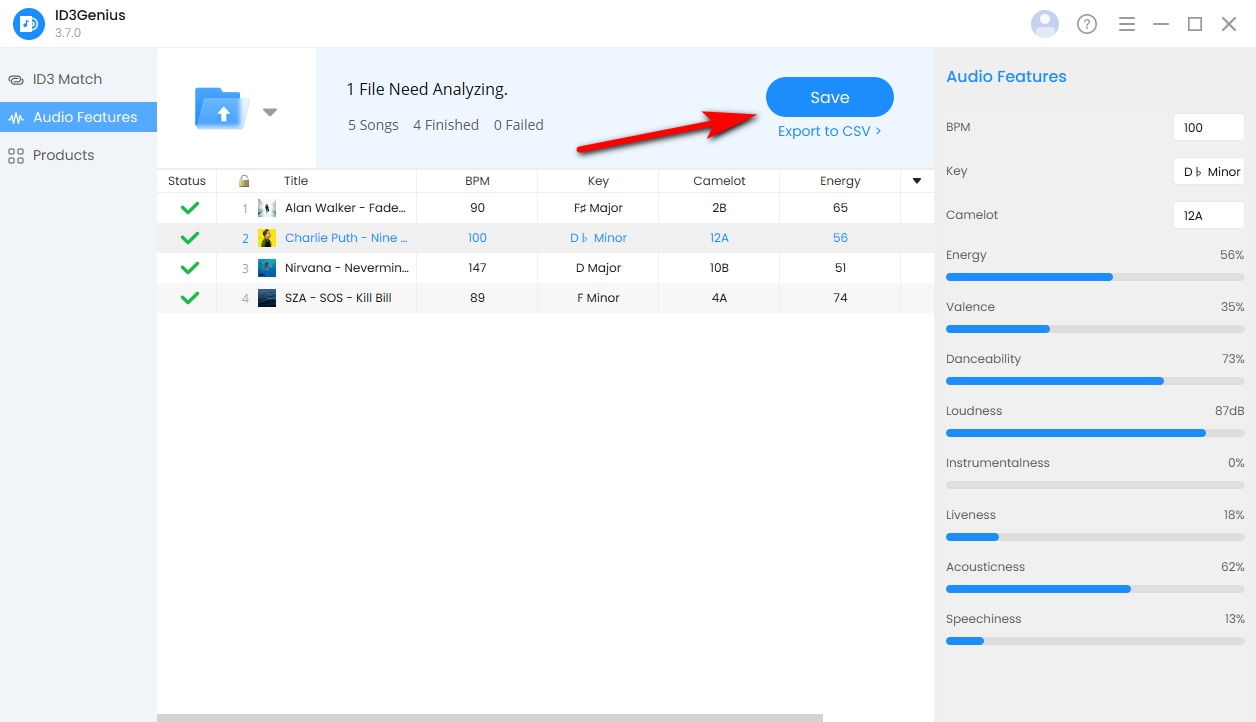
Preview and Export the Results
After the analysis is complete, you can preview detailed audio feature results. Click "Save" to write the analysis data into the music file tags, or export the analysis report as a CSV file for further use in music production, DJ mixing, or playlist creation.
Get Help & Support
We’re always happy to improve our applications to better meet your needs.
If you have a feature request or encounter any issues while using ID3Genius tag editor, feel free to contact our support team.
 Get Started