The generic default ringtone is boring. It makes you scramble for your phone every time a stranger’s device goes off, and honestly, it just lacks personality. You deserve a better sound experience, whether that’s a killer 30-second guitar solo, a funny movie quote, or a unique chime.
If you’ve ever wondered how to make a custom ringtone that actually sounds professional and not choppy, you’ve come to the right place. Forget complicated, paid software or outdated iTunes syncing.
This guide breaks the process down into two simple steps: creating the perfect audio clip and setting the tone on your specific phone (Android or iPhone). on your specific phone (Android or iPhone). You can get this done in under 10 minutes, and the only limit is your imagination.
Let’s start.
Step 1: Create Your Perfect Audio Clip to Make a Custom Ringtone
Before you start playing around in your phone’s settings, you first need to prepare your audio clip. Most people skip this step, which is why their custom ringtones end up sounding messy.
Why You Need to Trim It Right: Length Limits and File Formats
You can’t just drop a five-minute song onto your phone and call it a ringtone. All mobile operating systems impose length limits to save memory and ensure a smooth calling experience.
● Android: The recommended maximum length is 30 seconds. The phone will likely support standard formats like MP3 and AAC.
● iPhone: You have a little more room, up to 40 seconds, but 30 seconds is a safe bet. The phone requires the file to be an M4R format (which is essentially an M4A/AAC file with a different extension).
The goal here is to isolate the absolute best 30-40 second segment of your chosen song or audio. This is where an editing tool comes in.
Use an Online Tool for Quick, Free, and Easy Ringtone Creation
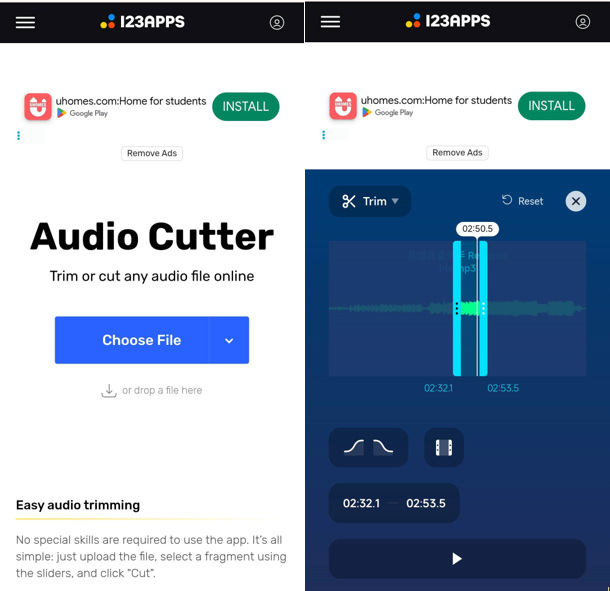
For the fastest and easiest experience, skip the software installation entirely. Using a free, reliable online audio cutter is the best way to get the job done right now.
You simply upload your audio file (MP3, WAV, etc.) directly to the service’s website. The interface usually shows a visual waveform of your song. You can drag the start and end markers to precisely select your 30-second clip. You’ll be able to listen back and make sure you’ve caught the exact moment you want.
Once trimmed, the tool lets you select the output format—choose MP3 for Android or M4R for iPhone—and then download the perfectly sized file directly to your computer or phone’s file system. No bloatware, no fuss. You’ll be surprised at how fast the conversion is.
For Power Users: Use a Desktop Tool for Advanced Custom Ringtone Features
If you want your ringtone to sound truly polished, like it came straight from a professional audio studio, you might want a desktop application.
A dedicated audio editor like TuneBer Audio Converter gives you features that basic online tools can’t match.
Critically, you can add a fade-in effect at the start and a fade-out effect at the end. This is a game changer! It stops the audio from cutting in abruptly and gives the clip a smooth, professional swell and decay. It makes your custom ringtone sound natural, not amateur.
Beyond fading, you get more control. You can change the speed, adjust the volume, or even reverse the audio if you want something truly unique.
Ready to try it? Let’s install TuneBer and learn how to make a song your ringtone easily and professionally.
TuneBer
Convert, trim, and merge audio for perfect sound
- for Windows 11/10/8
- for Mac OS X 14+
- for Android
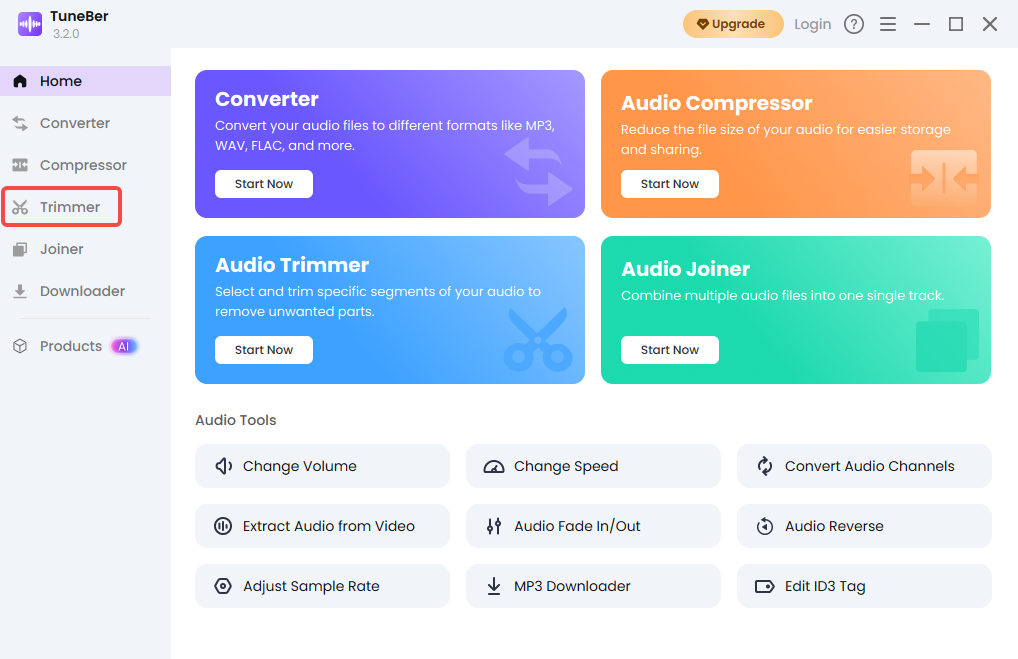
How to Use TuneBer Audio Converter for Advanced Ringtone Creation?
- Launch File: Launch TuneBer Audio Converter and go to the Trimmer tab. Upload your audio file.
- Edit and Refine: Click the scissor icon to start the editing process. Use the trimming handles to isolate your perfect 30-40 second segment. Don’t forget to enable the Fade In/Out effect if necessary for that polished finish. Use the other tools to adjust volume or speed if you need to.
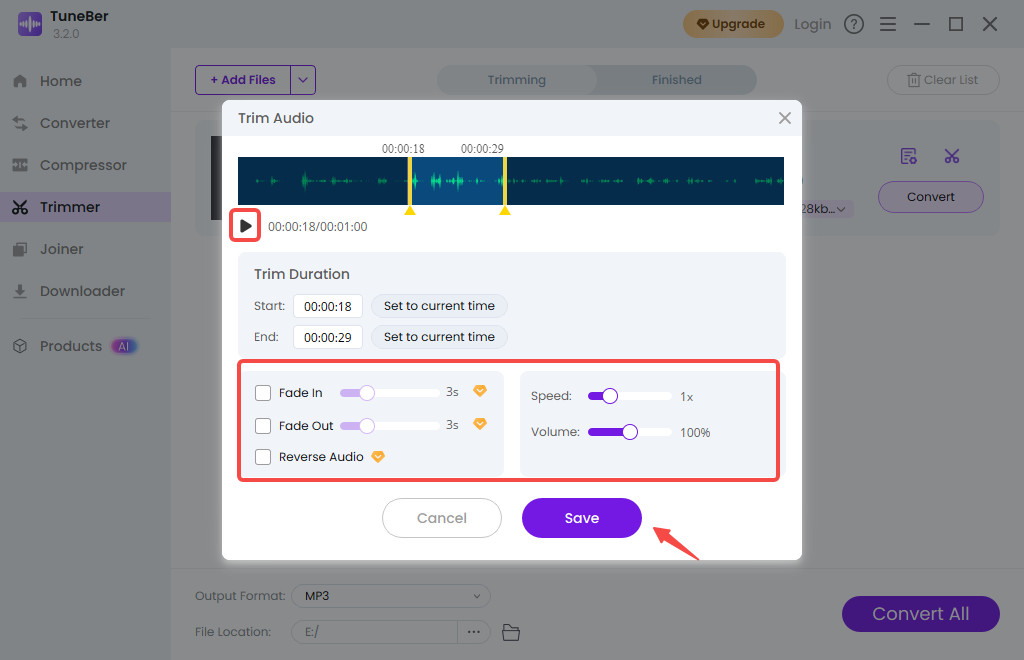
- Preview and Save: Preview the trimmed audio to ensure you’ve captured the exact part you want. When satisfied, hit the Save button to confirm the alteration.
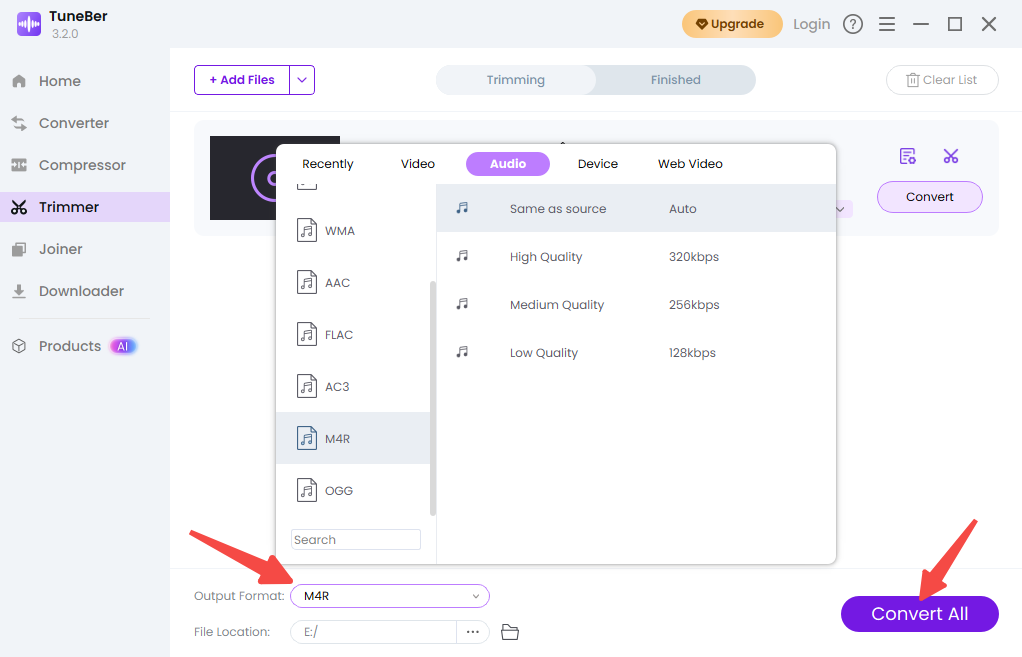
- Format and Export: Now, set your output format: choose MP3 for Android or M4R for iPhone. Finally, click the Convert All button to export your perfectly crafted ringtone file.
Step 2: How to Set a Song as a Ringtone on Android (The Simple Way)
Setting a song on an Android device is mercifully straightforward. Since Android is open with its file system, you just need to put the file in the right place. This lets you instantly set a song as your Android ringtone.
1. Download and Move Your Custom Ringtone File
- Locate the File: If you created your custom clip on a computer, connect your Android phone via USB. If you used an online ringtone maker on your phone, your file is likely in the Downloads folder.
- Move the File: Using your computer’s File Explorer or your phone’s Files app, navigate to your phone’s internal storage. Find your trimmed MP3 file.
- Place the File: Copy or move that custom audio file directly into the folder labeled Ringtones. If you can’t see the Ringtones folder immediately, look in the Media or Notifications folder first, but the dedicated Ringtones folder is the primary target.
2. Set Your New Custom Ringtone in Android Settings
- Go to Settings: Open the main Settings app on your Android device.
- Find Sound: Tap on Sound & Vibration (the exact name may vary slightly, e.g., Sound & Notification or Sound & touch).
- Select Ringtone: Tap on Phone Ringtone (or simply Ringtone).
- Add/Select Custom: At the top of the list, you should see an option like Add Ringtone/My Sounds/Choose online ringtone/Choose local ringtone. If your phone automatically scanned the Ringtones folder, your custom clip should already be listed! Select the file you just moved and tap OK or Save.
Your new personalized sound is now ready to go. You can finally change ringtone on Android without needing any third-party apps.
Step 2 (Alternative): How to Make a Custom Ringtone on iPhone with GarageBand
iPhone users have a slightly more complex, but entirely free, route: using Apple’s own GarageBand app. This is the official, no-computer/no-iTunes required way to successfully make a custom ringtone on iPhone.
1. Import Your Song into GarageBand
- Open or Download GarageBand: Get the free GarageBand app from the App Store if you don’t have it. Open the app and start a new project (any instrument will do, like the Audio Recorder).
- Enter Track View: Tap the Tracks View button (it looks like a series of parallel bars or bricks, usually in the upper left).
- Import Your Clip: Tap the Loop Browser icon (it looks like a loop or “O” shape). In the menu that appears, navigate to Files and find the custom MP3 or M4A clip you saved earlier. Touch and hold the file, then drag it onto the timeline in the Tracks View.
- Fine-Tune (If Needed): Tap on the audio track on the timeline. Drag the left and right edges to ensure the clip is under 40 seconds.
2. Export the Project as an iPhone Ringtone
- Save the Project: Tap the down arrow in the upper-left corner, and select My Songs. Your project is now saved.
- Share as Ringtone: Tap and hold on your saved project thumbnail until a menu appears. Select Share, then choose the Ringtone option (it looks like a bell icon).
- Name and Export: Give your ringtone a name and tap Export. GarageBand will automatically convert the file to the correct M4R format. If your clip is over 40 seconds, the app will warn you and offer to shorten it for you—a helpful fail-safe!
- Set the Tone: Once the export is successful, tap Use sound as… and select Standard Ringtone to make it your default, or select Standard Text Tone or Assign to Contact…
You have successfully used a free Apple tool to make a custom ringtone that is saved perfectly in your phone’s settings.
Level Up Your Personalization with Custom Ringtones
You’ve successfully learned how to make a custom ringtone, but don’t stop there! The real power of customization is in assigning different tones to different people and alerts.
Set Unique Tones for Specific Contacts
Imagine knowing exactly who is calling without even glancing at your screen. That’s the utility of a contact-specific ringtone. You might set a serious, professional sound for your boss, a fun audio clip for your best friend, or a special song for your partner.
– On iPhone: Go to the Contacts app, tap the person’s name, tap Edit in the corner, and tap the Ringtone field. Your new custom tone will be at the top of the list.
– On Android: Open the Contacts app, select the person, tap the three dots (More options), and select Set Ringtone. You can pick from the full list, including the custom clip you just created.
Don’t Forget Notification Sounds!
The same process you used for your 30-second ringtone can also create a short 5-second tone for texts or app alerts. You can upload a fun ding, boop, or hiss sound, trim it with TuneBer Audio Converter, and place it in your phone’s Notifications folder (on Android) or select it as a Text Tone (on iPhone). It adds another layer of unique personalization to your device that really elevates the user experience.
TuneBer
Convert, trim, and merge audio for perfect sound
- for Windows 11/10/8
- for Mac OS X 14+
- for Android
Frequently Asked Questions (FAQ)
Is it legal to use a copyrighted song when I make a custom ringtone?
When you make a custom ringtone for your own private, personal use, it is generally considered acceptable under fair use or private copy laws in most regions. The key is personal use—you cannot sell or distribute the clip. Always ensure the song you are using is legally owned (purchased or streamed) to create your personal custom tone.
Can I set a custom ringtone that is longer than 40 seconds on an iPhone?
No. The iPhone operating system is hardcoded to recognize M4R files up to 40 seconds in length. If you try to sync or export a longer file, the phone or GarageBand app will automatically truncate (shorten) it to the maximum allowable length. To ensure the highest quality, you should always do the trimming yourself to maintain control over the audio segment.
Do I need to buy an app to change my ringtone on Android?
Absolutely not. You do not need to buy any app to change ringtone on Android. The operating system fully supports adding and selecting audio files like MP3s from your device storage. The only tool you need is TuneBer Audio Converter for trimming and conversion, plus your phone’s built-in Files and Settings apps.
Why won't my new custom ringtone show up in my iPhone's settings?
If your custom ringtone is not appearing, it’s usually for one of three reasons: 1) The file is longer than 40 seconds (re-export in GarageBand). 2) The file extension is incorrect (it must be M4R). 3) You didn't complete the final Export as Ringtone step in GarageBand, or you didn't properly sync the file via Finder/Music app (if using a computer).
How to change ringtone on iPhone?
1. Open your iPhone's Settings app. 2. Scroll down and tap Sounds & Haptics (or just Sounds on older models). 3. Under the Sounds and Vibration Patterns section, tap Ringtone. 4. Your custom-made tone will appear at the very top of the list, usually under the heading Ringtones or a similar section. 5. Tap the name of your custom tone to select it. A checkmark will appear next to it. 6. Tap Back to save your selection. Your iPhone will now play your custom sound for all incoming calls (unless you have assigned a specific ringtone to a contact).
How to change ringtone on Android?
1. Open your Android's Settings app. 2. Tap Sound & vibration (or similar, like Sounds and notifications or sound & touch). 3. Scroll down and select Phone ringtone (it may be listed under Advanced options). 4. You will see a list of default system tones. Scroll to the top or bottom and look for an option like Add Ringtone, My Sounds, or a (+) Plus icon. 5. Tap this option to open your phone's file picker. 6. Select your custom audio file from the list (you may need to navigate to the Ringtones folder). 7. Once selected, tap Save or Done (depending on your model). Your new custom sound is now your default ringtone.