In the last post, we have studied how to record computer audio via Audacity.
But there is a legacy that recording by Audacity may produce noise. To improve this situation, a noise gate plugin for Audacity comes out. What is a noise gate? Could it remove the noise when recording? How to install noise gate in Audacity?
This tutorial will lead you to know what is a noise gate, how to use audacity noise gate plugin to eliminates noise.
And also, if you want to know the better way of removing noise while recording, you can go to the part 4 directly.
Let’s start it.
CONTENTS
What is a Noise Gate?
Noise gate also calls gate directly. Do you know the definition of a noise gate?
In Wikipedia, a noise gate or gate is an electronic device or software to control the volume of an audio signal. The detailed professional explanation from the link is as followed: https://en.wikipedia.org/wiki/Noise_gate
In brief, a noise gate is one of the Nyquist effect plugins. It will prevent unwanted noise when you recording audio, like room reverb, electrical hum, sounds from the recorders and ambient noise, etc. It will eliminate all the unnecessary noises that you won’t like.
How to Install Noise Gate Plugin in Audacity?
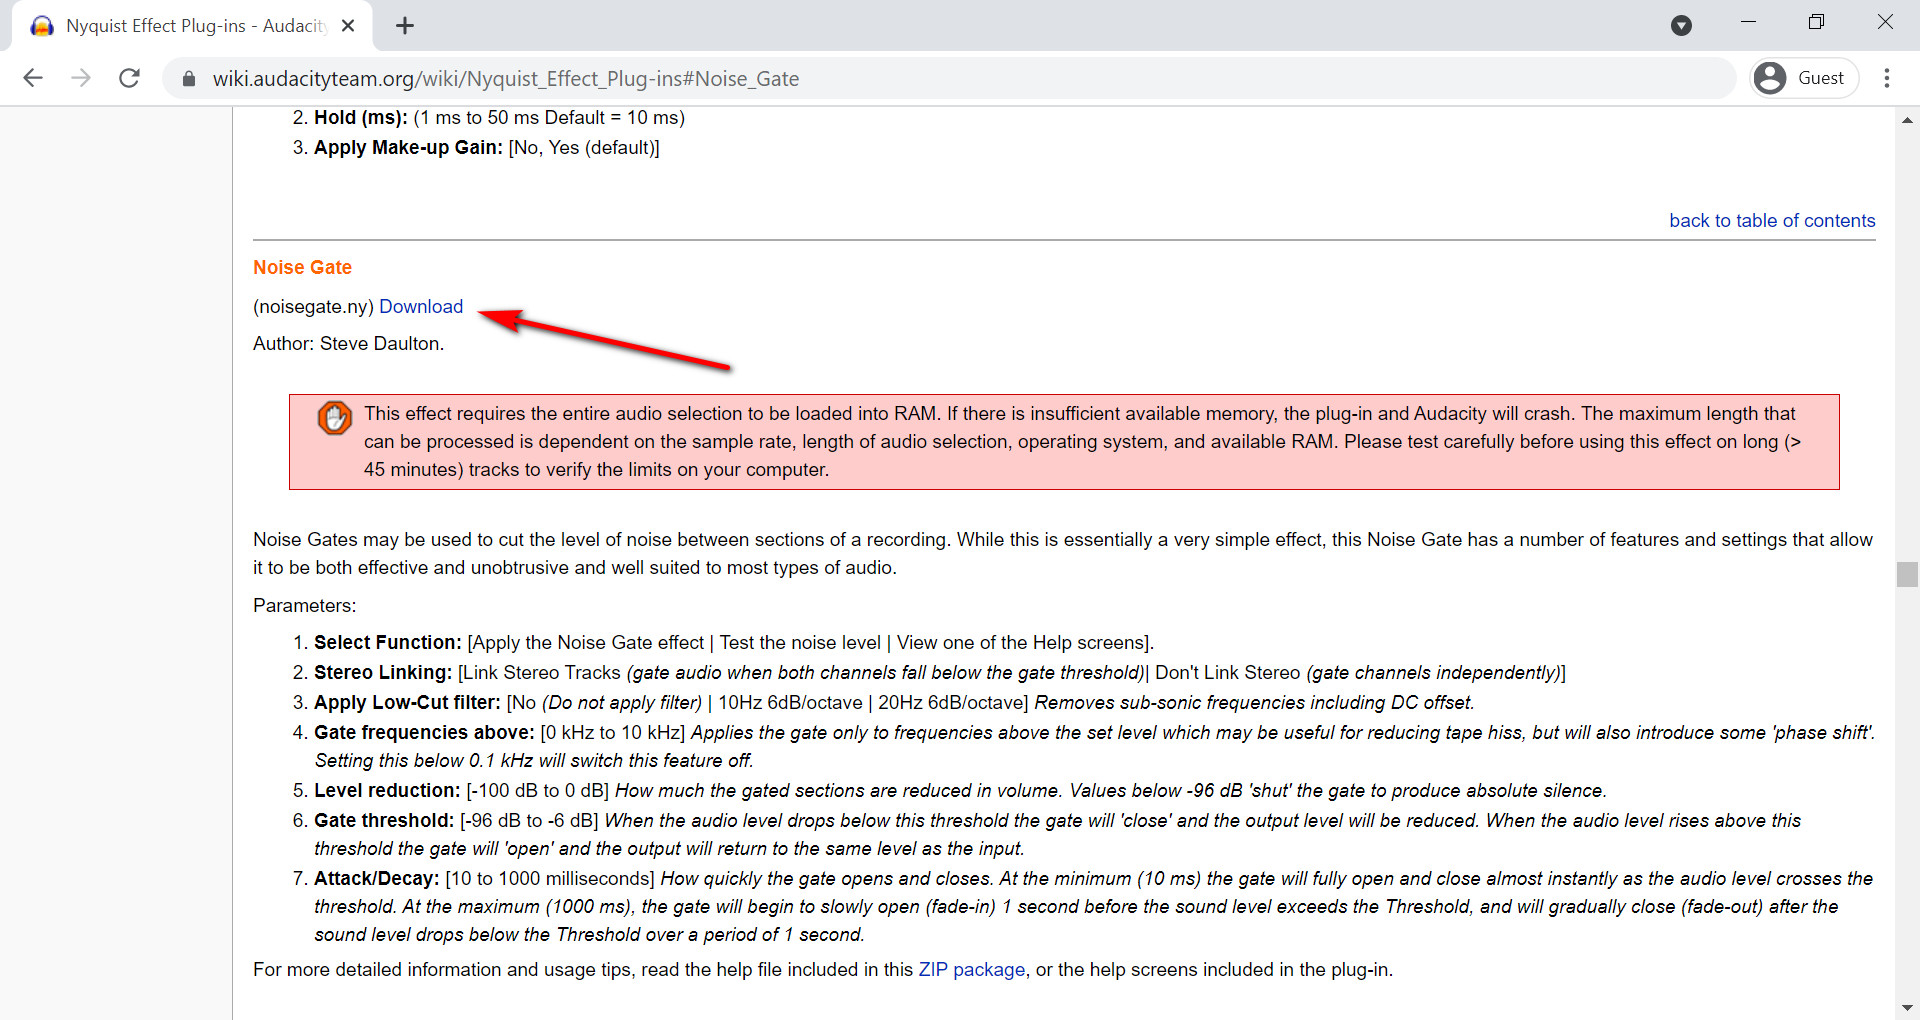
- To reduce the noise, Audacity needs a noise gate plugin downloaded. Click the blue Download button to install it.
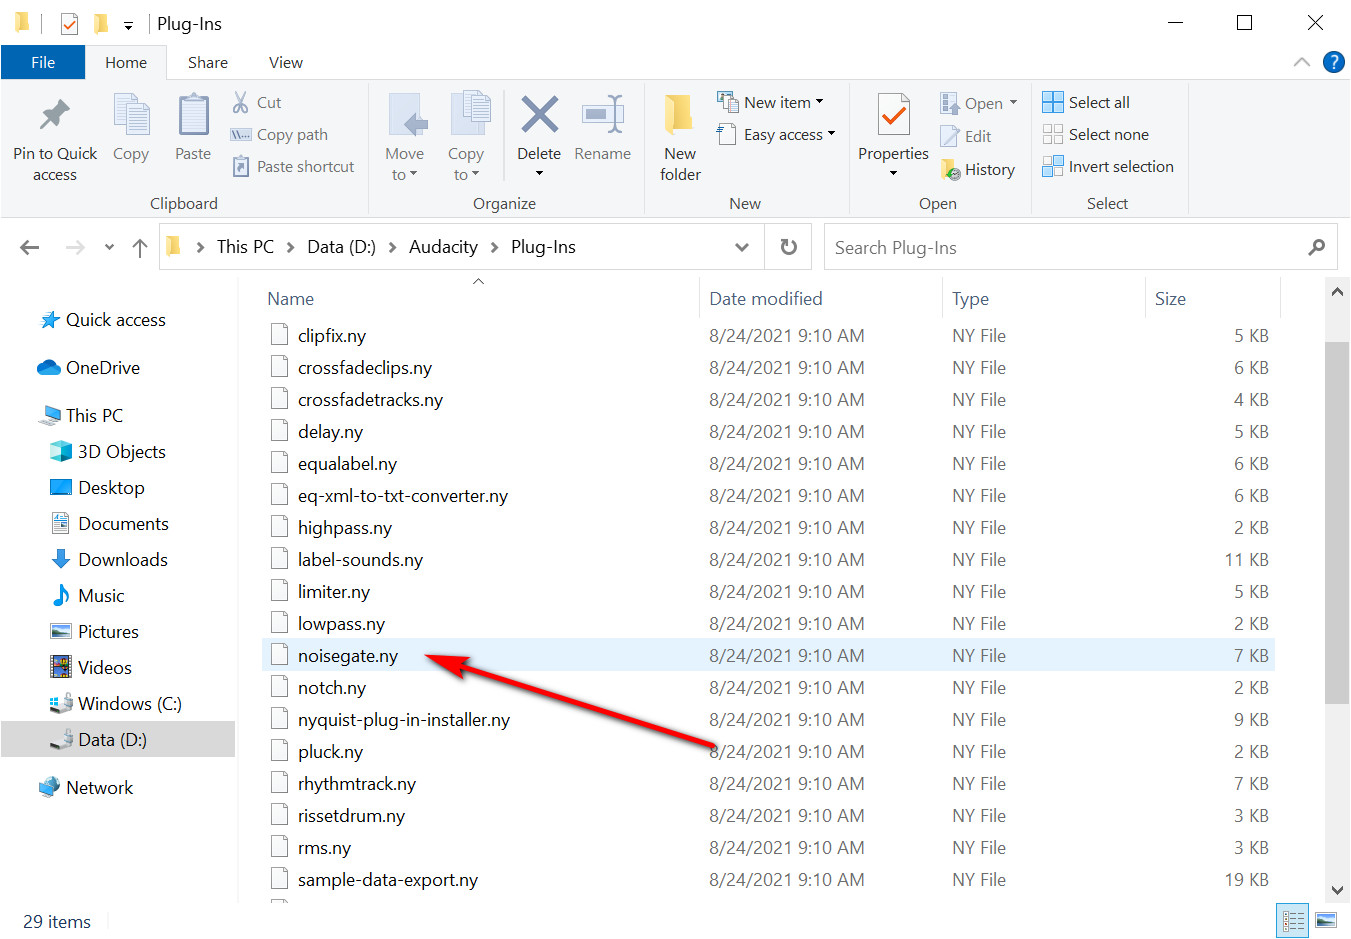
- Once the Noisegate.ny file is downloaded, you can copy and paste it into the Audacity Plug-ins file, which usually located at Data(D:)>Audacity>Plug-Ins.
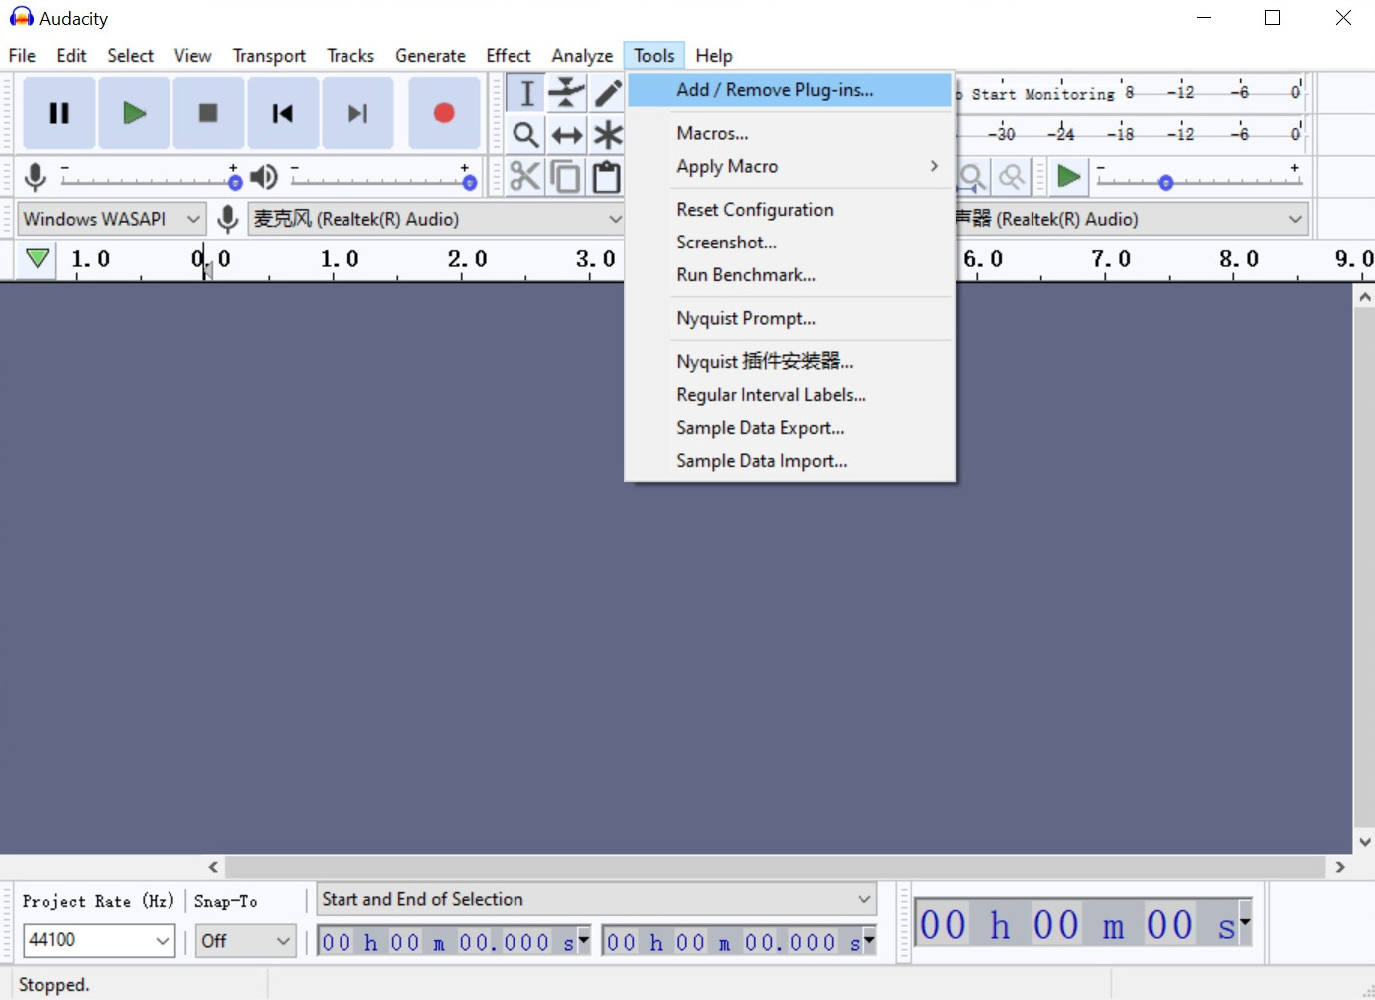
- Open Audacity after the Noisegate.ny is pasted. Next, go to the Tools menu, click Add / Remove Plugins… as the picture displayed.
- We will see the following picture after you click the Add / Remove Plugins…Now find Noise gate and click it, then click the Enable and OK buttons.
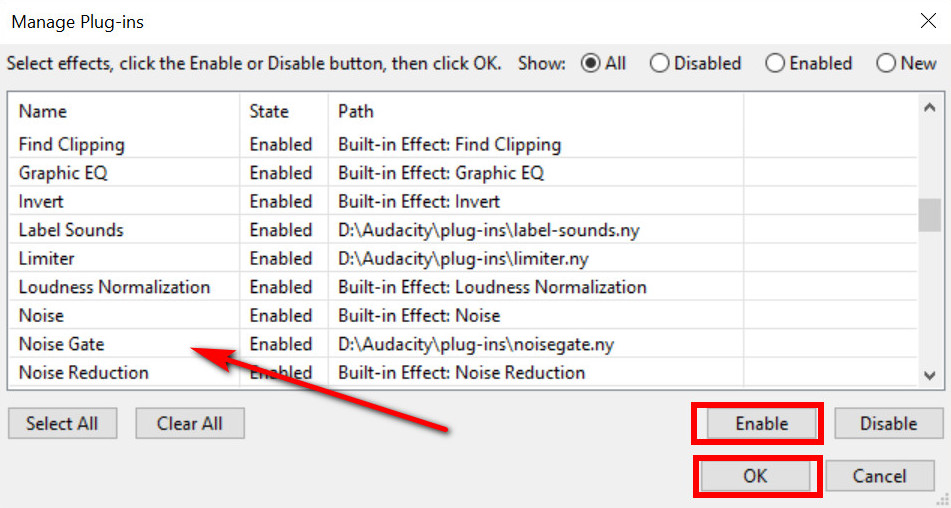
- Now the noise gate has been installed, and we could use it from the Effect menu on the interface of Audacity.
How to Use Audacity Noise Gate?
We can learn from Wikipedia that a noise gate could reduce the intensity of sounds up to a specific threshold. When the audio level drops below this threshold, the gate will close, and the output level will be reduced. When the audio level rises above this threshold the gate will open, and the output will return to the same level as the input.
I hope these complicated words fronted didn’t frighten you. Let’s explore how to use the noise gate in Audacity. Follow my steps, and you will not feel puzzled anymore.Open Audacity as we set the noise gate plugin well. Click Noise Gate from Effect menu.
- Open Audacity as we set the noise gate plugin well. Click Noise Gate from Effect menu.
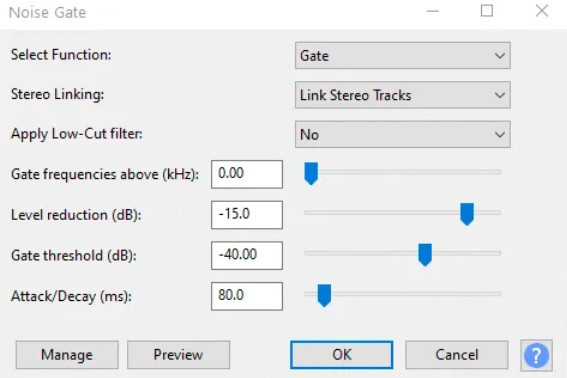
- Level reduction, Gate threshold, and Attack/Decay will be the main settings we use. We usually only use the first two. I will explain each setting one by one.
- Level reduction: The audio reduces harder as the level gets lower. If we are in a relatively quiet environment, we could control the level reduction from -10dB to -20dB.
- Gate threshold: It decides which the noise or sound should be removed below the corresponding threshold.
- Attack/Decay: Attack is an effect of fade-in. On the contrary, decay is fade-out. Therefore, we need to control it well. Otherwise, the beginning or end of the audio we record may miss.
Just adjust these buttons to make awesome recordings.
Best Way to Record Audio Without Background Noise?
Now we have studied together about installing and using the noise gate in Audacity. The complicated process may be a bit unacceptable to the users who don’t have any experience in recording audio. Some users are even unfamiliar with the computer.
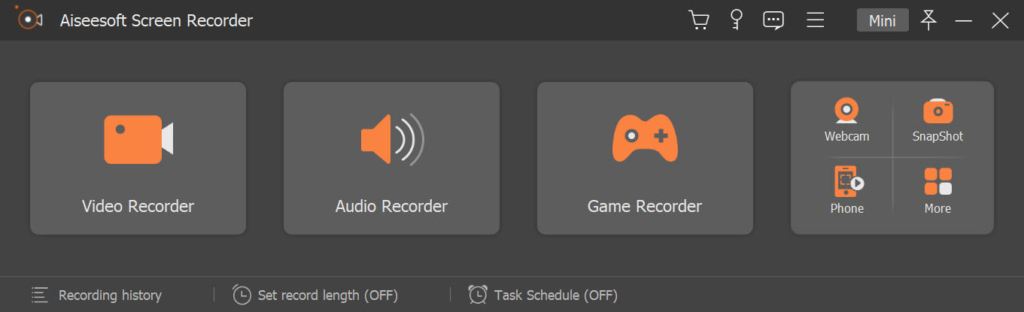
There is an application flexible to different users. It is easy to operate, without using such a noise gate to remove background noise when recording. I guess you already know what it is. AmoyShare newly launched an application, AmoyShare Screen Recorder, compatible with both Windows and MacBook systems. And more importantly, it supports recording without noise and doesn’t need any plugins at the same time.
By the way, it is a multi-functional application. For example, users could record HD videos with no watermark, capture screenshots whenever they want, produce noiseless audio without plugins, etc. Also, you can select the multiple recording forms from the menu More on the interface.
Now open your laptop, and practice how to remove noise with Screen Recorder without installing any plugins. Three simple steps could get the task done.
Screen Recorder
Capture HD video and audio instantly
- Download Screen Recorder from AmoyShare and open it.
- Click Audio recorder, and you can see the microphone icon. Click the triangle icon at the right of the microphone, and we can select Microphone noise cancellation or Microphone enhancement.
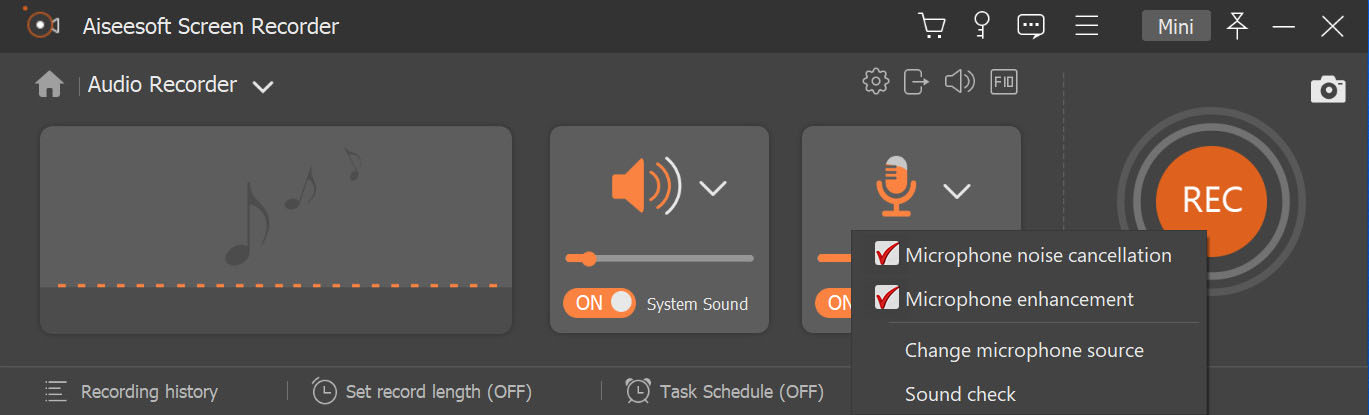
- Then click the red REC icon to start recording.
These three steps are all we should do when recording audio without installing a noise gate. So, now you are able to handle it with no sweat.
Conclusion
We’ve introduced the definition of noise gate in Audacity and how to install and use the noise gate plugin in Audacity.
Compared to AmoyShare Screen Recorder, to eliminate noise, the Nyquist noise gate in Audacity needs to be downloaded first and then to be set. But Screen Recorder could solve this complicated process by only three steps.
Have a try to use Screen Recorder to record audio without background noise!
Screen Recorder
Capture HD video and audio instantly